
Today we will learn how to program the STM32C0 Franzininho with the Arduino IDE. We have already seen how to program it with the STM32CubeIDE IDE in this article.
I based the tutorial on this post on the Embarcados portal (google translate required), so you can access the link and follow the step-by-step instructions before starting here. First we will flash one of the onboard LEDs on Franzininho C0, the LED on pin PB6.
To flash Franzininho C0 with the Arduino IDE, we need to put it in recording mode. We do this by first pressing the BOOT button on the board, then the RST button. Finally we can release both buttons.
To do this, we will use the code below, based on BlinkWithoutDelay that comes with the Arduino IDE. I just changed the “ledPin = PB6” and “interval = 100” to 100mS.
Here is an important detail: normally in Arduino programs you place pin 6 as “ledPin = 6”. In the case of Franzininho C0, I had to put the real name of the pin on the microcontroller, “ledPin = PB6”.
The code must be pasted and compiled in the Arduino IDE (I’m using version 2.3.2). It is also on Github.
// constants won't change. Used here to set a pin number:
const int ledPin = PB6; // the number of the LED pin
// Variables will change:
int ledState = LOW; // ledState used to set the LED
// Generally, you should use "unsigned long" for variables that hold time
// The value will quickly become too large for an int to store
unsigned long previousMillis = 0; // will store last time LED was updated
// constants won't change:
const long interval = 100; // interval at which to blink (milliseconds)
void setup() {
// set the digital pin as output:
pinMode(ledPin, OUTPUT);
}
void loop() {
// here is where you'd put code that needs to be running all the time.
// check to see if it's time to blink the LED; that is, if the difference
// between the current time and last time you blinked the LED is bigger than
// the interval at which you want to blink the LED.
unsigned long currentMillis = millis();
if (currentMillis - previousMillis >= interval) {
// save the last time you blinked the LED
previousMillis = currentMillis;
// if the LED is off turn it on and vice-versa:
if (ledState == LOW) {
ledState = HIGH;
} else {
ledState = LOW;
}
// set the LED with the ledState of the variable:
digitalWrite(ledPin, ledState);
}
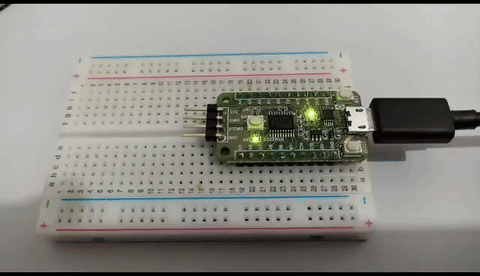
}And below is a gif with the code running on the board.
Reading a push-button (digital input)
To read a push-button we will use the one available on the board, connected to pin A8 of the STM3C0. It works like this: when pressing button A8, the PB6 LED will go off. When you release the button, the LED lights up.
I noticed that this behavior is inverted in relation to what is in the code below, indicating that this button on the Franzininho C0 board has inverted logic.
// constants won't change. They're used here to set pin numbers:
const int buttonPin = PA8;  // the number of the pushbutton pin
const int ledPin = PB6;    // the number of the LED pin

// variables will change:
int buttonState = 0;  // variable for reading the pushbutton status

void setup() {
  // initialize the LED pin as an output:
  pinMode(ledPin, OUTPUT);
  // initialize the pushbutton pin as an input:
  pinMode(buttonPin, INPUT);
}

void loop() {
  // read the state of the pushbutton value:
  buttonState = digitalRead(buttonPin);

  // check if the pushbutton is pressed. If it is, the buttonState is HIGH:
  if (buttonState == HIGH) {
    // turn LED on:
    digitalWrite(ledPin, HIGH);
  } else {
    // turn LED off:
    digitalWrite(ledPin, LOW);
  }
}
Note that again we need to put the real name of the pins, “buttonPin = PA8” and “ledPin = PB6”. Below is a video of the sketch in operation.
That’s all for today guys, we were able to flash an LED and read a push-button with the Arduino IDE. In the future I will bring even more content about this board, mainly programming via STM32Cube IDE.
Want to read this content in Portuguese? click here.
Pingback: Franzininho C0 com a IDE do Arduino - dicas e truques - Fritzenlab eletrônica