Let’s talk about the ESP32-S2 Franzininho with Arduino IDE. We will start by burning ESP32-S2 with the right bootloader for the job, in order to use the Arduino IDE.
We previously talk about Franzininho Wi-Fi here. If you ever want to read about it in Portuguese, see here. Chances are, if you are a maker, student or professional that you have heard about the Arduino IDE.
The software has example code, but you can also search the internet for almost anything you need (some things are in this blog, of course). To start let’s flash the Arduino bootloard into the Franzininho Wi-Fi (see how here).
It can be done with the Adafruit system, the Espressif system or the official Franzininho way here (this is what I used, it is in Portuguese).
After flashing the Arduino bootloader, open the IDE and paste the code below. It is inspired in the “blinkWithoutDelay” that comes with it.
/*
Blink without Delay
Turns on and off a light emitting diode (LED) connected to a digital pin,
without using the delay() function. This means that other code can run at the
same time without being interrupted by the LED code.
The circuit:
- Use the onboard LED.
- Note: Most Arduinos have an on-board LED you can control. On the UNO, MEGA
and ZERO it is attached to digital pin 13, on MKR1000 on pin 6. LED_BUILTIN
is set to the correct LED pin independent of which board is used.
If you want to know what pin the on-board LED is connected to on your
Arduino model, check the Technical Specs of your board at:
https://www.arduino.cc/en/Main/Products
created 2005
by David A. Mellis
modified 8 Feb 2010
by Paul Stoffregen
modified 11 Nov 2013
by Scott Fitzgerald
modified 9 Jan 2017
by Arturo Guadalupi
This example code is in the public domain.
https://www.arduino.cc/en/Tutorial/BuiltInExamples/BlinkWithoutDelay
*/
// constants won't change. Used here to set a pin number:
const int ledPin1 = 21; // the number of the LED pin
const int ledPin2 = 33; // the number of the LED pin
// Variables will change:
int ledState = LOW; // ledState used to set the LED
// Generally, you should use "unsigned long" for variables that hold time
// The value will quickly become too large for an int to store
unsigned long previousMillis = 0; // will store last time LED was updated
// constants won't change:
const long interval = 200; // interval at which to blink (milliseconds)
void setup() {
// set the digital pin as output:
pinMode(ledPin1, OUTPUT);
pinMode(ledPin2, OUTPUT);
}
void loop() {
// here is where you'd put code that needs to be running all the time.
// check to see if it's time to blink the LED; that is, if the difference
// between the current time and last time you blinked the LED is bigger than
// the interval at which you want to blink the LED.
unsigned long currentMillis = millis();
if (currentMillis - previousMillis >= interval) {
// save the last time you blinked the LED
previousMillis = currentMillis;
// if the LED is off turn it on and vice-versa:
if (ledState == LOW) {
ledState = HIGH;
} else {
ledState = LOW;
}
// set the LED with the ledState of the variable:
digitalWrite(ledPin1, ledState);
digitalWrite(ledPin2, !ledState);
}
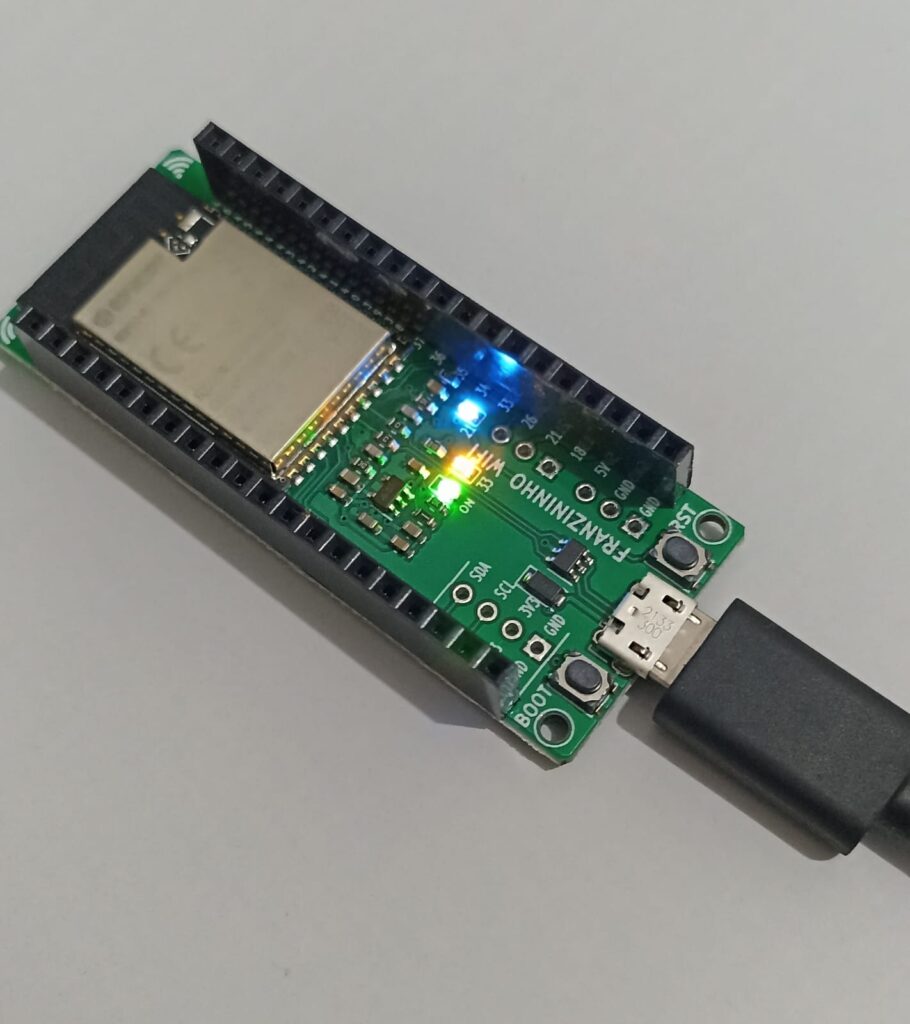
}Click “upload” and look at the board, LEDs yellow and blue (pins 21 and 33) will be alternating.
Example of Wi-Fi connection with web browser
We will use an example from this website (code below). All you need to change is “yourssid” and “yourpassword”.
/*********
  Rui Santos
  Complete project details at https://randomnerdtutorials.com
*********/

// Load Wi-Fi library
#include <WiFi.h>

// Replace with your network credentials
const char* ssid = "yourssid";
const char* password = "yourpassword";

// Set web server port number to 80
WiFiServer server(80);

// Variable to store the HTTP request
String header;

// Auxiliar variables to store the current output state
String output33State = "off";
String output21State = "off";

// Assign output variables to GPIO pins
const int output33 = 26;
const int output21 = 27;

// Current time
unsigned long currentTime = millis();
// Previous time
unsigned long previousTime = 0;
// Define timeout time in milliseconds (example: 2000ms = 2s)
const long timeoutTime = 2000;

void setup() {
  Serial.begin(115200);
  // Initialize the output variables as outputs
  pinMode(output33, OUTPUT);
  pinMode(output21, OUTPUT);
  // Set outputs to LOW
  digitalWrite(output33, LOW);
  digitalWrite(output21, LOW);

  // Connect to Wi-Fi network with SSID and password
  Serial.print("Connecting to ");
  Serial.println(ssid);
  WiFi.begin(ssid, password);
  while (WiFi.status() != WL_CONNECTED) {
    delay(500);
    Serial.print(".");
  }
  // Print local IP address and start web server
  Serial.println("");
  Serial.println("WiFi connected.");
  Serial.println("IP address: ");
  Serial.println(WiFi.localIP());
  server.begin();
}

void loop(){
  WiFiClient client = server.available();   // Listen for incoming clients

  if (client) {                             // If a new client connects,
    currentTime = millis();
    previousTime = currentTime;
    Serial.println("New Client.");          // print a message out in the serial port
    String currentLine = "";                // make a String to hold incoming data from the client
    while (client.connected() && currentTime - previousTime <= timeoutTime) {  // loop while the client's connected
      currentTime = millis();
      if (client.available()) {             // if there's bytes to read from the client,
        char c = client.read();             // read a byte, then
        Serial.write(c);                    // print it out the serial monitor
        header += c;
        if (c == '\n') {                    // if the byte is a newline character
          // if the current line is blank, you got two newline characters in a row.
          // that's the end of the client HTTP request, so send a response:
          if (currentLine.length() == 0) {
            // HTTP headers always start with a response code (e.g. HTTP/1.1 200 OK)
            // and a content-type so the client knows what's coming, then a blank line:
            client.println("HTTP/1.1 200 OK");
            client.println("Content-type:text/html");
            client.println("Connection: close");
            client.println();

            // turns the GPIOs on and off
            if (header.indexOf("GET /33/on") >= 0) {
              Serial.println("GPIO 33 on");
              output33State = "on";
              digitalWrite(output26, HIGH);
            } else if (header.indexOf("GET /33/off") >= 0) {
              Serial.println("GPIO 33 off");
              output33State = "off";
              digitalWrite(output33, LOW);
            } else if (header.indexOf("GET /21/on") >= 0) {
              Serial.println("GPIO 21 on");
              output21State = "on";
              digitalWrite(output21, HIGH);
            } else if (header.indexOf("GET /21/off") >= 0) {
              Serial.println("GPIO 21 off");
              output21State = "off";
              digitalWrite(output21, LOW);
            }

            // Display the HTML web page
            client.println("<!DOCTYPE html><html>");
            client.println("<head><meta name=\"viewport\" content=\"width=device-width, initial-scale=1\">");
            client.println("<link rel=\"icon\" href=\"data:,\">");
            // CSS to style the on/off buttons
            // Feel free to change the background-color and font-size attributes to fit your preferences
            client.println("<style>html { font-family: Helvetica; display: inline-block; margin: 0px auto; text-align: center;}");
            client.println(".button { background-color: #4CAF50; border: none; color: white; padding: 16px 40px;");
            client.println("text-decoration: none; font-size: 30px; margin: 2px; cursor: pointer;}");
            client.println(".button2 {background-color: #555555;}</style></head>");

            // Web Page Heading
            client.println("<body><h1>ESP32 Web Server</h1>");

            // Display current state, and ON/OFF buttons for GPIO 33
            client.println("<p>GPIO 33 - State " + output33State + "</p>");
            // If the output33State is off, it displays the ON button
            if (output33State=="off") {
              client.println("<p><a href=\"/33/on\"><button class=\"button\">ON</button></a></p>");
            } else {
              client.println("<p><a href=\"/33/off\"><button class=\"button button2\">OFF</button></a></p>");
            }

            // Display current state, and ON/OFF buttons for GPIO 21
            client.println("<p>GPIO 21 - State " + output21State + "</p>");
            // If the output21State is off, it displays the ON button
            if (output21State=="off") {
              client.println("<p><a href=\"/21/on\"><button class=\"button\">ON</button></a></p>");
            } else {
              client.println("<p><a href=\"/21/off\"><button class=\"button button2\">OFF</button></a></p>");
            }
            client.println("</body></html>");

            // The HTTP response ends with another blank line
            client.println();
            // Break out of the while loop
            break;
          } else { // if you got a newline, then clear currentLine
            currentLine = "";
          }
        } else if (c != '\r') {  // if you got anything else but a carriage return character,
          currentLine += c;      // add it to the end of the currentLine
        }
      }
    }
    // Clear the header variable
    header = "";
    // Close the connection
    client.stop();
    Serial.println("Client disconnected.");
    Serial.println("");
  }
}
Upon uploading this code I started having a problem: my COM port did not show up anymore. Searching the internet, this thread helped me in a way. It did not solved my problem but helped me see that the board was not the issue.
It contains a sketch to scan for networks, which is simpler than the code above. And it worked, it scanned the networks around me. It showed me that the code above was the problem.
I then found the code below in a Brazilian website. Again, change “yourssid” and “yourpassword”.
#include <WiFi.h>

const char* ssid = "yourssid";
const char* password = "yourpassword";
int LED = 33;
WiFiServer server(80);

void setup() {
  Serial.begin(115200);
  pinMode(LED, OUTPUT);

  Serial.println();
  Serial.print("Conectando-se a ");
  Serial.println(ssid);
  WiFi.begin(ssid, password);

  while (WiFi.status() != WL_CONNECTED) {
    delay(500);
    Serial.print(".");
  }

  Serial.println("");
  Serial.println("WiFi conectada.");
  Serial.println("Endereço de IP: ");
  Serial.println(WiFi.localIP());

  server.begin();
}

void loop() {
  WiFiClient client = server.available();
  if (client) {
    Serial.println("New Client.");
    String currentLine = "";
    while (client.connected()) {
      if (client.available()) {
        char c = client.read();
        Serial.write(c);
        if (c == '\n') {
          if (currentLine.length() == 0) {
            client.println("HTTP/1.1 200 OK");
            client.println("Content-type:text/html");
            client.println();
            client.print("Click <a href=\"/H\">here</a> to turn the LED on pin 33 on.<br>");
            client.print("Click <a href=\"/L\">here</a> to turn the LED on pin 33 off.<br>");
            client.println();
            break;
          } else {
            currentLine = "";
          }
        } else if (c != '\r') {
          currentLine += c;
        }
        if (currentLine.endsWith("GET /H")) {
          digitalWrite(LED, HIGH);
        }
        if (currentLine.endsWith("GET /L")) {
          digitalWrite(LED, LOW);
        }
      }
    }
    client.stop();
    Serial.println("Client Disconnected.");
  }
}
Upon loading the sketch and opening the serial monitor, an IP address is shown. Type such address in any web browser (that is in the same network as the Franzininho Wi-Fi.

In the page, click the “here” buttons to turn LED on pin 33 ON and OFF. Look at the board and have fun.
Conclusion: there is a variety of code examples to do almost anything with the ESP32-S2, I suggest you explore and see what you can do. Use your Franzininho Wi-Fi and have fun.


Pingback: ESP32-S2 internal temperature sensor - FritzenLab electronics