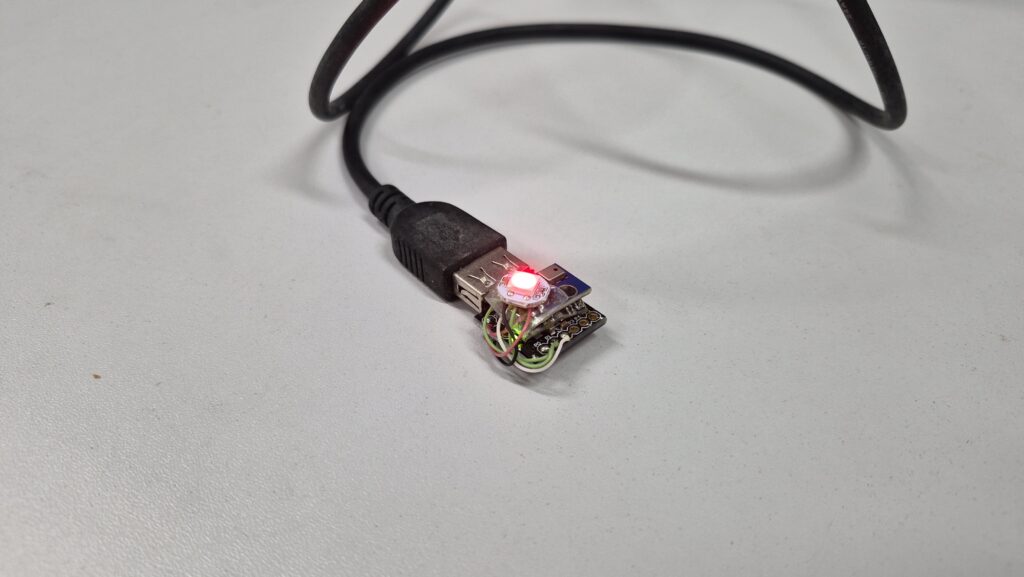
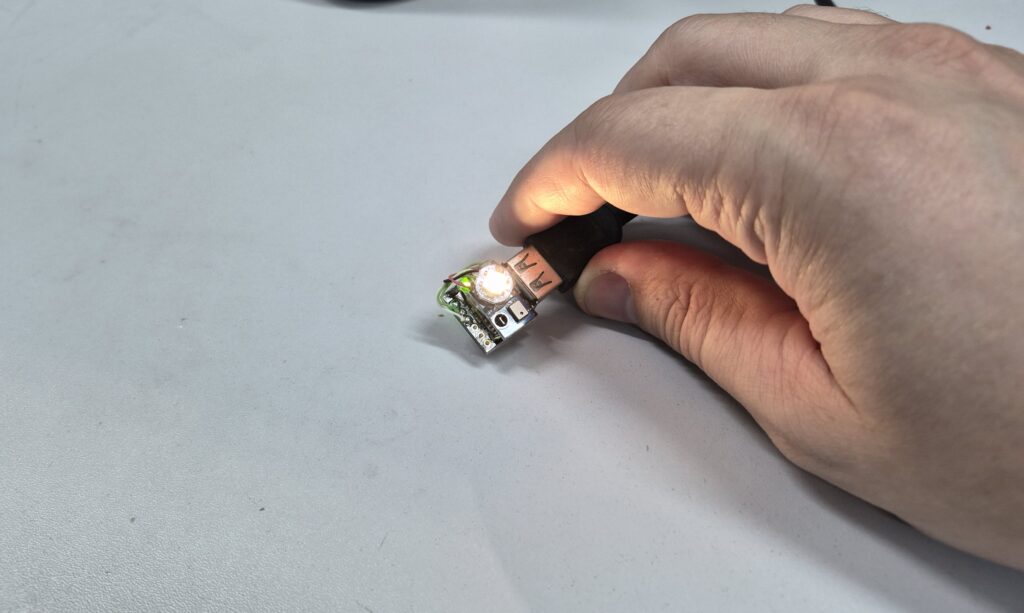
Today’s post is all about TSAQM – The smallest air quality monitor. It is an Arduino gadget based on the Attiny85, which uses na AGS10 sensor to assess air quality. It uses a single addressable RGB LED as interface, changing color to reflect air quality.
Where did the inspiration for this gadget came from? it actually came from this video of my friend at StuckAtPrototype. I actually thought that the concept of measuring and presenting visually the surrounding air quality is pretty neat.
The problem
VOC or volatile organic compounds are substances based on carbon that are organic, and can pose a threat to human health. That is if the exposition level is too high in a short periodo of time. Substance on that list include Gasoline, Toluene, metanol, plastics of various types and also some trees.
As we all know, exposition to some of those materiais can even be fatal. So measuring and understanding the exposition levels is of very high importance to our health. As we will see througout this article, even deodorant can be dangerous to our health. Our AGS10 sensor is very sensitive to that, which is very visible in the experiments we will carry.
Another fun fact: even our breath can trigger this sensor very quickly, so sensitive it is. This is since it contains a lot of CO2.
The product
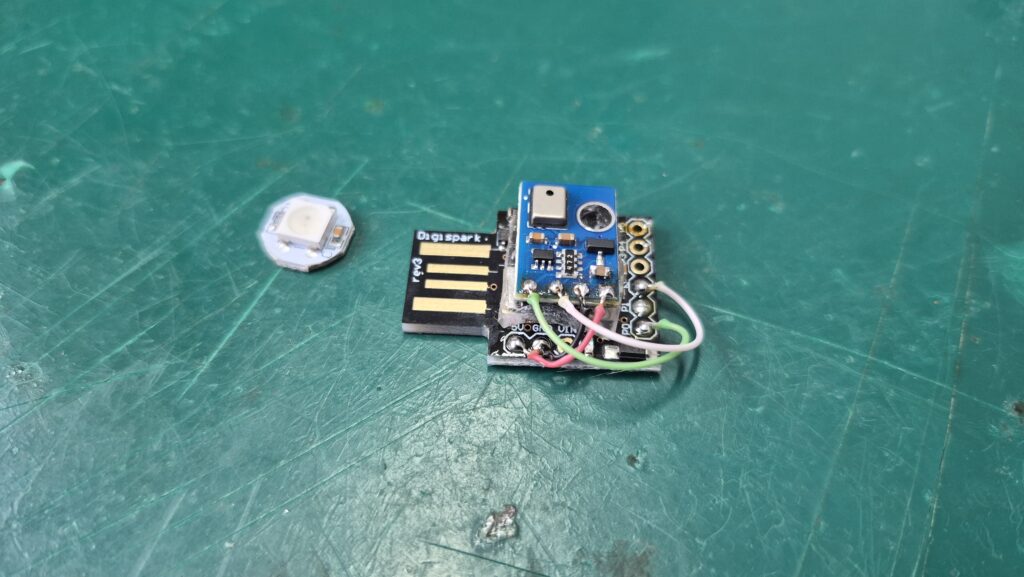
I am a very minimalist maker when it comes to user interfaces, as one can see on this and this old projects of mine. The present project could not be different, I wanted to measure air quality levels without taking too much space and resources. So I decided that my HMI (human-machine interface) would be a single RGB LED.
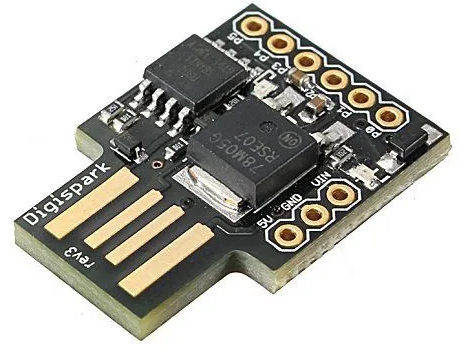
I then picked the easy to use and control WS2812b, which can be controlled to product over 16 millions colors via a single wire. Another constraint I put on myself for this project is space: I would pick some microcontroller that took the least space possible. For that I had really two options: the Xiao family from SeeedStudio, which I own a couple of options from. Or then the well-known Attiny85 in the form of the now-deceased Digispark.
I picked the latter, since I would not need Wi-Fi or bluetooth for this specific project. Added to that choice the fact that the Digispark I own features the USB A connector already onboard, no need for cables. That would be a problem with the Xiao family, I would then need a USB C cable to go with.
The heart and soul of the project is actually the TVOC (total volatile organic compound) sensor, called AGS10 (datasheet here). I bought it earlier this year along with a couple other options. That was with the objective of testing them out, which I did in this blog post. All sensors tested (and all sensors available on the market, really) do work, so picking AGS10 for this project was more of a personal choice matter.
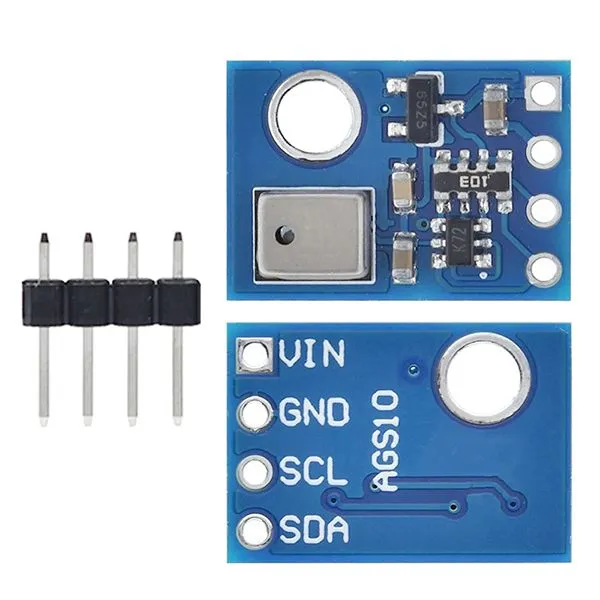
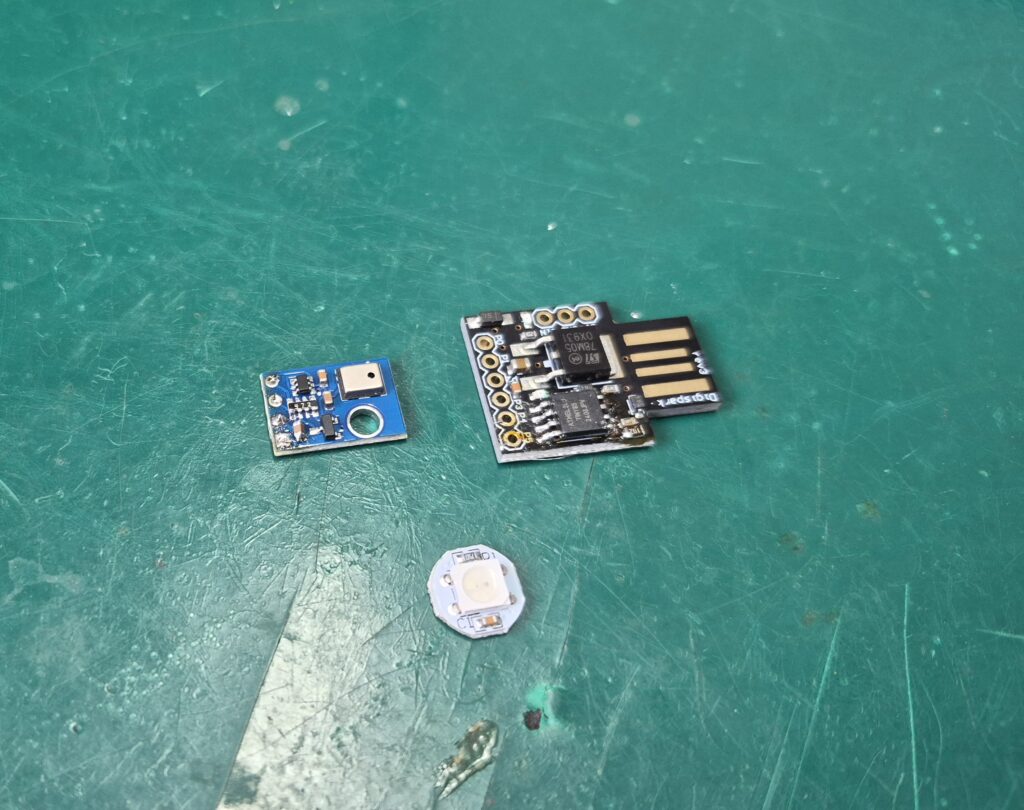
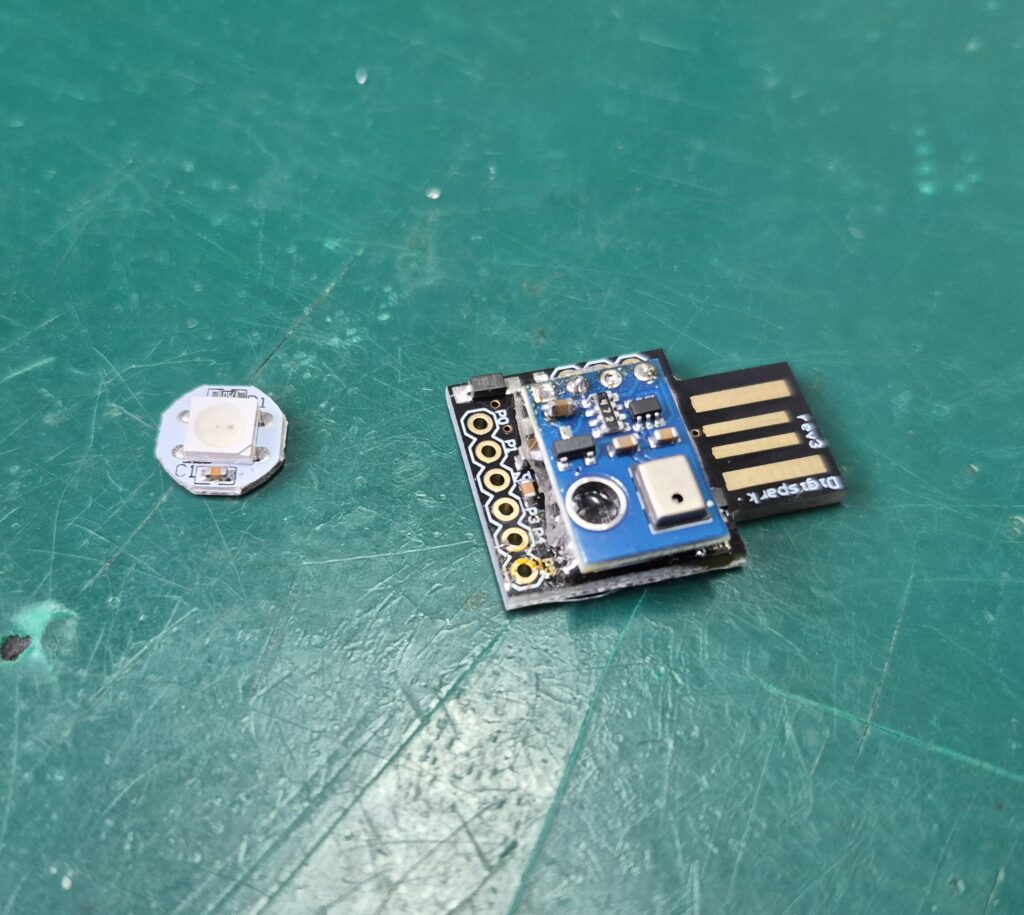
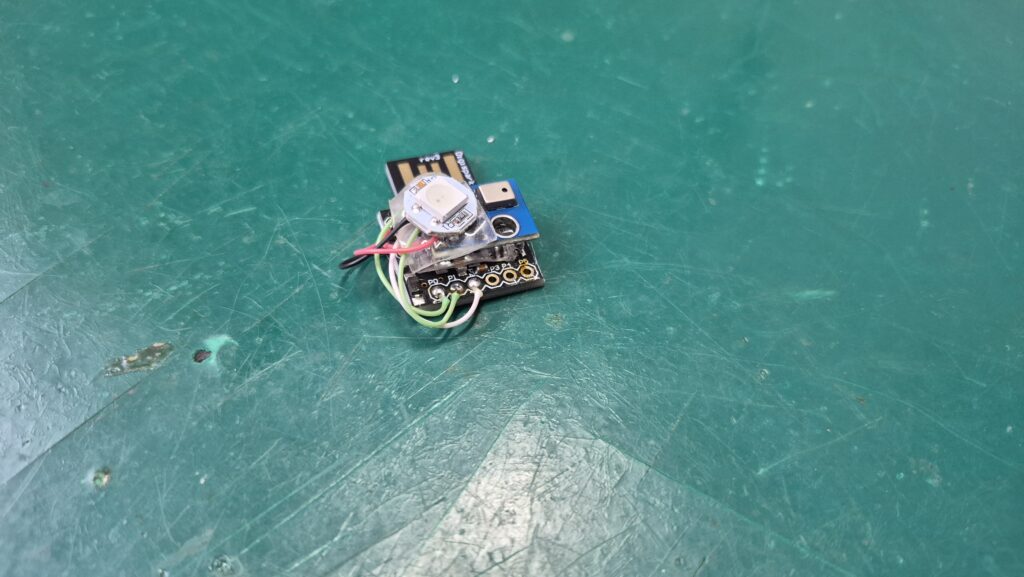
In fact its easy interface, i2c and clean necessary code had a say on my choice as well. More on that later. As stated before, I wanted to assemble a very compact yet simple product, so I decided to just stack things on top of one another.
For that I decided to use double sided tape, providing at the same time mechanical strenght and glueing/sticking. I basically laid a pice of double sided tape on top of the Digispark board, then sit the AGS10 sensor. Then another layer of double sided tape and sit the WS2812b neopixel on top.
Finally I had to solder a total of seven (7) wires: 3V3 and GND for both AGS10 and WS2812b, SDA and SCL for AGS10 and then DIO for the WS2812b. That was it, a 5-minutes prototype.
The implemented color system
Measuring range for the AGS10 is 0-99,999 TVOC, but the most common values are between 0 and 4500. I decided I wanted a four color and 20 shades system to represent our TVOC levels. That would be divided into:
- Five shades of green for the first 325 values,
- Then five shades of yellow for the next values (up to 950),
- Then five shades of orange for next values (up to 1950),
- Finally five shades of red for the values up to 4500.
In case of sensor not reachable or values smaller than 1, WS2812b would blink in blue. Values over 5500 (extremely dangerous environment) would make the LED blink in red. ChatGPT actually created the graph below, for you to have and idea of what I want for the final product.
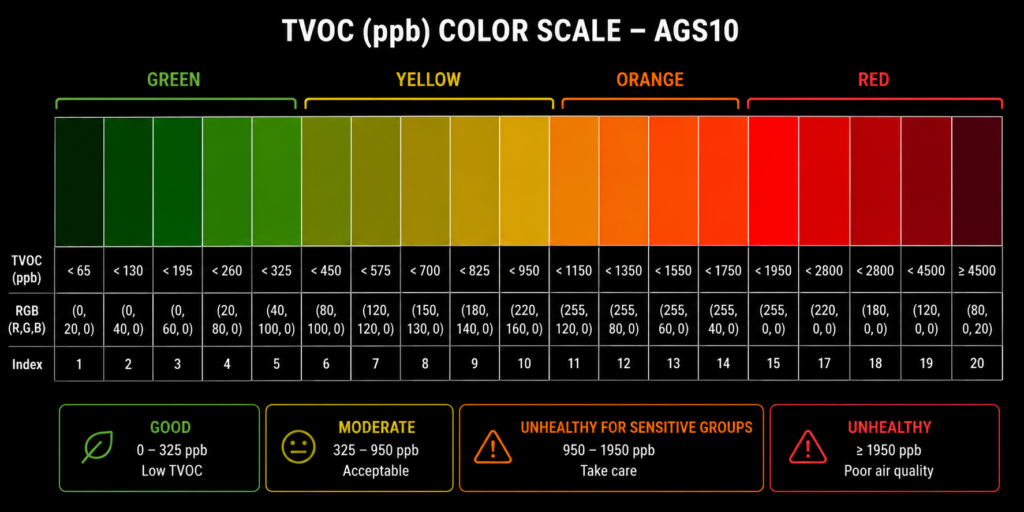
Air quality monitor color scale
Of course a color grade like this one does not stand on the crowd as it should. At the end of the day, who can differentiate between shades of red? not me for sure. But one thing it provides is the possibility of understanding the “ballpark”: green is good, red is bad, and that is it.
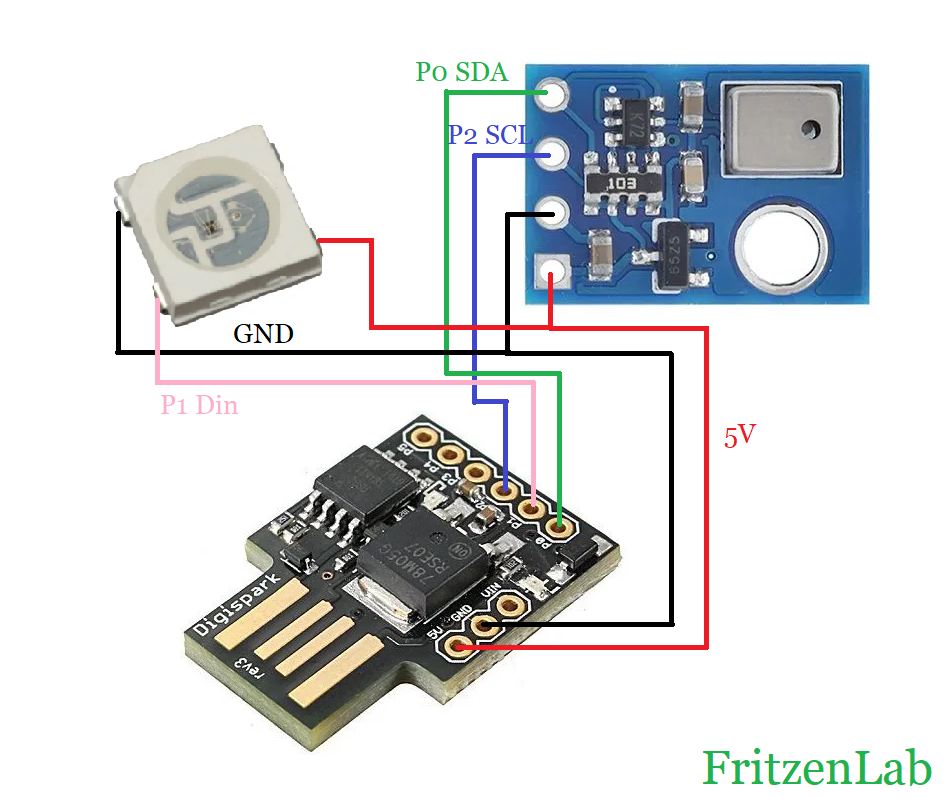
Hardware of the air quality monitor
As usual here on the blog, schematic diagrams are easy, quick an straightforward. Not different at this time, where we have to connect only a couple of wires to make everything work. That is WS2812b to Attiny85 and also AGS10 to Attiny85, besides USB power.
Schematic diagram is below, along with picture illustrating the assembly process. Enjoy and copy those at your will. Feedback is welcome both in the comments below and also on my Youtube channel comments section.
Firmware/Arduino code
Just like every programmer and maker does in this day and age, I had help from generative AI to implement code for this project. I used the traditional Arduino IDE software for this project, version 2.3.8 nightly (old I know, but I just did not bother updating it yet).
Code is simple enough that I did most of the work. Just the color picking and showing part of it was made by ChatGPT:
void showTVOC(uint32_t tvoc)
{
  // ===== GREEN =====
  if(tvoc < 65)          setColor(0, 20, 0);
  else if(tvoc < 130)    setColor(0, 40, 0);
  else if(tvoc < 195)    setColor(0, 60, 0);
  else if(tvoc < 260)    setColor(20, 80, 0);
  else if(tvoc < 325)    setColor(40, 100, 0);

  // ===== YELLOW =====
  else if(tvoc < 450)    setColor(80, 100, 0);
  else if(tvoc < 575)    setColor(120, 120, 0);
  else if(tvoc < 700)    setColor(150, 130, 0);
  else if(tvoc < 825)    setColor(180, 140, 0);
  else if(tvoc < 950)    setColor(220, 160, 0);

  // ===== ORANGE =====
  else if(tvoc < 1150)   setColor(255, 120, 0);
  else if(tvoc < 1350)   setColor(255, 100, 0);
  else if(tvoc < 1550)   setColor(255, 80, 0);
  else if(tvoc < 1750)   setColor(255, 60, 0);
  else if(tvoc < 1950)   setColor(255, 40, 0);

  // ===== RED =====
  else if(tvoc < 2300)   setColor(255, 0, 0);
  else if(tvoc < 2800)   setColor(220, 0, 0);
  else if(tvoc < 3500)   setColor(180, 0, 0);
  else if(tvoc < 4500)   setColor(120, 0, 0);
  else                   setColor(80, 0, 20);
}
Essentially a bunch of IF/ELSE clauses put together. Everything else was made by me, including the bliking at the beginning and end of scale:
void blink_LED(int color){
  if(millis() - blinkTimer > 300){
    blinkTimer += 300;

    if(blink == 0){
      blink= 1;
      if(color == 1){
        setColor(0, 0, 254);
      }else{
        setColor(254, 0, 0);
      }
    }else{
      blink= 0;
      setColor(0, 0, 0);
    }

  }

}
Besides that, the piece of code below is the “juice” of this project. I read the sensor and do a moving average to it, before finally just handing the control to the color picking function, shown above.
if(millis() - mainTimer > 5000){
    mainTimer += 5000;

    tvoc = readAGS10(); // make an AGS10 reading

    if(tvoc < 1){ // maybe we lost connection to the sensor
      blinkLED= 1; // blinks in blue
    }else if(tvoc > 5500){ // very likely a bad situation
      blinkLED= 2; // blinks in red

    }else{ // this is the normal, just light the Neopixel with the corresponding color
      blinkLED= 0;
      smoothtvoc = tvocSensorAvg.update(tvoc);
      showTVOC(smoothtvoc);
    }

  }
So essentially no calibration, nothing besides a moving average filter. I do everything every five (5) seconds, there is no need to be faster than that on that kind of sensor. Also if it were to be fasted there would be a change for the LED to appear to be “blinking”, and I do not want that. Full code is here and also on my Github:
// Air quality monitor with AGS10 TVOC sensor, Attiny85 and WS2812b addressable LED
/*There are 20 different colors possible, representing AGS10 TVOC values between
sixty five (65) or smaller and five thousand five hundred (5500) or larger
(five green, five yellow, five orange and five red colors)
- RGB LED on pin 1, SDA on pin 0 and SCL on pin 2

*/
#include <TinyWireM.h>
#define AGS10_ADDR 0x1A
#include <Adafruit_NeoPixel.h>

#define LED_PIN 1
#define NUMPIXELS 1

Adafruit_NeoPixel pixel(NUMPIXELS, LED_PIN, NEO_GRB + NEO_KHZ800);

uint32_t tvoc = 0;
unsigned long mainTimer = 0;
unsigned long blinkTimer = 0;
uint32_t smoothtvoc = 0;
int blink = 0;
int blinkLED = 0;

class MovingAverage {
  private:
    int _numReadings;
    uint32_t *_readings;
    int _readIndex = 0;
    uint32_t _total = 0;

  public:
    MovingAverage(int size) {
      _numReadings = size;
      _readings = new uint32_t[_numReadings];
      for (int i = 0; i < _numReadings; i++) _readings[i] = 0.0;
    }

    ~MovingAverage() {  // free memory
      delete[] _readings;
    }

    uint32_t update(uint32_t newValue) {
      _total -= _readings[_readIndex];
      _readings[_readIndex] = newValue;
      _total += newValue;

      _readIndex++;
      if (_readIndex >= _numReadings) _readIndex = 0;

      return _total / _numReadings;
    }
};

MovingAverage tvocSensorAvg(5);

uint32_t readAGS10()
{
  uint8_t data[5] = {0};

  // Select register 0x00
  TinyWireM.beginTransmission(AGS10_ADDR);
  TinyWireM.write(0x00);
  TinyWireM.endTransmission();

  delay(5);

  // Request 5 bytes
  TinyWireM.requestFrom(AGS10_ADDR, 5);

  for (uint8_t i = 0; i < 5; i++)
  {
    if (TinyWireM.available())
    {
      data[i] = TinyWireM.read();
    }
  }

  // TVOC value is bytes 1,2,3
  uint32_t tvoc =
      ((uint32_t)data[1] << 16) |
      ((uint32_t)data[2] << 8)  |
      data[3];

  return tvoc;
}
void setColor(uint8_t r, uint8_t g, uint8_t b)
{
  pixel.setPixelColor(0, pixel.Color(r, g, b));
  pixel.show();
}

void showTVOC(uint32_t tvoc)
{
  // ===== GREEN =====
  if(tvoc < 65)          setColor(0, 20, 0);
  else if(tvoc < 130)    setColor(0, 40, 0);
  else if(tvoc < 195)    setColor(0, 60, 0);
  else if(tvoc < 260)    setColor(20, 80, 0);
  else if(tvoc < 325)    setColor(40, 100, 0);

  // ===== YELLOW =====
  else if(tvoc < 450)    setColor(80, 100, 0);
  else if(tvoc < 575)    setColor(120, 120, 0);
  else if(tvoc < 700)    setColor(150, 130, 0);
  else if(tvoc < 825)    setColor(180, 140, 0);
  else if(tvoc < 950)    setColor(220, 160, 0);

  // ===== ORANGE =====
  else if(tvoc < 1150)   setColor(255, 120, 0);
  else if(tvoc < 1350)   setColor(255, 100, 0);
  else if(tvoc < 1550)   setColor(255, 80, 0);
  else if(tvoc < 1750)   setColor(255, 60, 0);
  else if(tvoc < 1950)   setColor(255, 40, 0);

  // ===== RED =====
  else if(tvoc < 2300)   setColor(255, 0, 0);
  else if(tvoc < 2800)   setColor(220, 0, 0);
  else if(tvoc < 3500)   setColor(180, 0, 0);
  else if(tvoc < 4500)   setColor(120, 0, 0);
  else                   setColor(80, 0, 20);
}
void blink_LED(int color){
  if(millis() - blinkTimer > 300){
    blinkTimer += 300;

    if(blink == 0){
      blink= 1;
      if(color == 1){
        setColor(0, 0, 254);
      }else{
        setColor(254, 0, 0);
      }
    }else{
      blink= 0;
      setColor(0, 0, 0);
    }

  }

}
void setup()
{
  TinyWireM.begin();
  pixel.begin();
  pixel.clear();
  pixel.show();
}

void loop()
{
  if(millis() - mainTimer > 5000){
    mainTimer += 5000;

    tvoc = readAGS10(); // make an AGS10 reading

    if(tvoc < 1){ // maybe we lost connection to the sensor
      blinkLED= 1; // blinks in blue
    }else if(tvoc > 5500){ // very likely a bad situation
      blinkLED= 2; // blinks in red

    }else{ // this is the normal, just light the Neopixel with the corresponding color
      blinkLED= 0;
      smoothtvoc = tvocSensorAvg.update(tvoc);
      showTVOC(smoothtvoc);
    }

  }
  // effectively execute the blinking, if and when necessary
  if(blinkLED == 1){
    blink_LED(1);
  }else if(blinkLED == 2){
    blink_LED(2);
  }else{

  }

}
Testing it out
You have to install Attiny85 support on you Arduino IDE in order for this project to compile. After that, just hit “upload”and wait for the “Connect the board” signal, then do so. Finally plug the project to any USB port and wait for the first five (5) seconds, then the LED will light up.
The code I devised has no memory and no calibration, so jut let the Attiny85 do its job. Moving average filter will do an excellent job in (literally) averaging the AGS10 read value. It means no excessive blinking or color changing, unless the environment itself changes.
In my experience using the gadget in the last couple of days, it will spend most of its time between yellow and orange colors. Meaning from ideal to slightly-less-than-ideal environment, at least in my case. There is a video of the system working, it is at the top of this post. Enjoy and rembember to comment if you have questions.