
Best way to use a thermocouple: Today we will study the K-type thermocouple with MAX6675, a set that is capable of providing industrial-quality temperature readings. The thermocouple is a predominantly industrial type of sensor, as it is robust and well-known.
Now let’s learn a little about the thermocouple and how to connect it to the Arduino. A thermocouple is a temperature sensor made up of two chemically different materials. The variation in temperature of this junction causes a very small variable voltage to appear (Seebeck effect), which can be amplified and used to measure said variation.

Thermocouples are widely used in industry because they are cheap and cover a wide temperature range. The one we are going to study in this article, type K, measures temperatures between -200ºC and +1350ºC, with a sensitivity of 41uV/ºC.
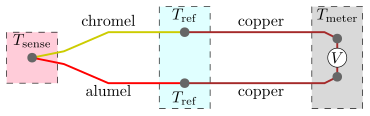
According to Wikipedia, the circuit below is necessary to measure a thermocouple. Note the Tref points, which are the so-called cold junction that must be taken into account to obtain a quality measurement.
The integrated circuit that we will use in this tutorial, MAX6675, already has cold junction compensation. This compensation is nothing more than a temperature sensor inside the chip.
Arduino code
We will use this article as a basis for our studies. It was also based on the same Adafruit library that we will use. First, open the Arduino IDE and install the MAX6675 library, in “Sketch > Include library > Manage libraries”. Search for the one from Adafruit and install it. On your way to finding the best way to use a thermocouple.
Assemble the circuit as shown below, there are only five wires.


Below is the full code for the example “serialthermocouple.ino” available in the Arduino IDE under “File > Examples > Max6675library”.
// this example is public domain. enjoy!
// https://learn.adafruit.com/thermocouple/
#include "max6675.h"
int thermoDO = 4;
int thermoCS = 5;
int thermoCLK = 6;
MAX6675 thermocouple(thermoCLK, thermoCS, thermoDO);
void setup() {
Serial.begin(9600);
Serial.println("MAX6675 test");
// wait for MAX chip to stabilize
delay(500);
}
void loop() {
// basic readout test, just print the current temp
Serial.print("C = ");
Serial.println(thermocouple.readCelsius());
Serial.print("F = ");
Serial.println(thermocouple.readFahrenheit());
// For the MAX6675 to update, you must delay AT LEAST 250ms between reads!
delay(1000);
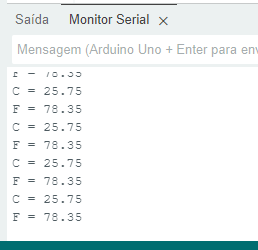
}Notice that the temperatures in Celsius and Fahrenheit are read every second. It’s a very simple code, the library does everything for us. An example of reading on the Arduino serial monitor is below.
Best way to use a thermocouple
The thermocouple generates a potential difference in the range of microvolts, which is very difficult to read. However, with the use of a specific integrated circuit (such as the MAX6675) and the right libraries, it is easy to take temperature readings.
Want to continue studying sensors? Check out this article on NTC thermistors. Want to buy a MAX6675? use my link on Aliexpress.
Pingback: Thermocouple with MAX6675 in microPython - FritzenLab electronics