

Today I will guide you into developing a time and temperature gadget. It is a beautiful four digits display that shows temperature and time. It features an LM35 temperature sensor and internet connection for time retrieval.
I like to make and bring to you simple and useful projects, most of them involving sensors. This is no different, we will use the well known TM1637 display to implement a temperature reading. It will also feature the show of time, retrieved from an API on the internet.
I have implemented something similar in the past, you can have a look here. That time I got time information from an RTC (real time clock), which is a chip that features a battery. It is very capable of keeping track of time, no worries. But today I have decided to do things different, use an API from TimeZoneDB and get live time from the internet.
That API is usable for free, as long as you don’t spam it. In our case all I want is to keep track of minutes, not seconds. So I will effectively only consult the API every 60 seconds sharp. This is the same API I have been using successfully for my pomodoro project.
You have to sign in to their website, then you get a unique identifier. Use that in the Arduino sketch we will write in a minute. Besides that you also have to connect an LM35 temperature sensor to the project. That is as simple as reading an analog input. On top of that we will implement a moving average filter of 20 readings, which will take 100 seconds to completely refresh.
Hardware
Our time and temperature gadget uses a total of four components: one four digit TM1637 display, one LM35 temperature sensor. Also an ESP32-C3 Super mini, which I made a dev board for, and finally two electrolytic capacitors.
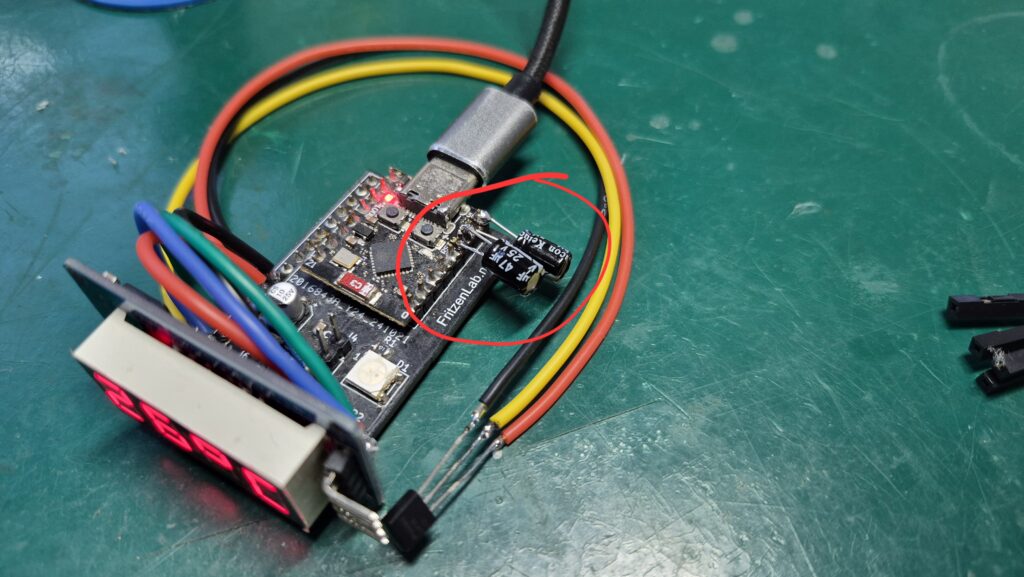
Those capacitors have to be put on top of the ESP32-C3 Super mini 5V and 3V3 pins, both to GND. That is because such board is known to brown out while trying WiFi connection, at least some times. Image below shows how I have done that myself, adding one 47uF/25V capacitor to each voltage pin.
As much as possible the schematic diagram/connections of this project are simple. The TM1637 display needs four wires: Clock, DIO, 3V3 and GND. Sensor LM35 needs three wires: data output, 3V3 and GND. LM35’s datasheet notes that you need at least 4V to suppy it. But in practice, on the bench, you can supply it with 3V3 no worries.
Power supply for the project comes straight from the USB C cable. Use a good 5V USB power supply, exactly because the aforementioned ESP32-C3 Super Mini power problem. It is the same cable/via used to send “Serial.println()” back to the computer, only if necessary. Speaking of the ESP32 I used, it is available from here if you want to get one.
Have a look at the schematic diagram below, as well as a project picture for your reference. One more thing: LM35 is a bit sensitive to noise, but in my experience our application does not suffer from it.
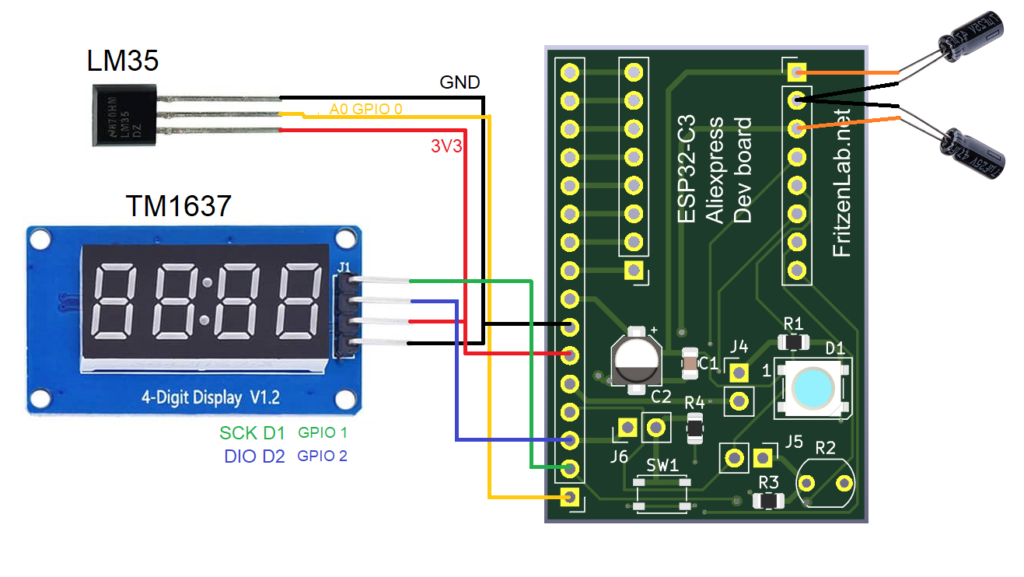
GPIO 0, 1 and 2 are used in this project: 0 for the analog input (LM35), 1 for TM1637 SCK and 2 for DIO. Just for fun I decided to solder the LM35 away from the ESP32-C3 Super Mini dev board. For that I used 22 AWG wire from here.
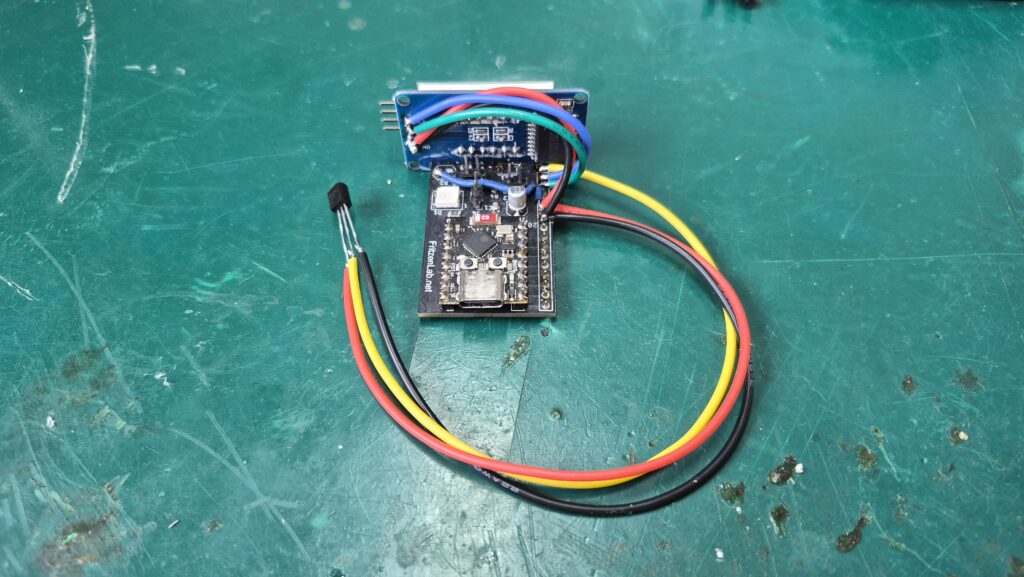
I used the same 22 AWG wire to connect the TM1637 to the ESP32-C3. I glued the two of them to one another with super glue, unapologetically. Here is a picture of the finished assembly.
Firmware/code
Besides my own code developed earlier here and here, I got a bit of help from Claude.ai to develop this code. This is how it works:
- Already on setup() WiFi is connected and time is feched from TimeZoneDB,
- LM35 sensor is read once every 5 seconds, feeding the moving average filter of 20 values. Pretty stable,
- Time is fetched again and again every 60 seconds (10 seconds cycle * 6),
- Display is updated every 5 seconds, alternating time and temperature,
- If and when WiFi drops, there is a recovery mechanism.
All code is available at my Github here, besides being replicated below in full. Notice the include
#include "secrets.h"it calls a file called “secrets.h”, where you have to store you WiFi credentials and the TimeZoneDB information (your ID and your location). File “secrets.h” has the structure below, and needs to be put alongside your Arduino sketch (in the same folder).
#pragma once

#define WIFI_SSID         "your ssid"
#define WIFI_PASSWORD     "your password"

#define TIMEZONEDB_API_KEY "your api key"
#define MY_CITY	"your location" // look into https://timezonedb.com/time-zones
Another interesting bit: 7 segment displays are “limited” to showing numbers and a couple of letters. But that does not mean you can not create your own symbols. I have created both the “C” in Celsius and the “º” degrees, as seen below.
const uint8_t cletter[] = {
	SEG_A | SEG_D | SEG_E | SEG_F            //Letter 'C'
	};
const uint8_t degrees[] = {
  SEG_A | SEG_B | SEG_F | SEG_G            //Symbol 'º'
};
The bit of code below is responsible for showing time, hour and minutes. It had to be done that way in order to also show the semicolon “:”.
display.showNumberDecEx(combinedTime, 0, true, 4, 0);
    uint8_t colonDigit[] = { (uint8_t)(display.encodeDigit(currentHour % 10) | 0x80) };
    display.setSegments(colonDigit, 1, 1);
Full code is seen below for you to copy, paste and use as you wish. Note that the getTime() function is a bit extensive. That is because it has to read the TimeZoneDB url, parse the JSON and divide it into usable parts.
// Board user: ESP32-C3 Super mini https://fritzenlab.net/fritzenlab-esp32-c3-super-mini-dev-board/
#include "secrets.h"
#include <Arduino.h>
#include <TM1637Display.h>
#include <WiFi.h>
#include <WiFiClientSecure.h>
#include <HTTPClient.h>
#include <ArduinoJson.h>

int tempcelsius;
int zero = 12;
int smoothlm35;
char timeStr[12];
int retrieveTime = 0;
int currentHour;
int currentMinute;
String currentDate;
String currentDayOfWeek;

WiFiClientSecure client;   // used by http.begin(client, url) for HTTPS

const char* ssid = WIFI_SSID;
const char* password = WIFI_PASSWORD;
const char* timekey = TIMEZONEDB_API_KEY;
const char* mycity = MY_CITY;

// IO naming
#define CLK 1 // GPIO 1 pin 15
#define DIO 2 // GPIO 2 pin 14
#define lm35 0 // A0 pin 16
// On my version of the ESP32C3 Super mini: 10 GND and 11 3V3

const uint8_t cletter[] = {
	SEG_A | SEG_D | SEG_E | SEG_F            //Letter 'C'
	};
const uint8_t degrees[] = {
  SEG_A | SEG_B | SEG_F | SEG_G            //Symbol 'º'
};

TM1637Display display(CLK, DIO);

long currenttime;
long oldtime= 0;
int sweepcounter;
int lastcounter;

class MovingAverage {
  private:
    int _numReadings;
    uint32_t *_readings;
    int _readIndex = 0;
    uint32_t _total = 0;

  public:
    MovingAverage(int size) {
      _numReadings = size;
      _readings = new uint32_t[_numReadings];
      for (int i = 0; i < _numReadings; i++) _readings[i] = 0.0;
    }

    ~MovingAverage() {  // free memory
      delete[] _readings;
    }

    uint32_t update(uint32_t newValue) {
      _total -= _readings[_readIndex];
      _readings[_readIndex] = newValue;
      _total += newValue;

      _readIndex++;
      if (_readIndex >= _numReadings) _readIndex = 0;

      return _total / _numReadings;
    }
};

MovingAverage avglm35(20);

void setup() {
  analogReadResolution(10);
  analogSetAttenuation(ADC_0db);
  display.clear();
  display.setBrightness(0x0f);
  Serial.begin(115200);

  Serial.println("[SETUP] WiFi conectado!");
  // Skips TLS certificate validation for WiFiClientSecure. Required or the
  // HTTPS handshake to api.timezonedb.com fails silently before any HTTP
  // response is even received.
  // https://docs.espressif.com/projects/arduino-esp32/en/latest/api/wificlientsecure.html
  client.setInsecure();

  if (connectSavedWiFi()) {

    configTime(0, 0, "pool.ntp.org");
    //Serial.println("Waiting for time sync...");
    time_t now = time(nullptr);
    now = time(nullptr);
    Serial.println("nTime synced!");
    getTime();
  }
}

void loop() {

  currenttime= micros();
  if(currenttime - oldtime >= 100000){
    oldtime= micros();
    sweepcounter++;

    if(sweepcounter == 1){
    retrieveTime++;
    if(retrieveTime > 5){
      retrieveTime = 0;
      getTime();
    }

    sprintf(timeStr, "%02d%02d", currentHour, currentMinute); // %02d so that minutes or hours smaller
    // than 10 will have the zero added to the left
    int combinedTime = atol(timeStr);
    display.showNumberDecEx(combinedTime, 0, true, 4, 0);
    uint8_t colonDigit[] = { (uint8_t)(display.encodeDigit(currentHour % 10) | 0x80) };
    display.setSegments(colonDigit, 1, 1);

    //Serial.println(currentHour);
    //Serial.println(currentMinute);
    Serial.println(combinedTime);

    }else if(sweepcounter == 25){
      // Backup reconnect check: WiFi.setAutoReconnect() usually handles
      // drops on its own, but can occasionally get stuck (e.g. after a
      // long outage or router reboot). This forces a fresh attempt if
      // still disconnected.
      // https://docs.espressif.com/projects/arduino-esp32/en/latest/api/wifi.html
      if (WiFi.status() != WL_CONNECTED) {
        Serial.println(F("WiFi disconnected, attempting reconnect..."));
        WiFi.disconnect();
        WiFi.begin(ssid, password);
      }

    }else if(sweepcounter == 50){

      //tempcelsius= analogRead(lm35) * 3.37 / 1023 * 100; // old way of reading the sensor
      int mv = analogReadMilliVolts(lm35); // new way of reading the sensor
      tempcelsius = mv / 10; // LM35: 10mV per °C
      smoothlm35 = avglm35.update(tempcelsius);
      Serial.println(smoothlm35);
      display.showNumberDecEx(smoothlm35, false, 0, 2, 0);
      display.setSegments(degrees, 1, 2); //Symbol 'º'
      display.setSegments(cletter, 1, 3); //Letter 'C'


    }else if (sweepcounter == 100){
      sweepcounter= 0;
      lastcounter= 0;
    }

  }
}
void getTime() {
  if (WiFi.status() != WL_CONNECTED) return;
  String url = "https://api.timezonedb.com/v2.1/get-time-zone?key=" + String(timekey) + "&format=json&by=zone&zone=" + String(mycity);

  HTTPClient http;

  if (http.begin(client, url)) {
    http.setReuse(false);

    int httpCode = http.GET();
    /*Serial.print("HTTP code time: ");
    Serial.println(httpCode);*/

    if (httpCode == 200) {
      DynamicJsonDocument doc(512);
      String payload = http.getString();  // pulls everything fast
      yield();

      DeserializationError err = deserializeJson(doc, payload);

      if (!err) {
        const char* datetime = doc["formatted"];

        Serial.print(F("Raw formatted: "));
        Serial.println(datetime);
        Serial.print(F("Free heap: "));
        Serial.println(ESP.getFreeHeap());

        char dateBuf[11];
        char hourBuf[3];
        char minBuf[3];

        strncpy(dateBuf, datetime, 10);
        dateBuf[10] = '';

        strncpy(hourBuf, datetime + 11, 2);
        hourBuf[2] = '';

        strncpy(minBuf, datetime + 14, 2);
        minBuf[2] = '';

        currentDate = String(dateBuf);
        currentHour = atoi(hourBuf);
        currentMinute = atoi(minBuf);

        Serial.println(currentDate);
        Serial.println(currentHour);
        Serial.println(currentMinute);
        // Derive weekday name from currentDate ("YYYY-MM-DD").
        // https://cplusplus.com/reference/ctime/tm/
        struct tm dowInfo = {0};
        dowInfo.tm_year = currentDate.substring(0, 4).toInt() - 1900;
        dowInfo.tm_mon  = currentDate.substring(5, 7).toInt() - 1;
        dowInfo.tm_mday = currentDate.substring(8, 10).toInt();
        dowInfo.tm_hour = 12;  // noon avoids DST/timezone edge cases

        // mktime() fills in tm_wday (0=Sunday..6=Saturday) as a side effect.
        // https://cplusplus.com/reference/ctime/mktime/
        mktime(&dowInfo);

        // %A = full weekday name, locale-dependent (default "C" locale = English).
        // https://cplusplus.com/reference/ctime/strftime/
        char dowBuf[10];
        strftime(dowBuf, sizeof(dowBuf), "%A", &dowInfo);
        currentDayOfWeek = String(dowBuf);
      }
    }

    http.end();
    client.stop();
  }
}

bool connectSavedWiFi() {
  // Simplified: connect directly with the hardcoded credentials instead of
  // reading from Preferences. The web-based provisioning flow (handleConnect,
  // WebServer routes) was never wired up, so prefs always came back empty.
  WiFi.mode(WIFI_STA);
  WiFi.setSleep(false); // reduces current spikes during association — known
                         // workaround for brownout resets on ESP32-C3 boards
                         // with weak onboard regulators (e.g. Super Mini)
  WiFi.setAutoReconnect(true);
  WiFi.persistent(true);
  WiFi.begin(ssid, password);

  Serial.print("Connecting");

  unsigned long start = millis();
  while (WiFi.status() != WL_CONNECTED && millis() - start < 15000) {
    Serial.print(".");
    delay(500);
  }

  if (WiFi.status() == WL_CONNECTED) {
    Serial.println("nConnected!");
    Serial.println(WiFi.localIP());
    return true;
  }

  return false;
}
Time and temperature gadget – results
Copy the code above and paste that into your Arduino IDE software. I am using version 2.3.8 nightly, but you can use really any version above 1.8.x. One thing to be mindful is that you will have to install all below listed libraries, in order for the code to compile.
- TM1637Display.h
- ArduinoJson.h
To do so, go to the top menu called “Sketch” then “Include library > manage libraries” and type the library name above. After that, just click the “->” arrow on the top left of the screen. Make sure that your ESP32-C3 Super mini is already connected to the computer via USB cable.
If everything was done correctly to this point, after a couple of seconds the code will be running. In 5+ seconds the display will start showing both temperature and time. Such pieces of information will take 5 seconds turns showing.
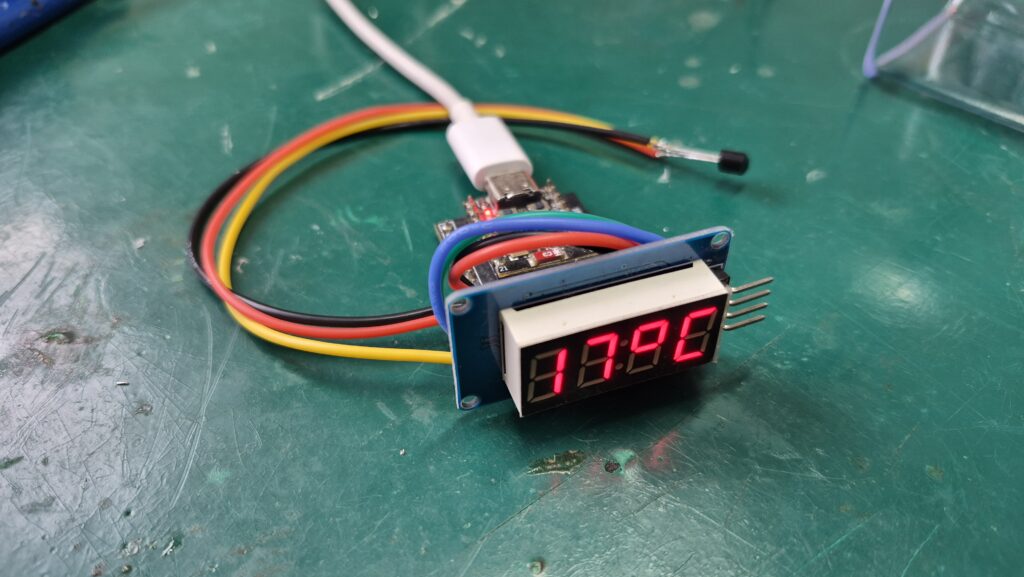
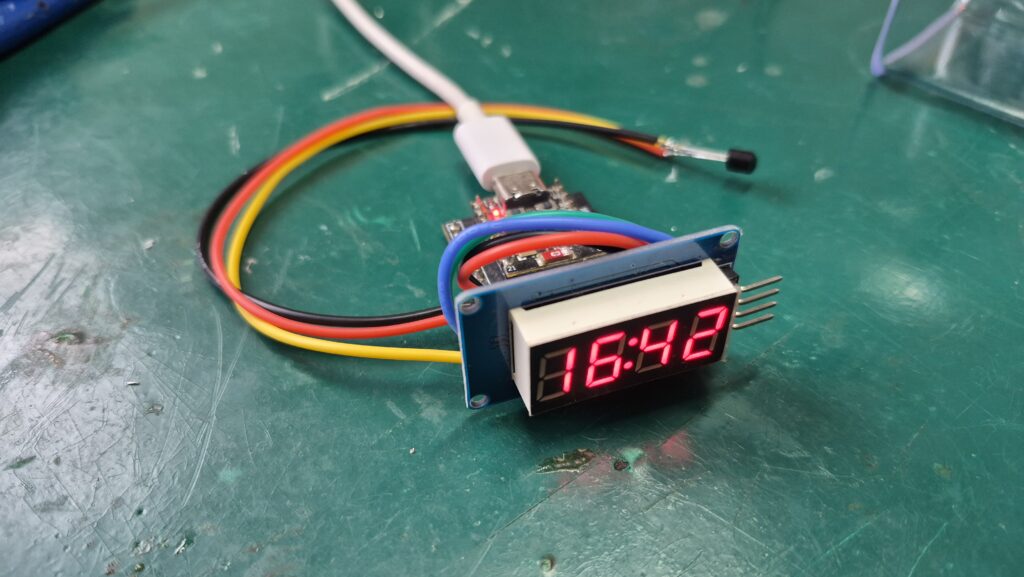
Please note that, since I am in Brazil, I programmed this time and temperature gadget’s temperature for degrees Celsius and time for 24h format. But nothing stops you from doing Fahrenheit and 12h format. I made a video showing how this gadget works, go back to the top of the article to watch.
Also please note that if you have any questions feel free to comment below. Also comment (and subscribe) on my Youtube Channel, as well as Instagam and TikTok.
teste de comentário