
The world around us is analog. Let’s learn how to do analog input readings with ESP32, using built-in functions. The Arduino code is ready to harness all the power necessary. No libraries are necessary beyond the ones already built in with Arduino firmware.
This microcontroller in specific for this article (Xiao ESP32-C6 – for my dev board), is capable of reading analog values up to 12bit and 3.3V. It means reading 4096 steps, or 805uV per step. That is different from the Arduino UNO for example, that can read values up to 5V in 10bit only.
This allows for projects where more precision in analog is required, as for example control loops, analog dials, positioning. Those 4096 steps present in the analog converter for the ESP32-C6 can leverage your projects to a new level. They mean a 4x increase in resolution from Arduino UNO, at a similar cost and reduced footprint.
The circuit
Our board with the ESP32-C6 features three analog inputs, A0-A2 located in the first three pins of the PCB. I am connecting a 10k Ohm potentiometer to pin A0, as seen in the image below. You could totally connect other two analog sensors, resistors and potentiometers to the other two inputs.
What is important to comment is that the voltage limit for those inputs is 3.3V. So you should always use the 3.3V supplied by the ESP32-C6 itself as the source for your sensors. You can damage your ESP32 if you supply those inputs with 5V for example.
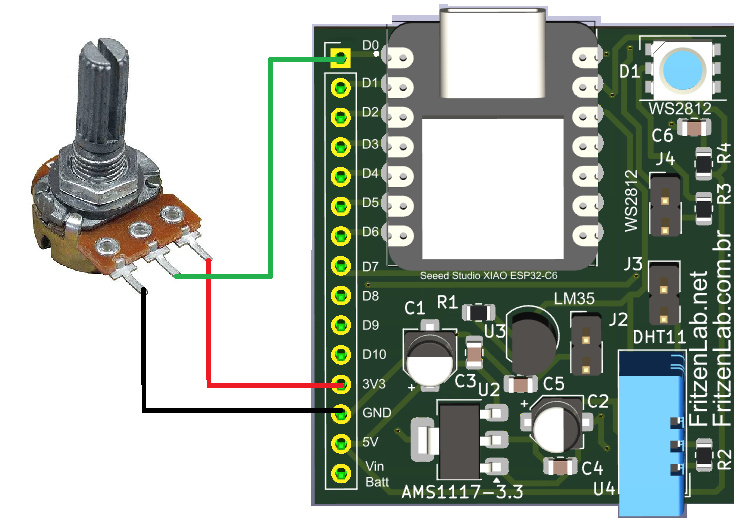
.That board you see in the picture about was made by me, specifically for the Xiao line of microcontrollers from SeeedStudio. More information about it is found here. Also important to mention that you could use any other ESP32 board for this experiment, all work the same way.
What you can’t do is apply this tutorial for the ESP8266, since it only has one analog input. Also more important, it supports 1.1V only. So stick to some (any, really) form and sort of ESP32 that you will be OK.
The code
This tutorial uses code made for Arduino boards. So if you want to use Micropython (for example) this tutorial will not do. But this does. I got the code below from this source, the official SeeedStudio Xiao ESP32-C6 page. It basically reads analog input in two ways: analogRead() which returns 0-4096 values. Also analogReadMilliVolts() which returns voltage in milivolts.
const int analogPin = A0;

void setup() {
  // Initialize serial communication at 115200 bits per second
  Serial.begin(115200);

  // Set the resolution to 12 bits (0-4095)
  analogReadResolution(12);
  //analogSetWidth(12);
}

void loop() {
  // Read the analog value and millivolts for the analogPin
  int analogValue = analogRead(analogPin);
  int analogVolts = analogReadMilliVolts(analogPin);

  // Print the values to the Serial Monitor
  Serial.printf("ADC analog value = %d\n", analogValue);
  Serial.printf("ADC millivolts value = %d\n", analogVolts);

  delay(100); // Delay for clear reading from serial
}
No special or specific libraries are used, Arduino/ESP32 analog interfaces are fully supported by the Arduino core. What is more on this code is the use of Serial.printf(), which literally prints information on the Arduino IDE’s console. In your Arduino IDE you will first upload the code then open the Serial Monitor.
Analog values both in 0-4096 and milivolts will pop every 100 miliseconds. You can totally change that interval by action over delay(100).
Notice that I use “analogReadResolution(12)”, meaning the resolution for the input is 12bit. I have done below some testing with 10bit to show you the difference. Notice that it is supposed to go from 0 to 1023, what it roughly does.
Final words
Analog input are the way any microcontroller can “listen” to the external world, which is mostly analog. Learn how to harness all its power is crucial to anyone developing embedded systems. As stated before, control systems rely heavily on analog signals, since the world is analog.
With all that said, see you next time. Take care and be safe everyone.