Have you ever had the need to use the BMP180 sensor with MicroPython? this post is for you. This tutorial will teach you how to read the BMP180 i2c sensor using a RP2350 microcontroller and MicroPython.
BMP180 is a temperature and atmospheric pressure sensor from Bosch, whose datasheet is here. It communicates with virtually any microcontroller that has an i2c port. All that is necessary are two wires for communication (SDA and SCL), VCC (3V3) and GND.
We have talked before about other sensors from Bosch, like the BMP280 and BME680. This article’s BMP180 is much simpler and older, but of course it will do the job for our purpose. Bosch’s sensor division is well known for its high quality, so we are on the safe side.
Now why use the RP2350 and MicroPython? essentially because it is possible and doable, and goes for an interesting read. MicroPython is very current and widely used these days, so the more content you find, the better you get at it.
Our microcontroller of choice will be the RP2350, one that is made by SeeedStudio and is called Xiao RP2350. Its small form factor makes it ideal (in my opinion) for embedding in projects you “make and forget”. This is since it is also very cheap, going sometimes for less that US$5 apiece.
Another thing we will implement for the sake of making it, is a 0.49″ OLED display, also controlled via MicroPython by the RP2350. It will show the current temperature every two (2) seconds, in degrees Celsius with a single decimal place.
We have talked about this display before, but with Arduino code. You can read it here if you want. This is a very fast and high quality display, easy to visualize despite its 0.49″ size. The one I own has white characters and black background, but you can find ones with yellow and blue characters as well.
Hardware
As previously stated, our microcontroller of choice will be the Xiao RP2350 (buy it here), one with eleven (11) GPIO and embedded voltage regulator. So that it can be supplied with 5V and will automatically convert it to 3V3 for usage.
Sensor wise we will use a single BMP180, temperature and atmospheric pressure from Bosch. It communicates via i2c and is supplied with 3V3. It is so precise in reading atmospheric pressure that it can calculate altitude as well. This sensor is therefore used in all sorts of projects where you need altitude, like for example drones for indoor navigation.
Then we will show temperature information in a 0.49″ OLED display, which also communicates to the RP2350 via i2c. As mentioned before, the one I own has white characters and black background, but yours may vary.
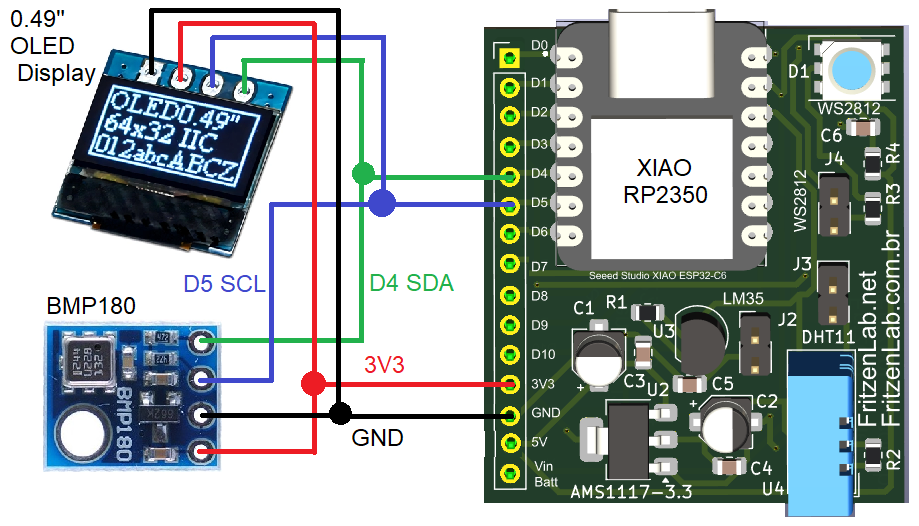
Schematic diagram is seen below. Power supply is not shown since we will be supplying the project via an USB-C cable. That will connect directly to the Xiao RP2350 female USB-C connector.
Coding/firmware
Our coding for this project will be made in MicroPython, programmed via Thonny IDE software. I have got a bunch of articles about configuring and using Thonny IDE with MicroPython, check it out here. Full code is below.
You also need two extra files, that must be saved inside your RP2350. Those are “BMP180.py” and “ssd1306.py”, besides the obvious “main.py” main file. All of them are here in this Github for you to grab. Our “main.py” file is below:
P.S: the actual code for “BMP180.py” is not mine and came from here. Code for “ssd1306.py” actually came from Google Gemini, which helped me structure the whole code below.
from machine import I2C, Pin
from bmp180 import BMP180
from ssd1306 import SSD1306_I2C
import time

# I2C Setup
i2c = I2C(id=1, scl=Pin(7), sda=Pin(6), freq=100_000)

# Initialize Display (64x32 is common for 0.49")
# If your text looks scrambled, try 128x32
oled = SSD1306_I2C(64, 32, i2c)

# Initialize Sensor
bmp180 = BMP180(i2c)
bmp180.oversample_sett = 0
bmp180.baseline = 101325

initialtime = 0

while True:
    if time.ticks_diff(time.ticks_ms(), initialtime) > 2000:
        initialtime = time.ticks_ms()

        # Get data
        t = bmp180.temperature
        p = bmp180.pressure
        a = bmp180.altitude
        # Clear display
        oled.fill(0)

        # Draw text: oled.text("string", x, y)
        oled.text("Temp:", 0, 0)
        oled.text(f"{t:.1f} C", 0, 15)

        # Send to screen
        oled.show()

        print(f"Temp: {t:.1f}")
        print(f"Pressure: {p:.1f}")
        print(f"Altitude: {a:.1f}")
There are a couple of things happening here, let us talk about them. First you need to import all necessary modules, like “machine”, “bmp180”, “ssd1306” and “time”. Then you initialize the i2c, the BMP180 sensor and the SSD1306 display controller. That is done once only, every power up.
The line below tells the BMP180 that the atmospheric pressure at sea level is such, it is a standard value.
bmp180.baseline = 101325Then inside “while True:”, which is essentially a forever loop, we do this:
if time.ticks_diff(time.ticks_ms(), initialtime) > 2000:
        initialtime = time.ticks_ms()
It serves basically to only execute everything every 2000 miliseconds, or 2 seconds. So the rest of the time the processor is essentially free to do any other thing we may want. For today’s code this is nothing, so the processor is free for most of the time.
This avoids the use of “utime.sleep(seconds)“, which would lock the processor in the waiting/sleep state for most of its execution time. The variable “initialtime” could (or should, maybe) be initialized to zero (0). Python does variable initialization very well, but you should initialize that anyway, just in case.
The “juice” of the code
First I would like to warn you a bit about the i2c pinout. On Xiao RP2350 (and most) Arduinos, i2c is on pins D4 and D5. In Arduino it is actually called 4 and 5. But in my experience Thonny IDE does not support calling it D4 and D5, so you have to call them by their “real” names, pins 6 and 7.
Now for the interesting part, the actual loop that executes forever. You first create three variables to store temperature, atmospheric pressure and altitude. Do the readings from the BMP180 sensor and populate it.
# Get data
        t = bmp180.temperature
        p = bmp180.pressure
        a = bmp180.altitude
Now you just do “oled.text”, define what you want to show and where, then do “oled.show”:
# Draw text: oled.text("string", x, y)
        oled.text("Temp:", 0, 0)
        oled.text(f"{t:.1f} C", 0, 15)
Then finally you do some “print()” to show information on the Thonny IDE’s console:
print(f"Temp: {t:.1f}")
        print(f"Pressure: {p:.1f}")
        print(f"Altitude: {a:.1f}")
Final words
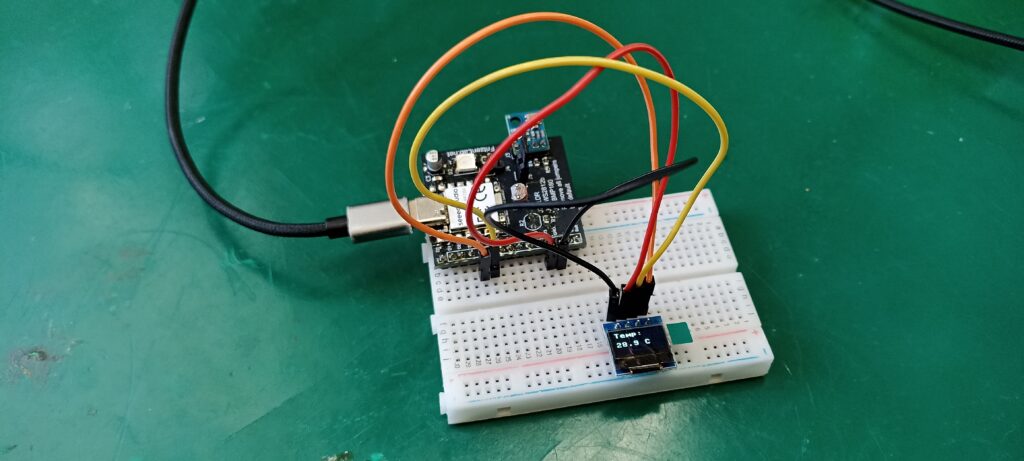
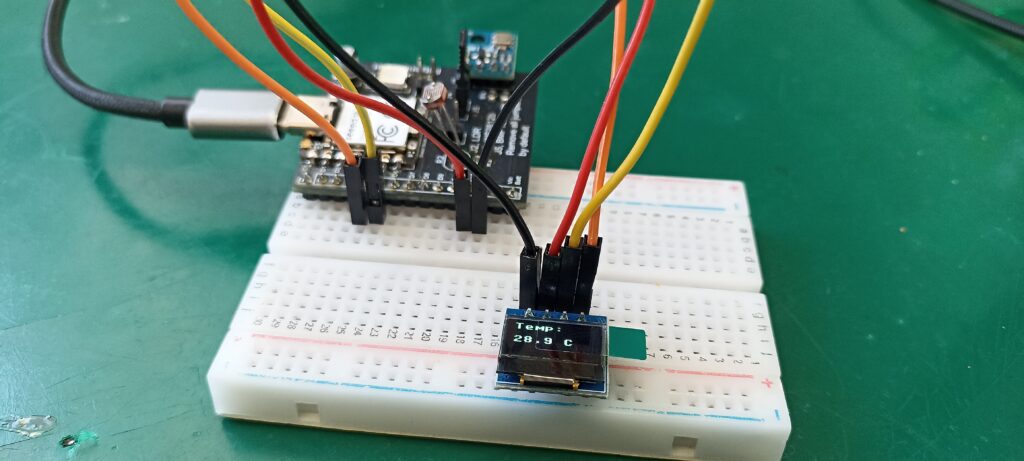
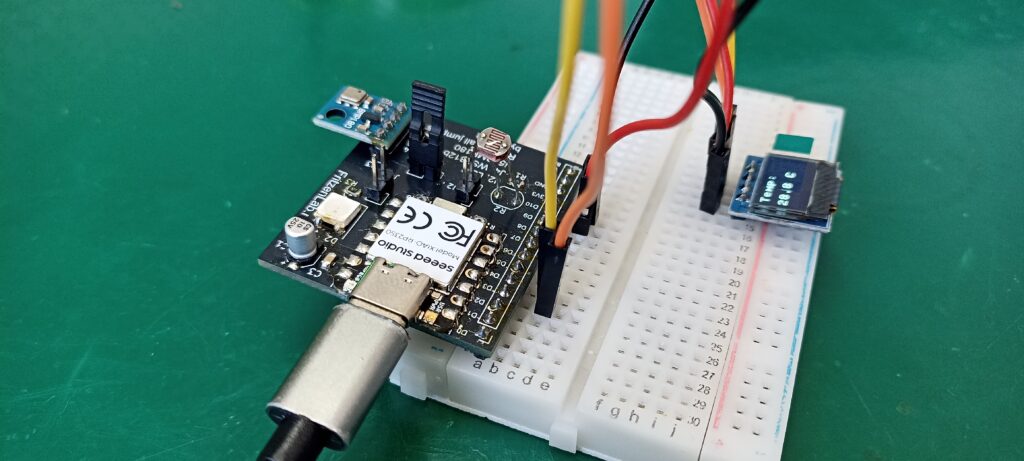
That is basically it, the beauty of MicroPython (and Python itself) lies in its simplicity. I took a picture of the setup I used, for you to have an idea on how to assemble yours. I used a 400-point breadboard, since my circuit board (I made it myself) exposes all RP2350 pins in a single row.
There is a video about this project at the beginning of the article, go back there and watch. Thank you for reading and see you guys in the next few articles.