
Have you even wanted to send Cellphone notifications with ESP32? then this post is for you. We will implement a push notifications system that allows ESP32 to send data to your phone. This means you can send any data from ESP32 like sensors, etc straight to your cellphone screen.
ESP32 → WiFi → ntfy.sh → Your Phone
This is implemented using a “free” service called NTFY.sh, whose official page is here. I say “free” because it is free to use to a certain point. It limits the number of push notifications sent/received to 250 a day. This is roughly ten push notifications per hour, or one every six minutes. We will limit our code to that.
One important detail to comment is that this is a wide open service, meaning that if someone figures the name of your topic, they can spam you. At least in the free to use tier. That is why it is very important to select a big, random name for your topic. Do not use names like “esp32_notifications” or “home_esp32” if you do not want to be eventually spammed.
What do I need?
In order to follow this tutorial you will need:
- ntfy.sh app, which you can download on your app store (I use Android and went to the Play store).
- An ESP32 development board. I own a bunch of them, all will do the job. For this tutorial I will use the ESP32-C3 Super mini.
- A computer with the Arduino IDE software installed.
- One breadboard and electronic components like buttons, LEDs (these are all optional). Get it if you want to create small automations like “when I press the button…”. Not necessary for this tutorial.
- Came for the code? there you go. Explanations will follow.
#include <WiFi.h>
#include <HTTPClient.h>

const char* ssid = "";
const char* password = "";

// Your ntfy topic
String ntfyTopic = "name_of_my_topic";

unsigned long lastSend = 0;
const unsigned long interval = 360000;  // 360 seconds (6 minutes)

void setup() {
  Serial.begin(115200);
  delay(100);

  Serial.println("\nConnecting to WiFi...");
  WiFi.begin(ssid, password);

  while (WiFi.status() != WL_CONNECTED) {
    delay(500);
    Serial.print(".");
  }

  Serial.println("\nWiFi connected!");
}

void loop() {
  unsigned long now = millis();

  if (now - lastSend >= interval) {
    lastSend = now;

    sendNotification(now/1000);
  }
}

void sendNotification(unsigned long elapsed) {
  if (WiFi.status() != WL_CONNECTED) {
    Serial.println("WiFi not connected. Skipping...");
    return;
  }

  HTTPClient http;
  String url = "https://ntfy.sh/" + ntfyTopic;
  http.begin(url);

  http.addHeader("Title", "ESP32");
  http.addHeader("Content-Type", "text/plain");

  String message = "ESP32 elapsed: " + String(elapsed) + " s";
  Serial.println("Sending: " + message);

  int httpResponseCode = http.POST(message);

  if (httpResponseCode > 0) {
    Serial.printf("ntfy response: %d\n", httpResponseCode);
  } else {
    Serial.printf("Error sending: %s\n", http.errorToString(httpResponseCode).c_str());
  }

  http.end();
}
The idea
At the end of this tutorial we will have implemented a complete push notifications system. It will send whichever data you want from ESP32 to your cellphone screen.When you install the ntfy.sh app in your cellphone, it will ask whether you permit it to send push notifications. Say yes, this is important and this tutorial is rendered useless without it.
In our case we will send the amount in seconds since ESP32’s power up. That number will show up in a push notification in your cellphone every six minutes. It is a number that will only grow, as long as the ESP32 remains powered up continually long enough. Every ESP32 power cycle will reset the number, but your app will keep every notification from the past.
That is an important part of this entire tutorial, every single notification that comes to the NTFY.sh app is saved on it. Meaning you do not have to worry losing past data.
Hardware
As mentioned earlier, this tutorial and project does not make use of LEDs, buttons, anything hardware related. All we need is a microcontroller with WiFi, which for us means any ESP32. I will use the ESP32-C3 Super mini, a neat little option which is cheap on most vendors, like this one.

Picture above shows an ESP32-C3 Super mini board soldered to a dev board. That was made by myself just to carry that neat little microcontroller. I used a free software called #Kicad to draw such circuit board. It actually exposes all of ESP32’s pins in a single row, including 5V, 3V3 and GND.
For this tutorial all you need to do is connect a USB-C cable to the ESP32-C3 dev board and you are good to go. You can see part of a breadboard in the picture above, but that is not really necessary. That would come in handy if you wanted to implement IO’s like buttons or LEDs.
NFTY.sh service
This is one of those finds that you come across from time to time. It is basically an app for you cellphone, your desktop or your browser. Its sole purpose is to receive and generate notifications in front of you. As you know, I have previously implemented a weather station that sends data to a Telegram account. I have also done a version that sends the same data to Whatsapp.
Those are two ways of getting notifications on your cellphone, but they come at an expense of a full app. I do enjoy getting my current weather on Telegram, but don’t really use it much beyond that. So it is just an app that does a lot, doing almost nothing. This is where NTFY.sh comes in handy, since it is an app whose ONLY purpose is to show notifications.
I will teach you the way I myself executed to configure the app, despite existing other ways to do the same. After you download the NTFY.sh app from you app store, click the “+” sign on the bottom right. By giving a name to the topic you automatically create it. Here you must exercise caution and come to your senses. As I previously stated, if you create a too short or too common of a name, people may find it out and SPAM you.
So instead of creating “My_ESP32” or “Home_ESP32”, do something like “3pdWeDYcXt2NjxF7DhDY” by using a service like Random.org. It will make virtually impossible for someone with bad intentions to reach your topic.
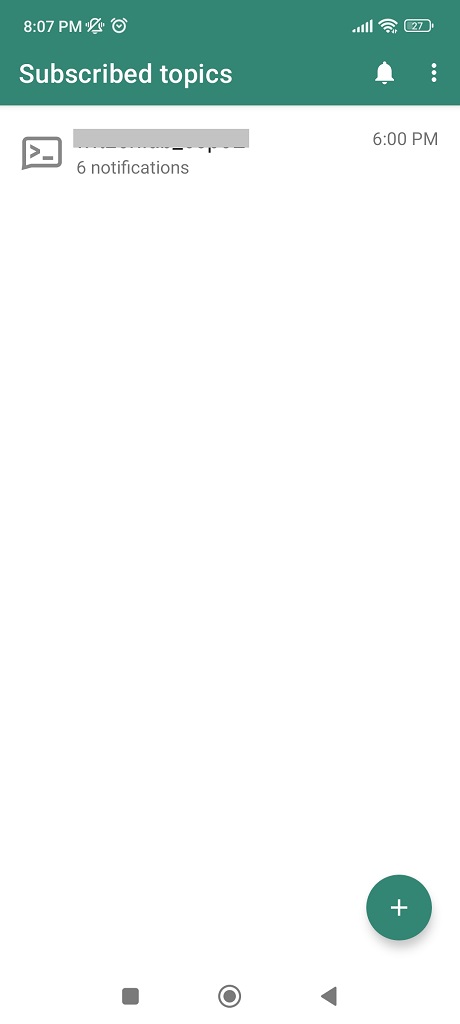
Once you have your topic, it is time to think about the ESP32 Arduino code to send messages to the app. Such messages will be stored one after the other in the same screen shown above. So besides getting a cellphone notification, you still have the full notifications history. That is perfect for my own project (which I liked above), a weather station.
The code/firmware
I am not going to lie to you, I have asked ChatGPT to generate ESP32 Arduino code for this project. All this code has to do is connect to WiFi and concatenate a string with the data I want to send. Then finally do a
http.POST(message);to the NTFY.sh URL:
String url = "https://ntfy.sh/" + ntfyTopic;All this whole service does is to receive a POST and generate a notification in your cellphone/app/browser. For this tutorial we will send the current time from the ESP32 power up, in seconds, every six minutes:
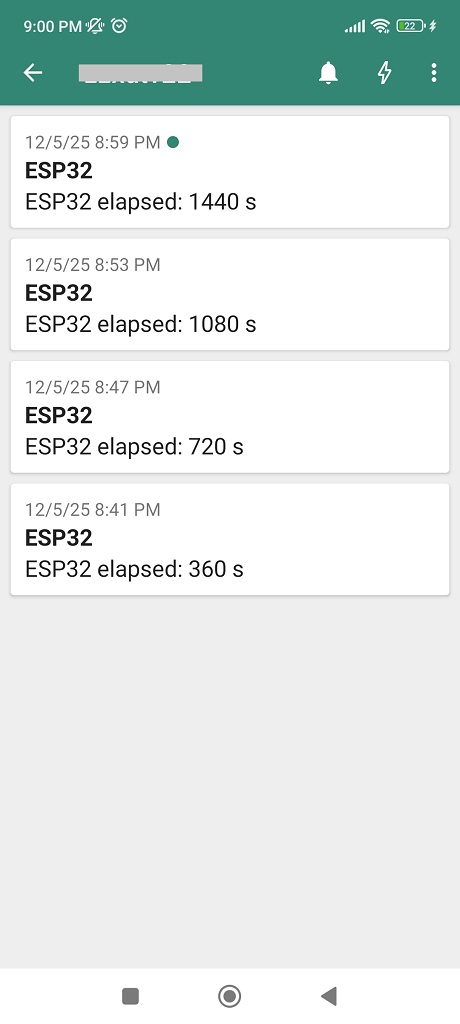
String message = "ESP32 elapsed: " + String(elapsed) + " s";We are effectively getting a notification like this: “ESP32 elapsed: 360 s”. Where the number (e.g “360”) will be increasing as time passes. Full code was presented above in the beginning of the article and here. You can use it, modify and remix, do your thing.
The result – notifications
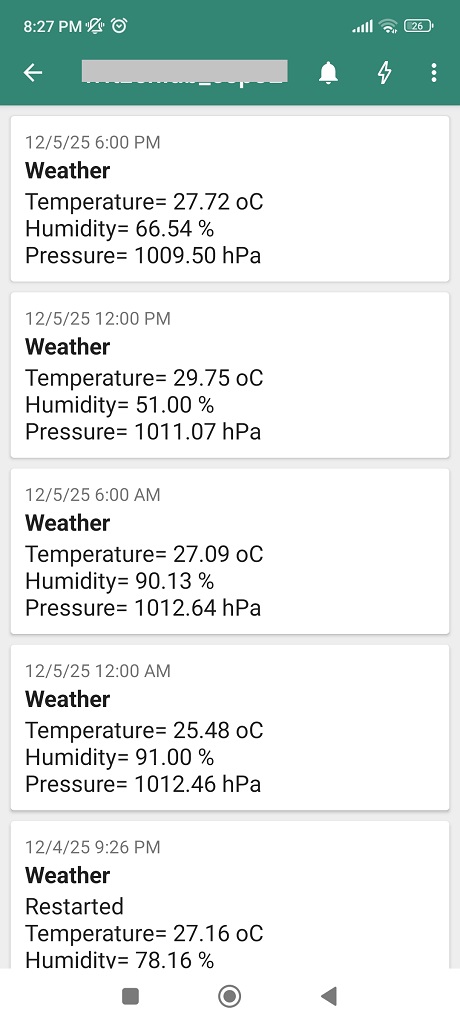
Image above is from my own weather station, where I get temperature, humidity and atmospheric pressure every six hours, sharp. Your creativity is the limit here, you could concatenate virtually any string. It could contain sensor values, calculations, etc.
As mentioned before, all notifications will remain stored, in order of appearance. P.S: you can test generating and receiving your notifications even without the ESP32. For that, just use curl:
$ curl -d "test" ntfy.sh/nameofyourtopicRunning the code presented in the beginning of this article (and in this Github) will result in notifications like in the image below. Notice that they happen exactly within 360 seconds (six minutes) from each other.
One thing worth mentioning is that NTFY.sh has paid plans which are more customizable and secure. You could even use it inside your professional ESP32 projects if you like. That is all for now, see you guys in the next articles.