We will implement a service to configure ESP32 sending messages to Whatsapp. If you are from anywhere except the USA, chances are you use Whatsapp daily as your main communication app. Wouldn’t that be cool if you could make your ESP32 microcontroller send messages to your Whatsapp?.
That is now possible using the Arduino IDE and a service called CallMeBot, which is free for personal use. It has (according to my internet search) a limit of 50 messages every four hours (240 minutes), more than OK to play with. The idea is to collect some data using your ESP32, maybe connected to a sensor or something like that. Then send it via Wi-Fi to your Whatsapp in your cellphone, wherever your are.
I based my research for this topic on this article from RandomNerdTutorials. I had to make a couple of changes to the code they provide, since the “as-is” one was not doing it. So stick to my text and code instead of going for theirs, as theirs will not work anymore (as of August 2025).
Schematic diagram
As stated above, you can send virtually any piece of information via Wi-Fi to your Whatsapp. I have decided to read an LDR (light dependent resistor) using analog input A0. Said LDR is in series with a 10k Ohm resistor, while the A0 measuring point is in the middle of it (in between the LDR and resistor).
The specific ESP32 I am using is the Xiao ESP32-C6 from SeeedStudio, for whom I made a special circuit board. It allows the board to be connected to any breadboard, occupying a single point of 15 rows. That leaves the other 4 points in each row free. More information about this setup can be obtained here.
You can see below the schematic diagram for our test. As stated I use a 10k Ohm resistor to make a divider with the LDR, allowing a voltage to “swing by” when light levels change. Since we are supplying the set with 3V3, voltage at the analog input A0 will never go over said 3V3.
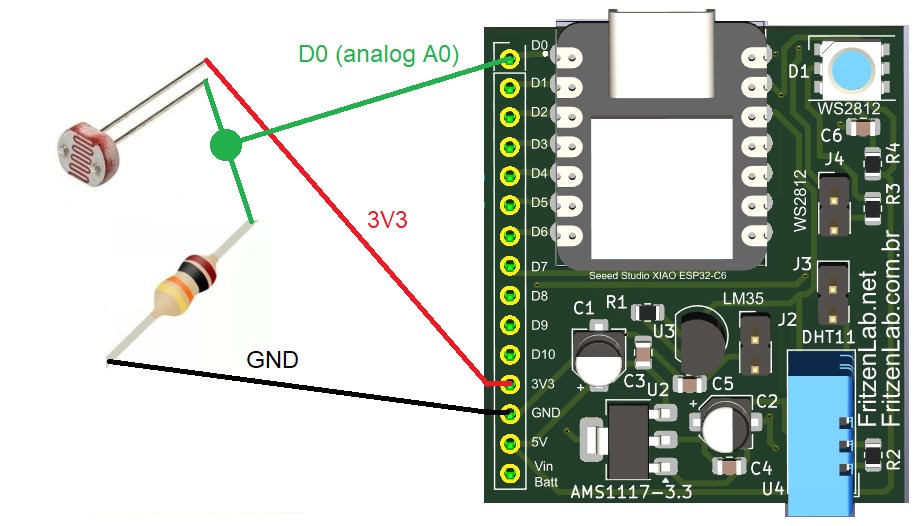
Just for your reference, you could use a ESP8266 in this experiment as well. You would just have to change the resistor divider to allow for up to 1V analog input (so not 3V3).
Firmware/code
This specific Xiao ESP32-C6 presents analog values in a different format. Instead of 0-1023 or 0-4096 it will bring us information in mV (milivolts). So our range of response from the analog to digital converter will be 0-3300 (mV) (0-3,3V). In our code we basically do
LDR= analogRead(D0);then send said value over Wi-Fi to CallMeBot. Of course here is the whole magic of this implementation. Instead of the “LDR” variable we can put virtually any information there. Even multiple variables, just do “+” sign in between variables or strings and you are good to go. You can see full code below, and also in my Github:
#include <WiFi.h>
#include <HTTPClient.h>
#include <UrlEncode.h>

const char* ssid = "";
const char* password = "";

long messageTime= 0;
float LDR= 0;

// +international_country_code + phone number
// Portugal +351, example: 351912345678
// Brazil +55, example: 551191234567 (skip the first 9 in front of the number)
String phoneNumber = "";
String apiKey = "";

void sendMessage(String message) {
  String url = "https://api.callmebot.com/whatsapp.php?phone=" + phoneNumber +
               "&text=" + urlEncode(message) +
               "&apikey=" + apiKey;

  HTTPClient http;
  http.begin(url);

  // Send HTTP GET request
  int httpResponseCode = http.GET();

  if (httpResponseCode == 200) {
    Serial.println("Message sent successfully");
  } else {
    Serial.println("Error sending the message");
    Serial.print("HTTP response code: ");
    Serial.println(httpResponseCode);
  }

  http.end();
}


void setup() {
  Serial.begin(115200);
  analogReadResolution(12);
  WiFi.begin(ssid, password);
  Serial.println("Connecting");
  while(WiFi.status() != WL_CONNECTED) {
    delay(500);
    Serial.print(".");
  }
  Serial.println("");
  Serial.print("Connected to WiFi network with IP Address: ");
  Serial.println(WiFi.localIP());

  // Send Message to WhatsAPP
  sendMessageFunction();
}

void loop() {


  if(millis() - messageTime > 600000){
    messageTime= millis();
    sendMessageFunction();
  }

}
void sendMessageFunction(void){
  LDR= analogRead(D0);
  sendMessage("Light level= " + String(LDR));
}
This part of the code:
if(millis() - messageTime > 600000){Makes sure that the “sendMessageFunction()” is only triggered every 600k miliseconds, or 10 minutes. I made that in order not to “stress” the CallMeBot service. You never know when you are going to be kicked out for overusing it. Our “sendMessage()” function handles all the heavy stuff, including https, etc.
Also as an (important) note, you have to allow CallMeBot to send you messages via Whatsapp. To do just that you can follow instructions in this link.
Important details
Code above does not show my personal information for SSID and password (Wi-Fi), phone number and API key. These are all pieces of information that are yours and yours only. Please be careful with entering you phone number in the code, since things like the “+” sign will not go into it. Also depending on your country’s telephone infrastructure, the way you enter the number may vary.
One important test you can do is type the full URL into your web browser and check if you receive the Whatsapp message. Something on the lines of:
http://api.callmebot.com/whatsapp.php?phone=551191234567&text=Hello%20from%20ESP32%21&apikey=YourAPIkeyI was facing issues trying to make my ESP32-C6 send me messages at first. Then I did what I show above and was sure that the problem was not on my URL. Typing the correct URL in your web browser and getting the WhatsApp messages is a crucial step into our project. Also as stated above the source where I got this code from (RandomNerdTutorials) presents a URL that does not work anymore (as of 08/2025), so be careful with that as well.
Results and final thoughts
I implemented this project a bit different, actually reading an i2c sensor. That is for temperature and humidity information. Instead of getting readings every 10 minutes, I programmed mine to send me stuff every 6 hours. Result can be seen below, information being received by my personal Whatsapp every 6 hours.
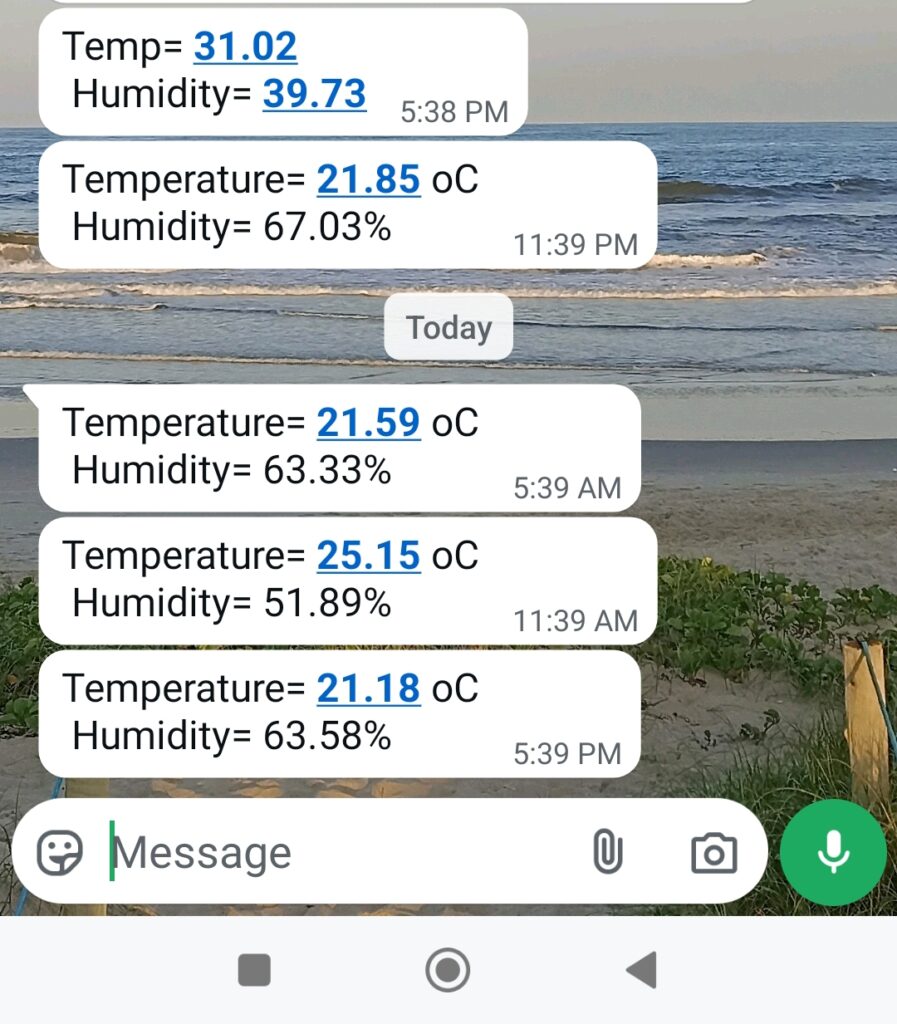
As stated above, you can mix strings (text) and variables (converted to strings) adding a “+” sign after every instance. If you know Arduino the sky is the limit for you, since all the “Whatsapp” thing is wrapped into a function. If you want to know more projects using Wi-Fi and ioT, check this one out. It is an ESP32 sending information to a MQTT server for you to consume.


Pingback: ESP32 sensors to Telegram - FritzenLab electronics
Pingback: Cellphone notifications with ESP32 - FritzenLab electronics