Let’s study and implement a GPS tracking with ESP32-C6, using Arduino code (Arduino IDE) and a softSerial port. But first, what is a GPS? It stands for Global Positioning System, comprised of a number of satellites (around 50). Your device (here on earth) triangulates with such satellites to obtain your position with a precision of centimeters.
GPS’s are everywhere, from our cars (for finding our way around) to drones to ships and airplanes. Various technologies exist, including Chinese and Russian; we are focusing on GPS since it is what is more widely available. Also of course Arduino code and hardware is more readly found for GPS than for other technologies.
Hardware
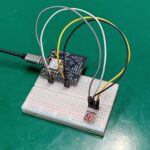
We are going to be using UBLOX’s NEO-6M for our prototype today, whose datasheet is here. It is a small and powerful GPS module, running at 3.3V and communicating via UART (serial) to any microcontroller.
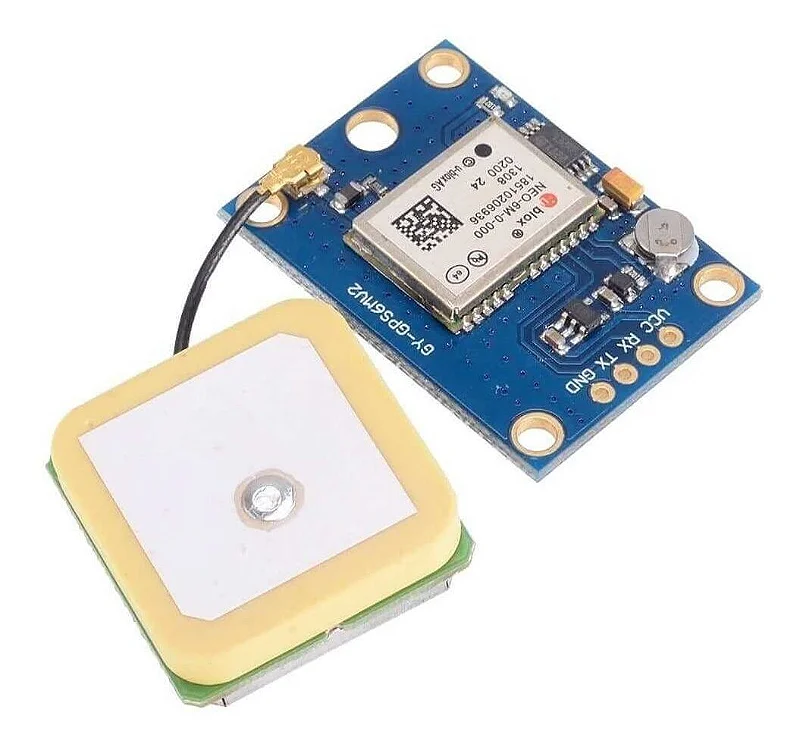
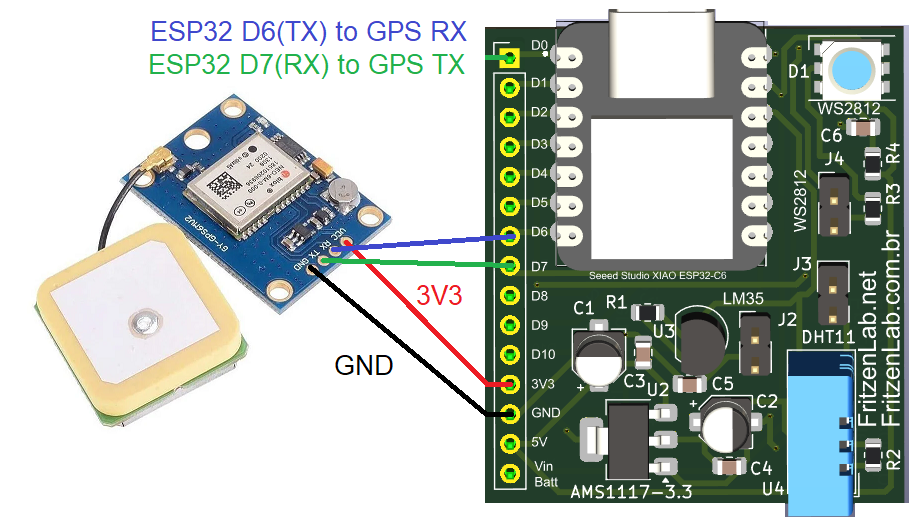
It features a FL connector for an external antenna, pictured above. It also has an external battery for time keeping, soldered to the circuit board. Connection diagram with our Xiao ESP32-C6 are below, notice that all you need are four wires: +3V3, GND, TX and RX.
Basic firmware
We are doing two tests here today, the first will be with an Arduino firmware that tests the basic off of the NEO-3M. This means that the information in the Arduino IDE serial monitor will be a bunch of numbers and letters, mostly unrecognizable by us (untrained) humans.
Code is below and was taken from this source, my friends at RandomNerdTutorials. It uses the primary serial port of my Xiao ESP32-C6, serial 0 on pins D6 and D7.
/*********
Rui Santos & Sara Santos - Random Nerd Tutorials
Complete instructions at https://RandomNerdTutorials.com/esp32-neo-6m-gps-module-arduino/
Permission is hereby granted, free of charge, to any person obtaining a copy of this software and associated documentation files.
The above copyright notice and this permission notice shall be included in all copies or substantial portions of the Software.
*********/
// Define the RX and TX pins for Serial 2
#define RXD2 D7
#define TXD2 D6
#define GPS_BAUD 9600
// Create an instance of the HardwareSerial class for Serial 2
HardwareSerial gpsSerial(0);
void setup(){
// Serial Monitor
Serial.begin(115200);
// Start Serial 2 with the defined RX and TX pins and a baud rate of 9600
gpsSerial.begin(GPS_BAUD, SERIAL_8N1, RXD2, TXD2);
Serial.println("Serial 2 started at 9600 baud rate");
}
void loop(){
while (gpsSerial.available() > 0){
// get the byte data from the GPS
char gpsData = gpsSerial.read();
Serial.print(gpsData);
}
delay(1000);
Serial.println("-------------------------------");
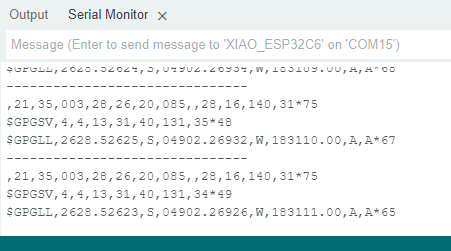
}Uploading the code above to the ESP32-C6 and opening the Arduino IDE’s serial monitor (and allowing some time to the GPS to fix position), you are going to see something like this:
A more “polished” solution
That above is not exactly what we want, right? we want to see actual coordinates, GPS position. For that we are going to have to use a library, called “TinyGPS”. Install that in your Arduino IDE by going: “Sketch > Include library > Manage libraries” and typing “TinyGPS”; install the one from Mikal Hart.
Complete code is below, and it is also found under the Arduno IDE examples, in “File > Examples > TinyGPS > Simple_test”. Such code will provide us with latitude and longitude data, besides number os satellites and number of errors.
#include <SoftwareSerial.h>

#include <TinyGPS.h>

/* This sample code demonstrates the normal use of a TinyGPS object.
   It requires the use of SoftwareSerial, and assumes that you have a
   9600-baud serial GPS device hooked up on pins 4(rx) and 3(tx).
*/

TinyGPS gps;
SoftwareSerial ss(D7, D6); // RX, TX

void setup()
{
  Serial.begin(115200);
  ss.begin(9600);

  Serial.print("Simple TinyGPS library v. "); Serial.println(TinyGPS::library_version());
  Serial.println("by Mikal Hart");
  Serial.println();
}

void loop()
{
  bool newData = false;
  unsigned long chars;
  unsigned short sentences, failed;

  // For one second we parse GPS data and report some key values
  for (unsigned long start = millis(); millis() - start < 1000;)
  {
    while (ss.available())
    {
      char c = ss.read();
      // Serial.write(c); // uncomment this line if you want to see the GPS data flowing
      if (gps.encode(c)) // Did a new valid sentence come in?
        newData = true;
    }
  }

  if (newData)
  {
    float flat, flon;
    unsigned long age;
    gps.f_get_position(&flat, &flon, &age);
    Serial.print("LAT=");
    Serial.print(flat == TinyGPS::GPS_INVALID_F_ANGLE ? 0.0 : flat, 6);
    Serial.print(" LON=");
    Serial.print(flon == TinyGPS::GPS_INVALID_F_ANGLE ? 0.0 : flon, 6);
    Serial.print(" SAT=");
    Serial.print(gps.satellites() == TinyGPS::GPS_INVALID_SATELLITES ? 0 : gps.satellites());
    Serial.print(" PREC=");
    Serial.print(gps.hdop() == TinyGPS::GPS_INVALID_HDOP ? 0 : gps.hdop());
  }

  gps.stats(&chars, &sentences, &failed);
  Serial.print(" CHARS=");
  Serial.print(chars);
  Serial.print(" SENTENCES=");
  Serial.print(sentences);
  Serial.print(" CSUM ERR=");
  Serial.println(failed);
  if (chars == 0)
    Serial.println("** No characters received from GPS: check wiring **");
}
Uploading this code to your ESP32 and opening the Arduino IDE’s serial monitor, you will see something like this:
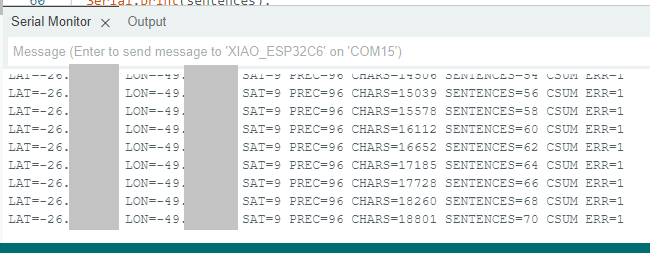
My coordinates are close to Lat=-26 Lon=-49, number of satellites at the moment is 9 and one error has happened.
Closing thoughts
A GPS is a powerful and precise sensor, taking advantage of many satellites in the sky in real time. There are many applications that can take advange of such device, as for example drones, delivery vehicles, terrain mapping and many others.
If you want to buy the sensor used in this tutorial, please refer to my affiliate link.


Leave a Reply