Have you seen a binary clock with ESP32? I will show you how to implement a clock that fetches data from the internet (via API), showing hour and minutes in binary format.
I like the binary format very much, it is light and simple to grasp, besides being very visual. Then I decided to implement a clock (hours and minutes) with a twist: the “display” will be 11 LEDs. Six for minutes (because it allows for 64 combinations) and five for hours (because it allows for 32 combinations).
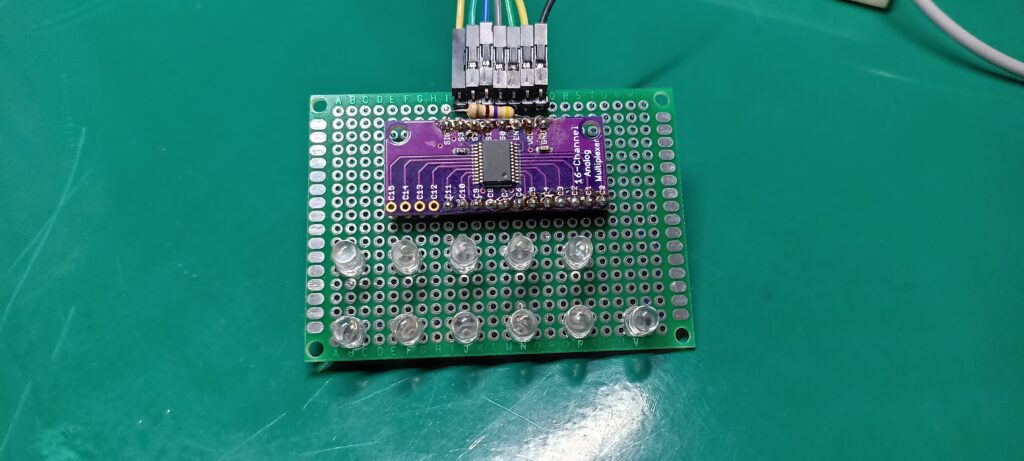
Observe there are eleven LEDs, five in the first row and six in the second row. The first five are for the hour, while the last six are for minutes. There is a purple board soldered to it, which is the 74HC4067 integrated circuit. It is an analog multiplexer/demultiplexer, which I am using as demultiplexer. It allows for only four pins to control all eleven LEDs.
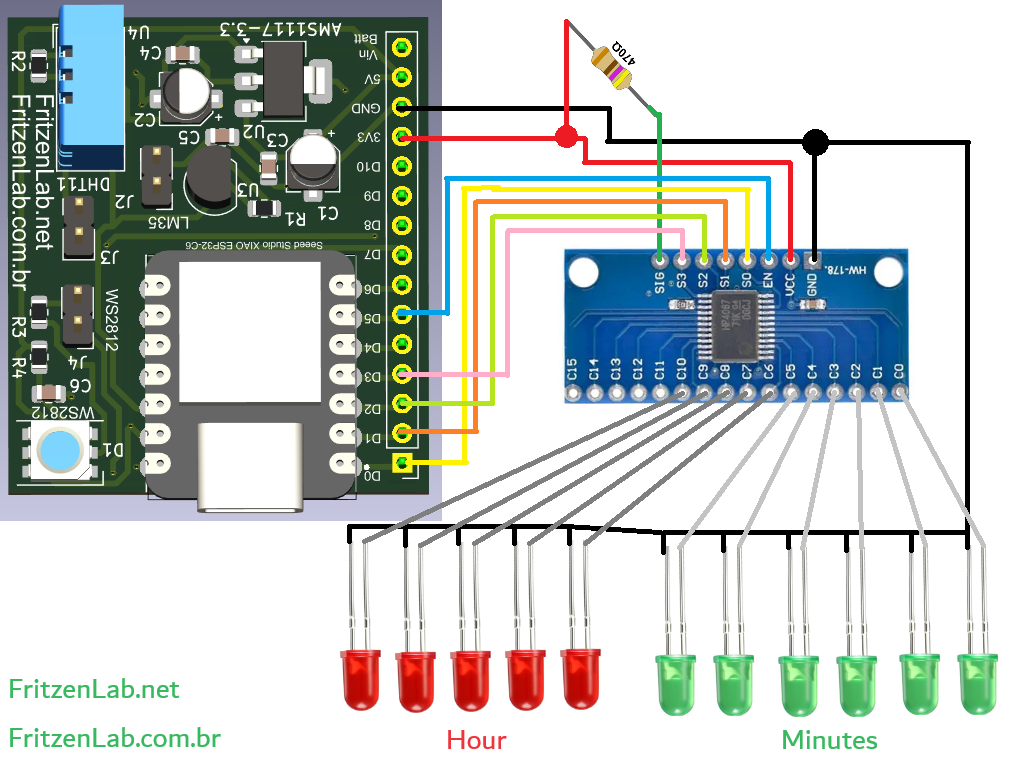
A single 470 Ohm resistor is connected to the SIG input of the 74HC4067, serves as the current limiter for all LEDs. This is since only one LED is on at a time, anytime.
Schematic diagram
This is basically a digital circuit, no analog parts. Five digital pins of the ESP32-C6 control the 74HC4067 chip, allowing for the “impression” that more than one LED is on at a time. The entire circuit is supplied by the USB cable connected to the ESP32-C6, converted into 3.3V for the 74HC4067 and LEDs.
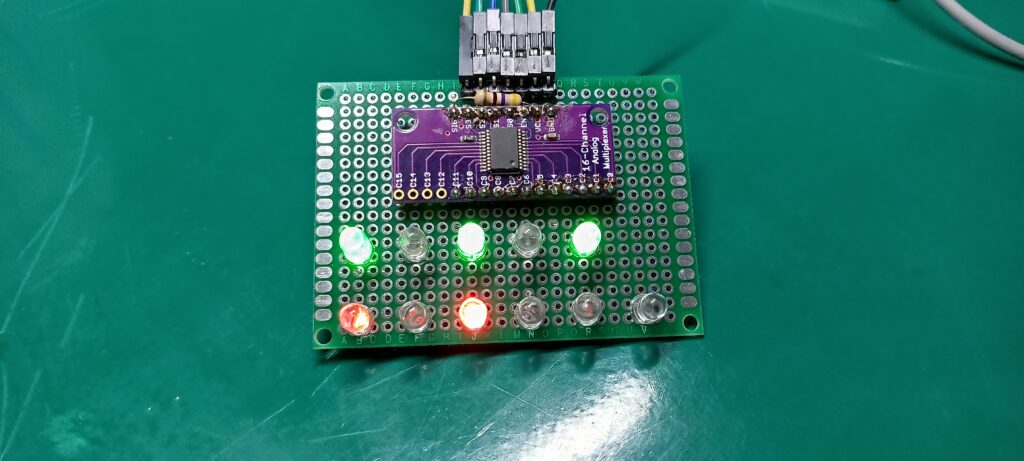
I assembled it into a perfboard, seen below. Notice that not all LEDs that are lit are “fully” lit. This is due to the fact that they are being “dimmerized”, since only one is really on at a time. It happens really fast so that you don’t notice it.
Coding
First thing you have to do is create an account (free) in the TimeZoneDB website. This is where we are going to retrieve time from. I could have used really any service that offers an API, but found this one on a Google search and liked it. There is also the possibility of using a RTC (real time clock) module like the DS1307, same effect. But this is not what we are doing today.
We are reaching for the TimeZoneDB website every two seconds to ask for hours and minutes. This is why you are going to see (in the video below) the LEDs blinking, it is the time it takes for the retrieving function to run.
#define bit0 D0
#define bit1 D1
#define bit2 D2
#define bit3 D3
#define enable D4


#include <WiFi.h>
#include <HTTPClient.h>
#include <ArduinoJson.h>

// Your WiFi credentials go here
const char* ssid = "";
const char* password = "";

String payload;
HTTPClient http;

int hour= 0;
int minute= 0;
long oldtime= 0;

String rawtime;
String hourstring;
String minutestring;

void setup() {
  // put your setup code here, to run once:
  pinMode(bit0, OUTPUT);
  pinMode(bit1, OUTPUT);
  pinMode(bit2, OUTPUT);
  pinMode(bit3, OUTPUT);
  pinMode(enable, OUTPUT);

  Serial.begin(115200);

  WiFi.disconnect();
  WiFi.mode(WIFI_STA);
  Serial.println("[SETUP] Trying WiFi connection...");
  WiFi.begin(ssid, password);
  if(WiFi.waitForConnectResult() == WL_CONNECTED)

  {
    Serial.println("[SETUP] WiFi connected!");
  }else
  {
    Serial.println("[SETUP] Restarting ESP");
    ESP.restart();
  }

  http.begin("https://api.timezonedb.com/v2.1/get-time-zone?key=YOUR_KEY&format=json&by=zone&zone=America/Recife");
}

void loop() {
  // put your main code here, to run repeatedly:
  if(millis() - oldtime > 2000){

    // Disable the LED outputs while WiFi is being handled, to avoid flickering
    digitalWrite(enable, HIGH);

    oldtime = millis();

    //Serial.println("[HTTP] GET...");
    int httpCode = http.GET();

    if (httpCode == HTTP_CODE_OK)

    {
      //Serial.println("[HTTP] GET... OK! Resposta: ");

      payload = http.getString();
      //Serial.println(payload);
    } else // se não, ...
    {
      //Serial.print("HTTP GET... Error message: ");
      //Serial.println(http.errorToString(httpCode).c_str());
    }

    http.end();

    JsonDocument remotedata;

    DeserializationError error = deserializeJson(remotedata, (char*) payload.c_str());

    // For this I got help from the official assistant: https://arduinojson.org/v7/assistant/#/step1


    rawtime= String(zones_0_zoneFormatted);

    hour= rawtime.substring(11,13).toInt();
    minute= rawtime.substring(14,16).toInt();

    // Re-enable the LED outputs
    digitalWrite(enable, LOW);
  }

  // The two FOR loops below are responsible for updating the 11 LEDs
  for(int i=0; i < 5; i++){
    //eraseoutputs();
    if(bitRead((hour+32), i) == 1){

      turnledon(i+6);
      //Serial.print("hour ");
      //Serial.println(i+6);
    }
    delay(1);
  }
  for(int j=0; j < 6; j++){
    //eraseoutputs();
    if(bitRead(minute, j) == 1){

      turnledon(j);
      //Serial.print("minute ");
      //Serial.println(j);
    }
    delay(1);
  }
}

// Turn all LEDs off if necessary
void eraseoutputs(){
  digitalWrite(bit0, HIGH);
  digitalWrite(bit1, HIGH);
  digitalWrite(bit2, HIGH);
  digitalWrite(bit3, HIGH);
  //digitalWrite(bit4, HIGH);

}

// Turn on the right LEDs
int turnledon(int selection){
  digitalWrite(bit0, bitRead(selection, 0));
  digitalWrite(bit1, bitRead(selection, 1));
  digitalWrite(bit2, bitRead(selection, 2));
  digitalWrite(bit3, bitRead(selection, 3));

  return 0;
}
TimeZoneDB’s website offers us a JSON file, reason why I am using the ArduinoJSON library. It is a very convenient way of receiving and parsing any data of this kind.
A couple of things in the code above:
- You have to provide your WiFi’s SSID and password
- TimeZoneDB URL will be personalized for you, with your key and location (get it in their website). The way it is in the code example above will not work, missing your key.
I have created a function called turnledon(), unsurprinsingly to turn ON a LED (actually all LEDs, in sequence). Since the 74HC4067 is only capable of having one output ON at a time, the FOR loop serves to maintain the impression of many LEDs ON.
End result
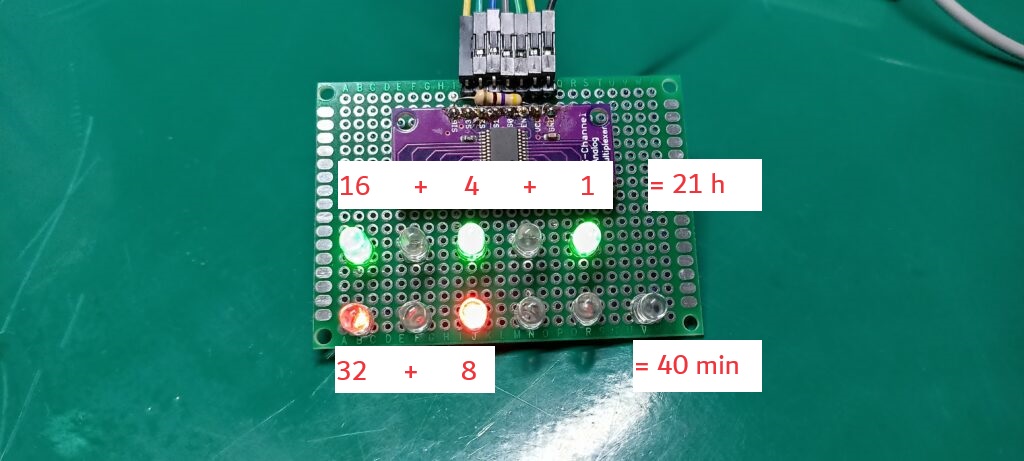
Look at the picture below, it is showing 21h 40min in binary. You are going to notice in the video that the LEDs blink every two seconds. This is due to the WiFi function being called and executed, there is nothing we can do about it.

I hope you liked this project, a neat little one for a science fair for example. If you want to know more about my ESP32-C6 dev board used in this experiment, click here.


Leave a Reply