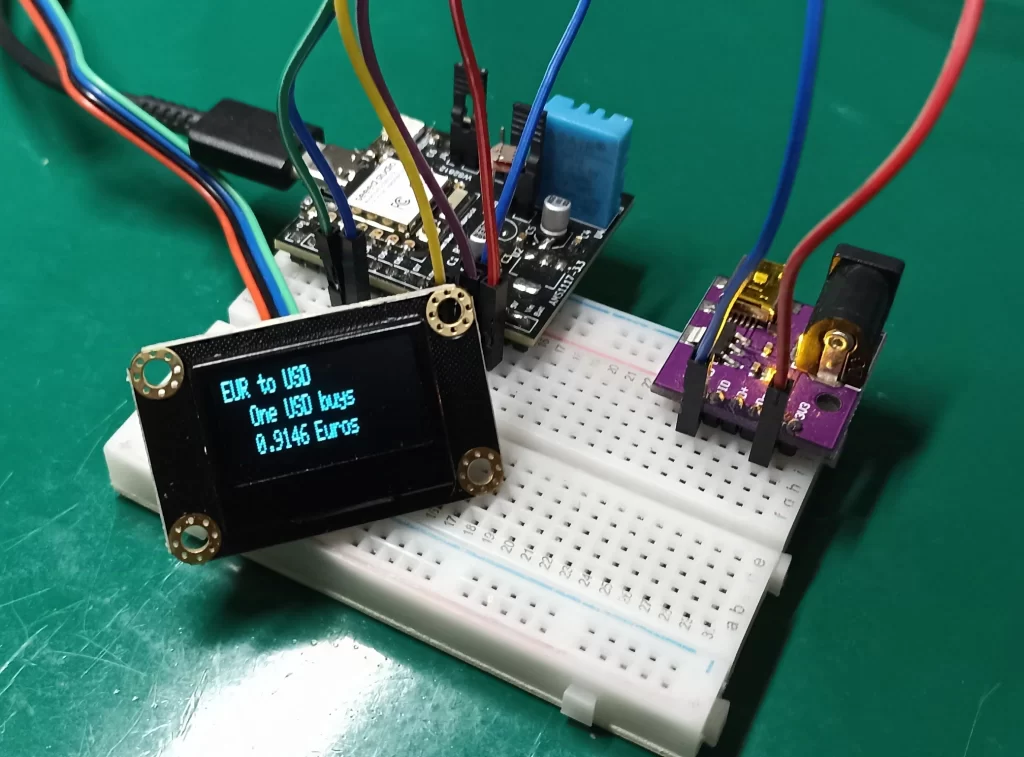
We will implement a currency converter display with ESP32, an i2c OLED display and the ArduinoJSON 7 library. The idea is to use one of many API currency conversion/equivalence available and fetch such data every now and then. After parsing such data with the ArduinoJSON library we will show the converted value in an i2c OLED display.
I have decided to fetch currency data from this Brazilian API https://docs.awesomeapi.com.br/api-de-moedas , but you can use any service you want, really. It just have to supply you with a JSON. You could also use this one http://freecurrencyapi.com but it will return a bunch of conversions (to a bunch of currencies) every time.
I have also gone after other API options, but all I found were either paid or changed keys every month or allowed like 100 requisitions every month. So the one I end up using (AwesomeAPI) is just perfect.
The only thing I had to work my way around (took me a while) is that the data comes with brackets “[” and “]”. Apparently the ArduinoJSON library does not like brackets, so I had to implement a function to remove them.
Despite being in Brazil I decided to implement a USD dollar to EUR Euro conversion prototype, to catch a broader international audience. In order not to abuse the service I implemented a 30 seconds delay between requests. The display used is an OLED 128×64 from DFRobot, whose review I made here.
Schematic diagram
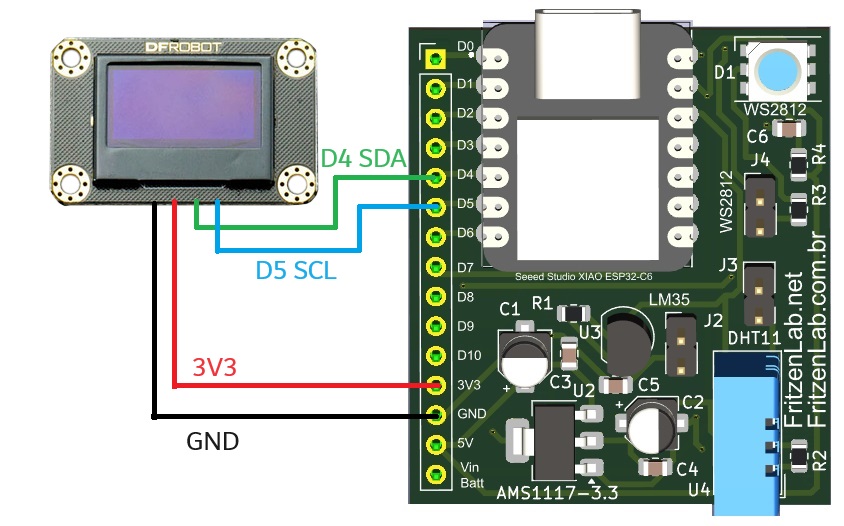
Schematic diagram for this build is very simple, just connect SDA, SCL, 3V3 and GND to the ESP32-C6 development board. A little note: I am using my own dev board with the ESP32-C6, but you could use any ESP32 or ESP8266 that you like, code and connections (i2c) don’t change.
The breadboard assembly is below, a bit messy due to the length of the jumper wires. The purple board on the right is just a USB to 3V3 converter, not using right now. Also you can see a LDR and a DHT11 sensor, both not used in here.

Code and testing
As stated before, what I want to achied is to show a currency conversion live on screen, in this case from US Dollar to Euro. In order not to abuse the API I will be fetching data every 30 seconds (might increase this interval in the future).
You have seen me testing this DFRobot OLED display here, it uses Adafruit’s SSD1306 library. Accessing the AwesomeAPI’s url returns us a JSON, so I will be using the “official” ArduinoJSON7 library to parse it. Our code was loosely based (but not copied) in this article from Eletrogate.
Code is available in my Github and also below. A couple of things to take note:
- Update the code with your WiFi credentials
- This URL is for USD to EUR conversion, please go to their website for more
http.begin("https://economia.awesomeapi.com.br/json/USD-EUR/1");- This is where the JSON is read from the API
payload = http.getString();- This is where the data (JSON) is deserialized to be read as a variable
DeserializationError error = deserializeJson(remotedata, (char*) payload.c_str()); // Here the JSON is deserialized- Since AwesomeAPI’s JSON comes with brackets (“[” and “]”) we have to manually remove them before reading the String
payload.replace("[", "");
payload.replace("]", "");
The line below is where we ask the value of the “bid” field in “remotedata” and store in “conversion”:
float conversion= remotedata["bid"]; // We want to read the "bid" price within the string receivedAnd finally show “conversion” on the OLED with four decimal places:
display.println(conversion, 4); // Showing converted value on screenThe complete code is below, enjoy.
#include <WiFi.h>
#include <HTTPClient.h>
#include <ArduinoJson.h>

// WiFi credentials
const char* ssid = "";
const char* password = "";

String payload;

HTTPClient http; // HTTPClient's object

#include <SPI.h>
#include <Wire.h>
#include <Adafruit_GFX.h>
#include <Adafruit_SSD1306.h>

#define OLED_RESET -1
Adafruit_SSD1306 display(OLED_RESET);

#define LOGO16_GLCD_HEIGHT 64
#define LOGO16_GLCD_WIDTH  128

long currenttime;
long oldtime;

void setup() {

  Serial.begin(115200);
  Serial.println();
  delay(1000);

  display.begin(SSD1306_SWITCHCAPVCC, 0x3C);
  display.display();
  delay(2000);
  // Clear the buffer.
  display.clearDisplay();

  WiFi.disconnect(); // First disconnects from WiFi to then connect properly
  WiFi.mode(WIFI_STA); // Station mode
  Serial.println("[SETUP] Trying WiFi connection...");
  WiFi.begin(ssid, password); // Use credentials to connect
  if (WiFi.waitForConnectResult() == WL_CONNECTED) //

  {
    Serial.println("[SETUP] Connected successfully!");
  } else
  {
    Serial.println("[SETUP] Connection failed, restarting ESP32");
    ESP.restart();
  }

  http.begin("https://economia.awesomeapi.com.br/json/USD-EUR/1"); // The URL to fetch currency conversion from

}

void loop() {

  currenttime= millis();
  if(currenttime - oldtime > 30000){  // enters the code only every 30000 ms (30 seconds)
    oldtime= millis();

    Serial.println("[HTTP] GET...");
    int httpCode = http.GET();

    Serial.print("[HTTP] GET... code: ");
    Serial.println(httpCode);
    if (httpCode == HTTP_CODE_OK)

    {
      Serial.println("[HTTP] GET... OK! Answer: ");

      payload = http.getString(); // This is where the magic happens, "payload" receives the newly fetched JSON here
      Serial.println(payload);
    } else
    {
      Serial.print("HTTP GET... Error message: ");
      Serial.println(http.errorToString(httpCode).c_str());
    }

    http.end();// Close HTPP requisition


    JsonDocument remotedata;


    // This is also part of the magic. Since AwesomeAPI's JSON comes to us with brackets ("[" and "]")
    // we have to remove both so that ArduinoJSON can read it
    payload.replace("[", "");
    payload.replace("]", "");

    DeserializationError error = deserializeJson(remotedata, (char*) payload.c_str()); // Here the JSON is deserialized


    float conversion= remotedata["bid"]; // We want to read the "bid" price within the string received
    Serial.println(conversion, 4);

    display.clearDisplay();
    display.setTextSize(1);
    display.setTextColor(WHITE);
    display.setCursor(0,0);
    display.println("EUR to USD");
    display.setCursor(15,10);
    display.println("One USD buys ");
    display.setCursor(15,20);
    display.println(conversion, 4); // Showing converted value on screen
    display.setCursor(50,20);
    display.println(" Euros");
    display.display();
  }

}
Edit: fetching data from FreecurrencyAPI
Besided Awesome API, I was able to make the same thing using FreecurrencyAPI. You have to register in their website and get an API key, put it in the fetching URL (which is shown below):
https://api.freecurrencyapi.com/v1/latest?apikey=YourAPIkeySince their JSON has a bit “more” to it than what ArduinoJSON is expecting (see below), you have to do a workaround in order for it to work. This is an example of their JSON:
{"data":{"AUD":1.4812302414,"BGN":1.7857002284,"BRL":5.6023007216,"CAD":1.3760501974,"CHF":0.8568100864,"CNY":7.06607111,"CZK":23.1031928798,"DKK":6.8207610011,"EUR":0.913750181,"GBP":0.7652001405,"HKD":7.7681411973,"HRK":6.4777808725,"HUF":366.5991296416,"IDR":15560.395268402,"ILS":3.7586104659,"INR":84.0984135739,"ISK":136.2421360606,"JPY":149.12577678,"KRW":1346.7958727075,"MXN":19.2684727479,"MYR":4.2857108042,"NOK":10.693421149,"NZD":1.636070264,"PHP":57.2133870147,"PLN":3.9219305098,"RON":4.545630534,"RUB":95.8006011973,"SEK":10.3671417216,"SGD":1.3037801975,"THB":33.1420633372,"TRY":34.2741747093,"USD":1,"ZAR":17.3821821208}}Notice the {“data”: that should not be there. Also the double }} in the end, that should be a single }. What you have to do is use the replace() function from the JSON library:
payload.replace(":{", ":1.00,");
payload.replace("}}", "}");
Then also change the desired search string to the currency you want. In my case I want to show BRL (Brazilian Real) in the screen):
double conversion= remotedata["BRL"];Results
I made a video to show you how the entire process works, hope you like and understand what is being said. If not, please comment below.


Leave a Reply