Unlocking the Power of MQTT: I will show you how to use the MQTT protocol with ESP32 and Adafruit.io, receiving data right in your hands via cellphone. The idea is to use an ESP32 and HTU21D sensor to sense temperature and humidity. Then send such data via WiFi/MQTT to the Adafruit servers. Finally reading this data in an Android app, MQTT Dash.
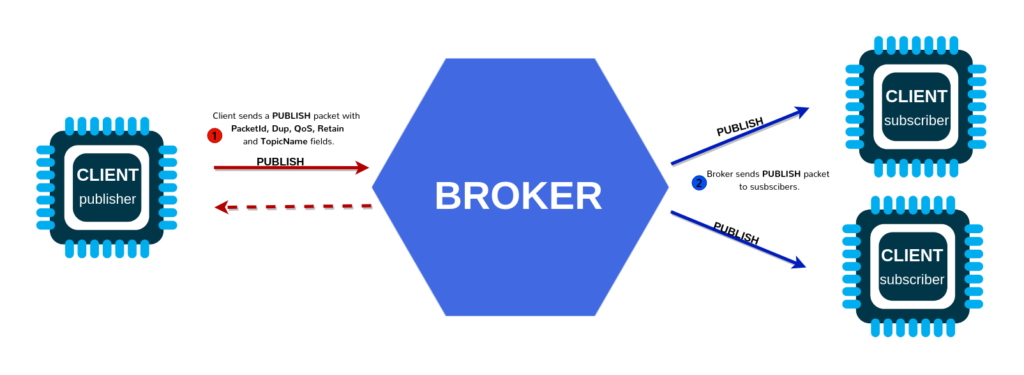
MQTT stands for “Message Queuing Telemetry Transport”, a lightweight protocol used mainly for ioT these days. It is capable of relaying a decent (but low) amount of data per second. It works based on the publish-subscribe structure, where some data is initially published to a topic.
This topic is stored in a server somewhere (could be your own computer or a Raspberry Pi). Then any device or service capable of handling MQTT can subscribe to such topic and receive its data.
Hardware
Talking about devices, we will be using an ESP32-C6 in this tutorial. One that I made myself, based around the SeeedStudio Xiao ESP32-C6. It is more than capable of handling MQTT over WiFi and the HTU21D sensor.
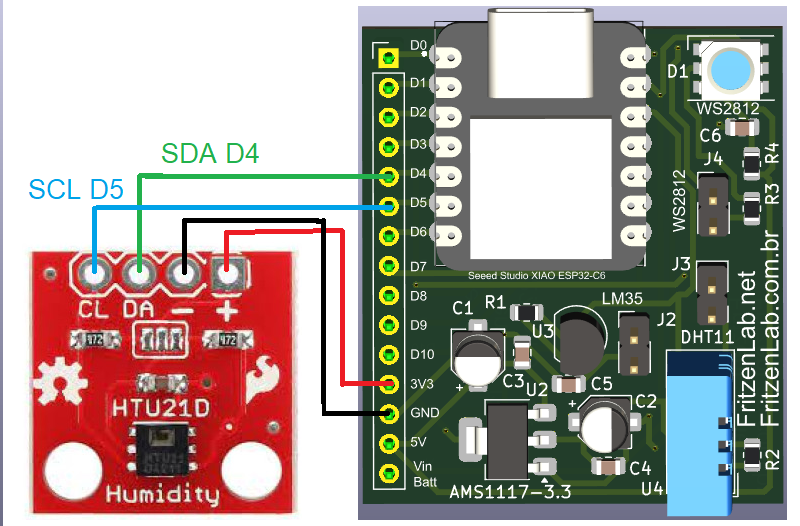
The use case will be this WiFi/USB thermometer project I recently made, schematic diagram above. There is really not much to it, a i2c connection (SDA and SCL pins), 3.3V and GND.
Necessary Arduino IDE libraries
HTU21D is a temperature and humidity sensor whose code and details are here. It will be used as a way of generating some data for us to send over MQTT. The Arduino code library for it can be download straight from the Arduino IDE, doing “Sketch > Include library > Manage libraries” and typing “HTU21D”. Download the Adafruit one.
We also need to download and install the Adafruit MQTT library, doing “Sketch > Include library > Manage libraries” and typing “Adafruit MQTT”. Download the Adafruit one. The example code I based my code on is the “Adafruitio_secure_esp32”, available from “File > Examples > Adafruit MQTT library > Adafruitio_secure_esp32”.
io.Adafruit.com account
Go to https://io.adafruit.com/ and register an account, it is free. Once inside the website, there is a round yellow key button at the top right corner (API Key), click that. Take note of the username and active key, you will need those later. Just don’t share those values with anyone, they secure your account.
Adafruit’s MQTT system has the concept of “feeds” (it is a menu item on the website), which are where you receive every piece of information from the field. Every sensor value is a new feed. You don’t need to create feeds right now, when the Arduino code pushes the first data it will be created for you.
Arduino code
Arduino code for MQTT is a bit long, but not really complicated. Functions take care of everything for us, just call them in the right moment. I will not post the entire code here, instead you can find it on my GitHub. Let’s just explore parts of it, shall we?.
The part below asks for your WiFi name and password:
#define WLAN_SSID ""
#define WLAN_PASS ""
Below you can see where those values you got from the Adafruit website go (username and AIO_KEY). Server is always io.adafruit.com, serverport is 8883 for secure MQTT.
#define AIO_SERVER      "io.adafruit.com"

// Using port 8883 for MQTTS
#define AIO_SERVERPORT  8883

// Adafruit IO Account Configuration
// (to obtain these values, visit https://io.adafruit.com and click on Active Key)
#define AIO_USERNAME ""
#define AIO_KEY      ""
The below info are for instanciating the protocol, also the Adafruit certificate. Do not modify those.
// Setup the MQTT client class by passing in the WiFi client and MQTT server and login details.
Adafruit_MQTT_Client mqtt(&client, AIO_SERVER, AIO_SERVERPORT, AIO_USERNAME, AIO_KEY);

// io.adafruit.com root CA
const char* adafruitio_root_ca = \
      "-----BEGIN CERTIFICATE-----\n"
      "MIIEjTCCA3WgAwIBAgIQDQd4KhM/xvmlcpbhMf/ReTANBgkqhkiG9w0BAQsFADBh\n"
      "MQswCQYDVQQGEwJVUzEVMBMGA1UEChMMRGlnaUNlcnQgSW5jMRkwFwYDVQQLExB3\n"
      "d3cuZGlnaWNlcnQuY29tMSAwHgYDVQQDExdEaWdpQ2VydCBHbG9iYWwgUm9vdCBH\n"
      "MjAeFw0xNzExMDIxMjIzMzdaFw0yNzExMDIxMjIzMzdaMGAxCzAJBgNVBAYTAlVT\n"
      "MRUwEwYDVQQKEwxEaWdpQ2VydCBJbmMxGTAXBgNVBAsTEHd3dy5kaWdpY2VydC5j\n"
      "b20xHzAdBgNVBAMTFkdlb1RydXN0IFRMUyBSU0EgQ0EgRzEwggEiMA0GCSqGSIb3\n"
      "DQEBAQUAA4IBDwAwggEKAoIBAQC+F+jsvikKy/65LWEx/TMkCDIuWegh1Ngwvm4Q\n"
      "yISgP7oU5d79eoySG3vOhC3w/3jEMuipoH1fBtp7m0tTpsYbAhch4XA7rfuD6whU\n"
      "gajeErLVxoiWMPkC/DnUvbgi74BJmdBiuGHQSd7LwsuXpTEGG9fYXcbTVN5SATYq\n"
      "DfbexbYxTMwVJWoVb6lrBEgM3gBBqiiAiy800xu1Nq07JdCIQkBsNpFtZbIZhsDS\n"
      "fzlGWP4wEmBQ3O67c+ZXkFr2DcrXBEtHam80Gp2SNhou2U5U7UesDL/xgLK6/0d7\n"
      "6TnEVMSUVJkZ8VeZr+IUIlvoLrtjLbqugb0T3OYXW+CQU0kBAgMBAAGjggFAMIIB\n"
      "PDAdBgNVHQ4EFgQUlE/UXYvkpOKmgP792PkA76O+AlcwHwYDVR0jBBgwFoAUTiJU\n"
      "IBiV5uNu5g/6+rkS7QYXjzkwDgYDVR0PAQH/BAQDAgGGMB0GA1UdJQQWMBQGCCsG\n"
      "AQUFBwMBBggrBgEFBQcDAjASBgNVHRMBAf8ECDAGAQH/AgEAMDQGCCsGAQUFBwEB\n"
      "BCgwJjAkBggrBgEFBQcwAYYYaHR0cDovL29jc3AuZGlnaWNlcnQuY29tMEIGA1Ud\n"
      "HwQ7MDkwN6A1oDOGMWh0dHA6Ly9jcmwzLmRpZ2ljZXJ0LmNvbS9EaWdpQ2VydEds\n"
      "b2JhbFJvb3RHMi5jcmwwPQYDVR0gBDYwNDAyBgRVHSAAMCowKAYIKwYBBQUHAgEW\n"
      "HGh0dHBzOi8vd3d3LmRpZ2ljZXJ0LmNvbS9DUFMwDQYJKoZIhvcNAQELBQADggEB\n"
      "AIIcBDqC6cWpyGUSXAjjAcYwsK4iiGF7KweG97i1RJz1kwZhRoo6orU1JtBYnjzB\n"
      "c4+/sXmnHJk3mlPyL1xuIAt9sMeC7+vreRIF5wFBC0MCN5sbHwhNN1JzKbifNeP5\n"
      "ozpZdQFmkCo+neBiKR6HqIA+LMTMCMMuv2khGGuPHmtDze4GmEGZtYLyF8EQpa5Y\n"
      "jPuV6k2Cr/N3XxFpT3hRpt/3usU/Zb9wfKPtWpoznZ4/44c1p9rzFcZYrWkj3A+7\n"
      "TNBJE0GmP2fhXhP1D/XVfIW/h0yCJGEiV9Glm/uGOa3DXHlmbAcxSyCRraG+ZBkA\n"
      "7h4SeM6Y8l/7MBRpPCz6l8Y=\n"
      "-----END CERTIFICATE-----\n";
Finally the function “void MQTT_connect() {}” at the end of the sketck handles MQTT connections and reconnections.
The cellphone app
There should be a way to receive temperature and humidity data from the HTU21D and ESP32. It is accomplished by means of one of many MQTT broker (subscriber) APPs available for (at least) Android. In your cellphone go to the Google Play store and search for an app called “MQTT Dash”.

I pick this APP for no special reason, just because it showed in a high position in my search for “MQTT”. Upon opening the APP, let’s register a new “channel”/consumer; click on the “+” sign on the top right corner.
In the screen below you should give a name to your channel (e.g “room temperature”), type the Address and port according to this Adafruit reference. It is not necessary to mark or unmark the checkboxes.
Then type your username and password also following the Adafruit guide in the link above. All other configurations are optional. Click save (the diskette at the top right).
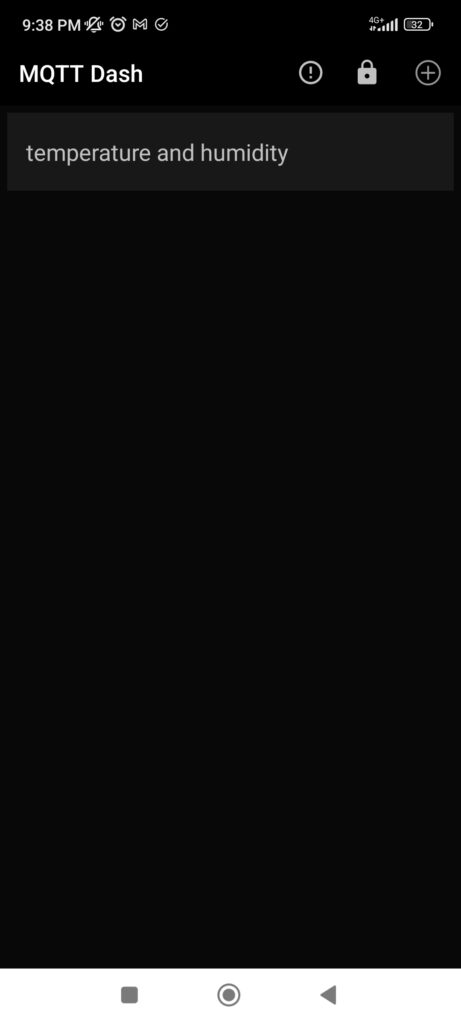
Now that you have created your channel let’s visualize it. Click in the channel name (in my case, “temperature and humidity”).
This is what you will see, all channels you have created at the Adafruit website will show up here. There is a timestamp for the last update in values received.
Keep in mind that the APP values are only updated when the actual value is received by the Adafruit server. And that has to abide to their rules, you can only send so much data so frequently in the free tier.
In my experience, having had this system running for a bunch of day I had no outages whatsoever. MQTT for the ESP32 + Adafruit band just works like charm. This is different from a previous attempt, where I connected the ESP32 to Thingspeak and the connection would not last even 24 hours without being dropped.
Power of MQTT
MQTT is a lightweight and fast communication protocol used for the internet of things (ioT). It allows for a reliable communication channel between edge devices (e.g. ESP32) and the cloud (in this case Adafruit).
Relaying data to a cellphone gets straighforward and simple with the stack I presented in this post. Do try and modify the presented sketch and see what yourself can do. Have fun!.


Pingback: Indoor weather station with MQTT, V2 - FritzenLab electronics
Pingback: ESP32 sensors to Telegram - FritzenLab electronics