Let’s dig in an create a time and temperature e-paper display using a 2.9″ and the Raspberry Pi Pico. What I want to achieve here is a e-paper display that shows time/date and temperature, updating every couple of seconds.
I will be using a 2.9″ monochromatic e-paper display from WeAct, as seen here. The controller is the (now old) Raspberry Pi Pico that I have laying around. Time will be kept by a DS1307 with a battery and temperature comes from a 10k NTC thermistor.
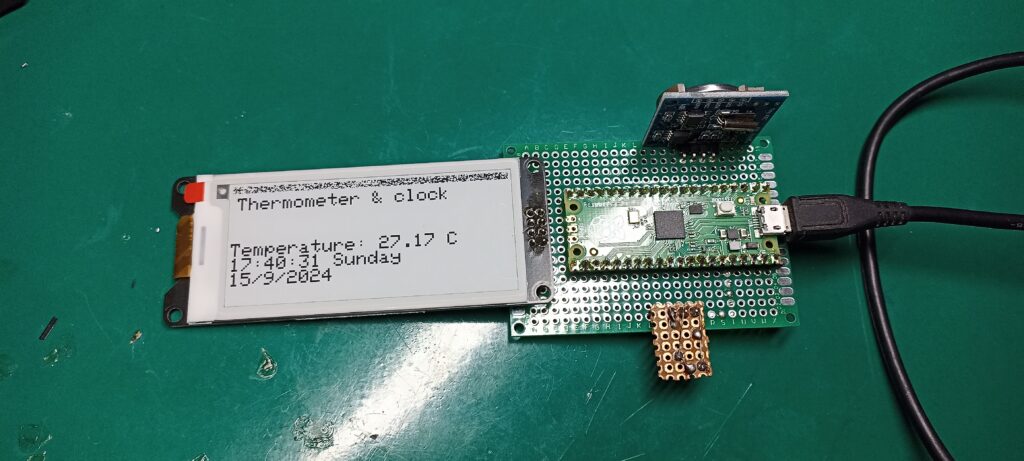
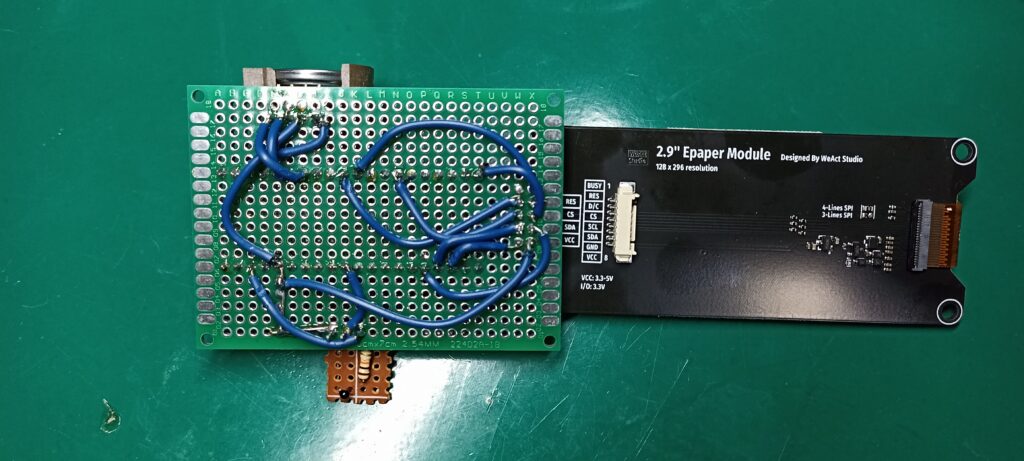
Complete prototype is seen below, I used a single perfboard for all the components. I wish I had mounted the display on top of the Pi Pico, but I did not have connectors tall enough for that.
Code
First thing you have to do is install support for the Raspberry Pi Pico on the Arduino IDE. All info necessary is here, including the link you have to paste on the Arduino configurations screen. Then you have to select the “Raspberry Pi Pico” as your board and paste the code below in the Arduino IDE.
/***************************************************
  Adafruit invests time and resources providing this open source code,
  please support Adafruit and open-source hardware by purchasing
  products from Adafruit!

  Written by Limor Fried/Ladyada for Adafruit Industries.
  MIT license, all text above must be included in any redistribution
 ****************************************************/

#include "Adafruit_EPD.h"
#include <Adafruit_GFX.h> // Core graphics library

// Source: https://www.makerhero.com/blog/termistor-ntc-arduino/
/*
 * Reading a thermistor
 */

// Thermistor analog pin
const int pinTermistor = A0;

// Thermistor parameters
const double beta = 3950.0;
const double r0 = 10000.0;
const double t0 = 273.0 + 25.0;
const double rx = r0 * exp(-beta/t0);

// circuit parameters
const double vcc = 3.3;
const double R = 9810.0;

// number of readings
const int nAmostras = 5;

#include <Wire.h>
#include "RTClib.h"
RTC_DS1307 rtc; //Objeto rtc da classe DS1307
//RTC_DS3231 rtc; //Objeto rtc da classe DS3132

char diasDaSemana[7][12] = {"Sunday", "Monday", "Tuesday", "Wednesday", "Thursday", "Friday", "Saturday"}; //Weekdays


#ifdef ARDUINO_ADAFRUIT_FEATHER_RP2040_THINKINK // detects if compiling for
                                                // Feather RP2040 ThinkInk
#define EPD_DC PIN_EPD_DC       // ThinkInk 24-pin connector DC
#define EPD_CS PIN_EPD_CS       // ThinkInk 24-pin connector CS
#define EPD_BUSY PIN_EPD_BUSY   // ThinkInk 24-pin connector Busy
#define SRAM_CS -1              // use onboard RAM
#define EPD_RESET PIN_EPD_RESET // ThinkInk 24-pin connector Reset
#define EPD_SPI &SPI1           // secondary SPI for ThinkInk
#else
#define EPD_DC 10
#define EPD_CS 15
#define EPD_BUSY 7 // can set to -1 to not use a pin (will wait a fixed delay)
#define SRAM_CS -1
#define EPD_RESET 8  // can set to -1 and share with microcontroller Reset!
#define EPD_SPI &SPI // primary SPI
#endif

/* Uncomment the following line if you are using 1.54" tricolor EPD */
// Adafruit_IL0373 display(152, 152, EPD_DC, EPD_RESET, EPD_CS, SRAM_CS,
// EPD_BUSY, EPD_SPI);

/* Uncomment the following line if you are using 1.54" monochrome EPD */
// Adafruit_SSD1608 display(200, 200, EPD_DC, EPD_RESET, EPD_CS, SRAM_CS,
// EPD_BUSY, EPD_SPI);

/* Uncomment the following line if you are using 2.13" tricolor EPD */
//Adafruit_IL0373 display(212, 104, EPD_DC, EPD_RESET, EPD_CS, SRAM_CS, EPD_BUSY,
//                        EPD_SPI);
//#define FLEXIBLE_213

/* Uncomment the following line if you are using 2.13" monochrome 250*122 EPD */
// Adafruit_SSD1675 display(250, 122, EPD_DC, EPD_RESET, EPD_CS, SRAM_CS,
// EPD_BUSY, EPD_SPI);

/* Uncomment the following line if you are using 2.7" tricolor or grayscale EPD
 */
// Adafruit_IL91874 display(264, 176, EPD_DC, EPD_RESET, EPD_CS, SRAM_CS,
// EPD_BUSY, EPD_SPI);

/* Uncomment the following line if you are using 2.9" EPD */
// Adafruit_IL0373 display(296, 128, EPD_DC, EPD_RESET, EPD_CS, SRAM_CS,
// EPD_BUSY, EPD_SPI); #define FLEXIBLE_290

/* Uncomment the following line if you are using 4.2" tricolor EPD */
// Adafruit_IL0398 display(300, 400, EPD_DC, EPD_RESET, EPD_CS, SRAM_CS,
// EPD_BUSY, EPD_SPI);

// Uncomment the following line if you are using 2.9" EPD with SSD1680
Adafruit_SSD1680 display(296, 128, EPD_DC, EPD_RESET, EPD_CS, SRAM_CS,
EPD_BUSY, EPD_SPI);

void setup() {
  // put your setup code here, to run once:
  display.begin();
  display.clearBuffer();
  rtc.begin();
  //rtc.adjust(DateTime(2024,9,15,17,37,00));
}

void loop() {
  // read sensor a couple of times
  int soma = 0;
  for (int i = 0; i < nAmostras; i++) {
    soma += analogRead(pinTermistor);
    delay (100);
  }

  // thermistor resistance
  double v = (vcc*soma)/(nAmostras*1024.0);
  double rt = (vcc*R)/v - R;

  // temperature calculations
  double t = beta / log(rt/rx);
  Serial.println (t-273.0);

  DateTime agora = rtc.now();

  display.clearBuffer();
  display.setCursor(5, 5);
  display.setTextColor(EPD_BLACK);
  display.setTextSize(2);
  display.println("Thermometer & clock");
  display.setTextSize(2);
  display.setCursor(5, 40); //(x, y)/?
  display.println(" ");
  display.print("Temperature: ");
  display.print(t-273);
  display.println(" C");
  display.print(agora.hour(), DEC);
  display.print(":");
  display.print(agora.minute(), DEC);
  display.print(":");
  display.print(agora.second(), DEC);
  display.print(" ");
  display.println(diasDaSemana[agora.dayOfTheWeek()]);
  //display.print(" ");
  display.print(agora.day(), DEC);
  display.print("/");
  display.print(agora.month(), DEC);
  display.print("/");
  display.print(agora.year(), DEC);
  display.display();
  delay(5000);
}
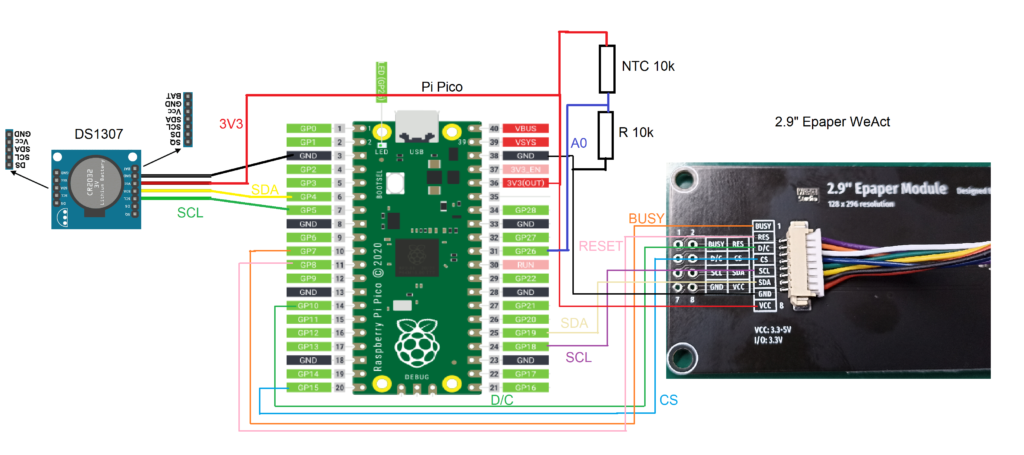
You also need to install “Adafruit EPD” library, by going to “Sketch > Include library > Manage libraries” and typing “Adafruit EPD”. Assemble the circuit according to the schematic below, connect it to the computer USB and hit “upload”.
The end result
What you are going to see is in the video below, temperature in degrees Celsius and time/date will be updated on the display every couple of seconds.
Final words
As stated in the beginning of the article, I was not able to make the display work with the official library, from the manufacturer. I made it work with the Adafruit library. Building on previously acquired knowledge I was able to read a NTC thermistor sensor and retrieve date/time from the DS1307.
Hope you enjoyed the article, see you next time.


Leave a Reply