Master ESP-NOW: There is a way to communicate between two ESP32s (or more) using a protocol developed by Espressif itself, called ESP-NOW on ESP32. The idea is to use the WiFi infrastructure already present in the chips to transmit packets of up to 250 bytes.
The protocol also works over Bluetooth, and can be used on both the ESP8266 series and the ESP32-S and ESP32-C series. The idea is to exchange information quickly and with low power consumption.
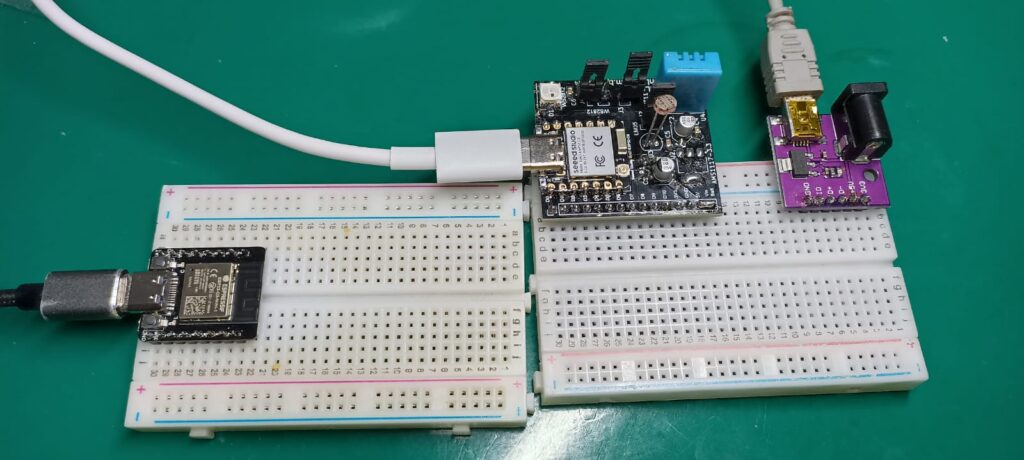
I’m going to use two ESP32s to test ESP-NOW: an ESP32-C3 from DFRobot and my ESP32-C6 development board. I’ll base this tutorial on the excellent article from RandomNerdTutorials, here. We’ll use the Arduino environment and its IDE for our tests.
The official ESP-NOW page is a great read, I recommend it. It gives examples of remote control of vehicles (cars, planes, quadcopters, remote control boats). It mentions that via WiFi the control distance with line of sight can reach 200 meters. That is the way to Master ESP-NOW.
One-way communication (sender- receiver)
The first thing we need to start thinking about communication is to know the MAC address of each ESP32. To do this, upload the code below to each board separately.
/*
  Rui Santos & Sara Santos - Random Nerd Tutorials
  Complete project details at https://RandomNerdTutorials.com/get-change-esp32-esp8266-mac-address-arduino/
  Permission is hereby granted, free of charge, to any person obtaining a copy of this software and associated documentation files.
  The above copyright notice and this permission notice shall be included in all copies or substantial portions of the Software.
*/
#include <WiFi.h>
#include <esp_wifi.h>

void readMacAddress(){
  uint8_t baseMac[6];
  esp_err_t ret = esp_wifi_get_mac(WIFI_IF_STA, baseMac);
  if (ret == ESP_OK) {
    Serial.printf("%02x:%02x:%02x:%02x:%02x:%02x\n",
                  baseMac[0], baseMac[1], baseMac[2],
                  baseMac[3], baseMac[4], baseMac[5]);
  } else {
    Serial.println("Failed to read MAC address");
  }
}

void setup(){
  Serial.begin(115200);

  WiFi.mode(WIFI_STA);
  WiFi.STA.begin();

  Serial.print("[DEFAULT] ESP32 Board MAC Address: ");
  readMacAddress();
}

void loop(){

}
MAC address obtained from the DFRobot Beetle ESP32-C3 board: 74:4d:bd:e2:c6:80. Address of my Xiao ESP32-C6 dev board: f0:f5:bd:18:fc:3c. Remember that each board has an individual, unique address. The next step is to run an example; first we will do one in the transmitter-receiver style.
The Beetle ESP32-C3 board will be the transmitter and the Xiao ESP32-C6 dev board will be the receiver. We will use code from this link for both the transmitter and the receiver. In the transmitter (code below) we must put the MAC address of the receiver, other than that no information is necessary. Not even the WiFi password, since ESP-NOW communication does not go through your home modem. Way to Master ESP-NOW.
/*
  Rui Santos & Sara Santos - Random Nerd Tutorials
  Complete project details at https://RandomNerdTutorials.com/esp-now-esp32-arduino-ide/
  Permission is hereby granted, free of charge, to any person obtaining a copy of this software and associated documentation files.
  The above copyright notice and this permission notice shall be included in all copies or substantial portions of the Software.
*/
#include <esp_now.h>
#include <WiFi.h>

// REPLACE WITH YOUR RECEIVER MAC Address
uint8_t broadcastAddress[] = {0xf0, 0xf5, 0xbd, 0x18, 0xfc, 0x3c}; // MAC of my Beetle ESP32-C3

// Structure example to send data
// Must match the receiver structure
typedef struct struct_message {
  char a[32];
  int b;
  float c;
  bool d;
} struct_message;

// Create a struct_message called myData
struct_message myData;

esp_now_peer_info_t peerInfo;

// callback when data is sent
void OnDataSent(const uint8_t *mac_addr, esp_now_send_status_t status) {
  Serial.print("\r\nLast Packet Send Status:\t");
  Serial.println(status == ESP_NOW_SEND_SUCCESS ? "Delivery Success" : "Delivery Fail");
}

void setup() {
  // Init Serial Monitor
  Serial.begin(115200);

  // Set device as a Wi-Fi Station
  WiFi.mode(WIFI_STA);

  // Init ESP-NOW
  if (esp_now_init() != ESP_OK) {
    Serial.println("Error initializing ESP-NOW");
    return;
  }

  // Once ESPNow is successfully Init, we will register for Send CB to
  // get the status of Trasnmitted packet
  esp_now_register_send_cb(OnDataSent);

  // Register peer
  memcpy(peerInfo.peer_addr, broadcastAddress, 6);
  peerInfo.channel = 0;
  peerInfo.encrypt = false;

  // Add peer
  if (esp_now_add_peer(&peerInfo) != ESP_OK){
    Serial.println("Failed to add peer");
    return;
  }
}

void loop() {
  // Set values to send
  strcpy(myData.a, "THIS IS A CHAR");
  myData.b = random(1,20);
  myData.c = 1.2;
  myData.d = false;

  // Send message via ESP-NOW
  esp_err_t result = esp_now_send(broadcastAddress, (uint8_t *) &myData, sizeof(myData));

  if (result == ESP_OK) {
    Serial.println("Sent with success");
  }
  else {
    Serial.println("Error sending the data");
  }
  delay(2000);
}
On the receiver, the code is very simple and does not require any configuration, neither MAC nor WiFi password. See below and upload it to your receiver board.
/*
  Rui Santos & Sara Santos - Random Nerd Tutorials
  Complete project details at https://RandomNerdTutorials.com/esp-now-esp32-arduino-ide/
  Permission is hereby granted, free of charge, to any person obtaining a copy of this software and associated documentation files.
  The above copyright notice and this permission notice shall be included in all copies or substantial portions of the Software.
*/

#include <esp_now.h>
#include <WiFi.h>

// Structure example to receive data
// Must match the sender structure
typedef struct struct_message {
    char a[32];
    int b;
    float c;
    bool d;
} struct_message;

// Create a struct_message called myData
struct_message myData;

// callback function that will be executed when data is received
void OnDataRecv(const uint8_t * mac, const uint8_t *incomingData, int len) {
  memcpy(&myData, incomingData, sizeof(myData));
  Serial.print("Bytes received: ");
  Serial.println(len);
  Serial.print("Char: ");
  Serial.println(myData.a);
  Serial.print("Int: ");
  Serial.println(myData.b);
  Serial.print("Float: ");
  Serial.println(myData.c);
  Serial.print("Bool: ");
  Serial.println(myData.d);
  Serial.println();
}

void setup() {
  // Initialize Serial Monitor
  Serial.begin(115200);

  // Set device as a Wi-Fi Station
  WiFi.mode(WIFI_STA);

  // Init ESP-NOW
  if (esp_now_init() != ESP_OK) {
    Serial.println("Error initializing ESP-NOW");
    return;
  }

  // Once ESPNow is successfully Init, we will register for recv CB to
  // get recv packer info
  esp_now_register_recv_cb(esp_now_recv_cb_t(OnDataRecv));
}

void loop() {

}
What these codes do is exchange information in the form of four data types: Char, int, Float and Bool. The int data is obtained using the random() function, the other data is fixed. See the image below for the output of the receiver’s serial monitor (in my case the Xiao ESP32-C6).
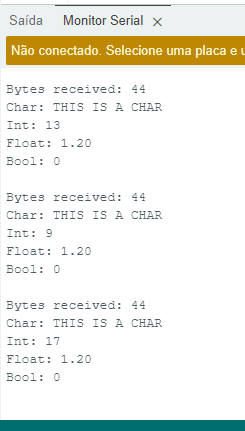
The number of bytes received is shown, in this case 44. Then comes the text “THIS IS A CHAR”, then a random int (between 1 and 20) and then a Float with the value 1.20 and a Bool “False” (0).
Master ESP-NOW
In addition to the communication we show here, transmitter-receiver, it is still possible to implement two-way communication between two or even more ESPs. We will show this type of communication in the future, when we intend to implement a remote control car. Stay tuned.
Want to buy my ESP32-C6 dev board? leave a comment in this post or here and let’s talk.


Pingback: Remote control RC car project - the beginning - FritzenLab electronics