Nice and cool ESP32: Let’s get to know the Beetle ESP32-C3 line from DFRobot, also using a 128×64 OLED display. This display is from DFRbot, “Gravity” line and works via i2c just like the one we tested here.
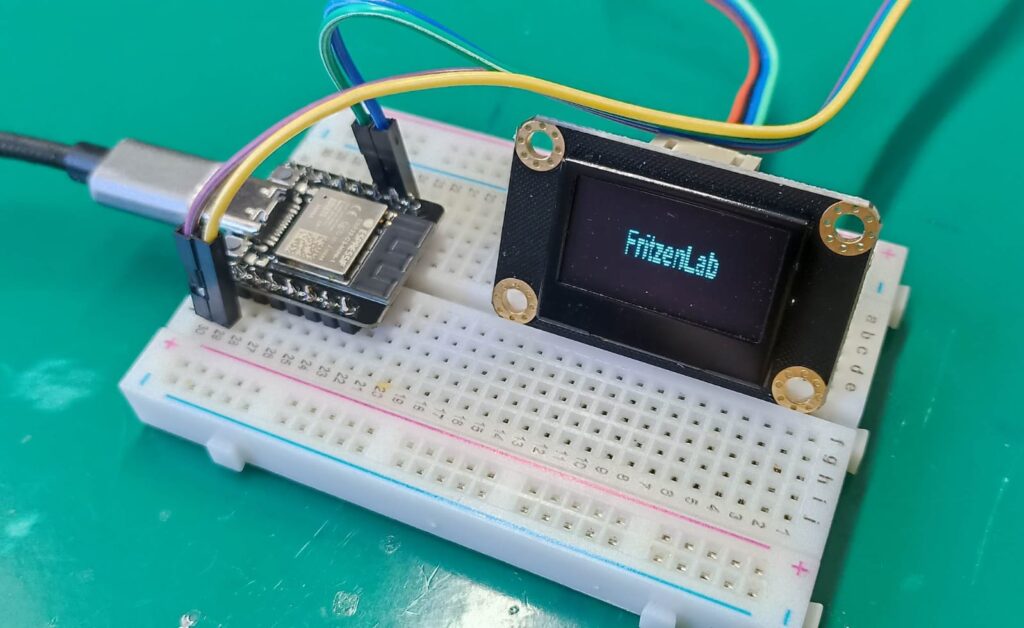
DFRobot’s Beetle line is minimalist, featuring small but powerful boards. This is the case of this nice and cool ESP32-C3 that they sent me, a RISC-V running at 160MHz with 4Mb of program memory (Flash) and 400kb of SRAM (volatile memory).
It is capable of running Bluetooth and WiFi (2.4GHz), in addition to 13 IOs, SPI, i2c and PWM. In the case of this board, it is not possible to use an external WiFi antenna, only the one printed on the board itself. It has six channels of analog-to-digital converter (AD) and does DMA (direct memory access).
The board itself (not the ESP32-C3 chip) has a 3.7V lithium battery charger, so just plug and play. Another cool feature it has is an infrared receiver and emitter, connectable to any pin.
All information about the board (a Wiki) is here, to purchase it click here.
Using the i2c port and an analog input
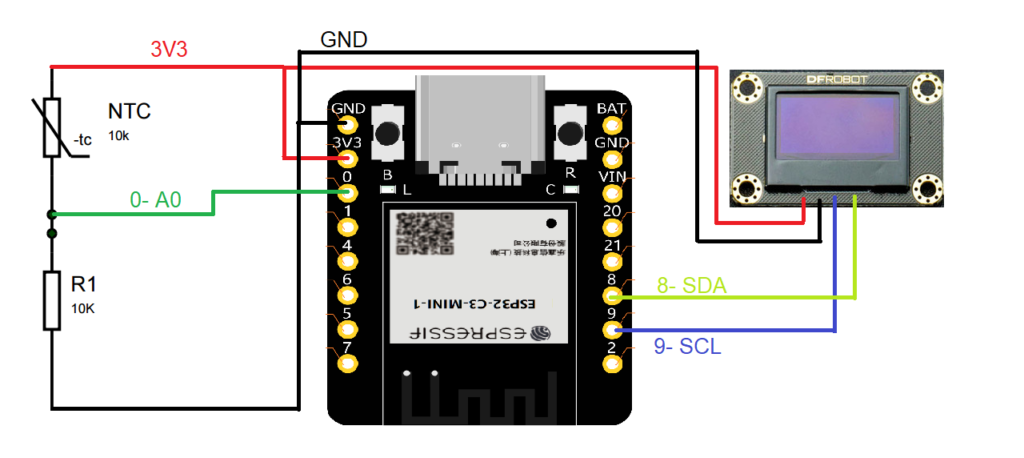
We will make an example using an analog input (NTC thermistor) and an i2c port (128×64 OLED gravity display). We will show the room temperature on the OLED display, to do this make the connections below.
The NTC sensor will be 10k Ohm (at 25ºC) and the series resistor will also be 10k Ohm, a set powered by 3.3V. The OLED display uses only the two i2c wires and 3.3V power supply.
The code is a mix of others I wrote in the past, such as about NTC thermistor and OLED display. I read the NTC thermistor sensor every two (2) seconds and update the display.
#include <SPI.h>
#include <Wire.h>
#include <Adafruit_GFX.h>
#include <Adafruit_SSD1306.h>
#define OLED_RESET -1
Adafruit_SSD1306 display(OLED_RESET);
#define LOGO16_GLCD_HEIGHT 64
#define LOGO16_GLCD_WIDTH 128
long currenttime;
long oldtime;
// Thermistor connection pin
const int pinThermistor = A0;
// Thermistor parameters
const double beta = 3950.0;
const double r0 = 10000.0;
const double t0 = 273.0 + 25.0;
const double rx = r0 * exp(-beta/t0);
// physical parameters
const double vcc = 3.28;
const double R = 9810.0;
// number of readings for each output result
const int nReadings = 5;
void setup() {
Serial.begin(115200);
// put your setup code here, to run once:
// by default, we'll generate the high voltage from the 3.3v line internally! (neat!)
display.begin(SSD1306_SWITCHCAPVCC, 0x3C); // initialize with the I2C addr 0x3D (for the 128x64)
// init done
// Show image buffer on the display hardware.
// Since the buffer is intialized with an Adafruit splashscreen
// internally, this will display the splashscreen.
display.display();
delay(2000);
// Clear the buffer.
display.clearDisplay();
}
void loop() {
// put your main code here, to run repeatedly:
currenttime= micros();
if(currenttime - oldtime > 2000000){
oldtime= micros();
// Read the sensor a couple of times
int sum = 0;
for (int i = 0; i < nReadings; i++) {
sum += analogRead(pinThermistor);
delay (50);
}
// Determine the resistance
double v = (vcc*sum)/(nReadings*4096.0);
double rt = (vcc*R)/v - R;
// Calculate temperature
double t = beta / log(rt/rx);
t= t-273;
//Serial.println(v);
display.clearDisplay();
display.setTextSize(1);
display.setTextColor(WHITE);
display.setCursor(0,0);
display.println("Temperature oC:");
display.setCursor(10,16);
display.println(t);
display.display();
}
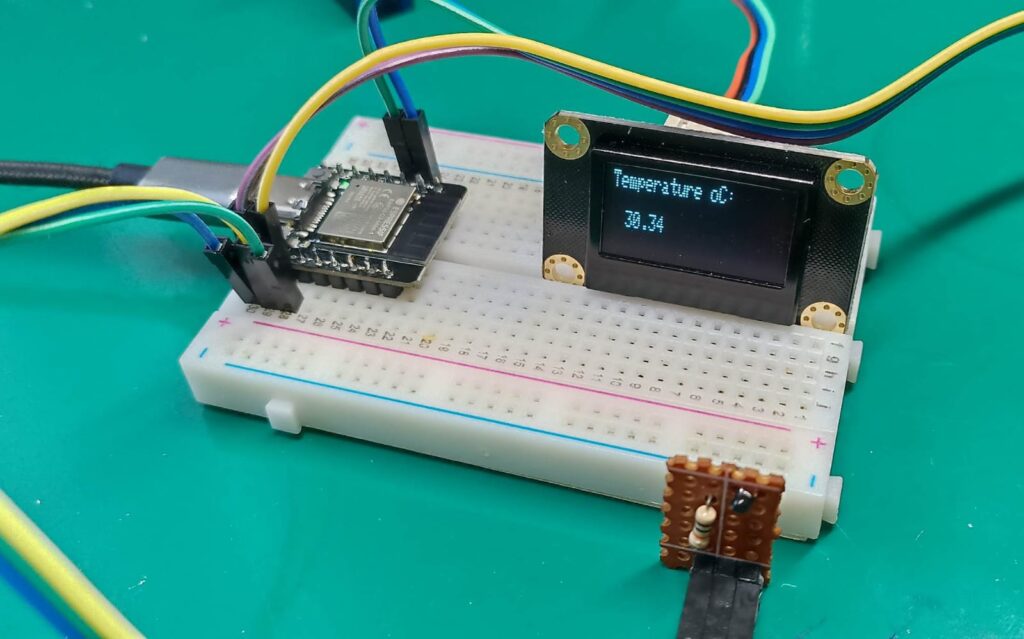
}The assembled and working circuit is seen below. See in the image the NTC (on a small board at the bottom), the Beetle ESP32-C3 on the protoboard on the left and the 128×64 OLED screen on the right.
WiFi connection
The main functionality of the Beetle ESP32-C3 is obviously to connect to WiFi. First, we will run an example that scans the networks (the modems) around your board, seen below. The code is the same as the one presented on the official page of my ESP32-C6 board.
#include "WiFi.h"
void setup() {
Serial.begin(115200);
// Set WiFi to station mode and disconnect from an AP if it was previously connected
WiFi.mode(WIFI_STA);
WiFi.disconnect();
delay(100);
Serial.println("Setup done");
}
void loop() {
Serial.println("scan start");
// WiFi.scanNetworks will return the number of networks found
int n = WiFi.scanNetworks();
Serial.println("scan done");
if (n == 0) {
Serial.println("no networks found");
} else {
Serial.print(n);
Serial.println(" networks found");
for (int i = 0; i < n; ++i) {
// Print SSID and RSSI for each network found
Serial.print(i + 1);
Serial.print(": ");
Serial.print(WiFi.SSID(i));
Serial.print(" (");
Serial.print(WiFi.RSSI(i));
Serial.print(")");
Serial.println((WiFi.encryptionType(i) == WIFI_AUTH_OPEN)?" ":"*");
delay(10);
}
}
Serial.println("");
// Wait a bit before scanning again
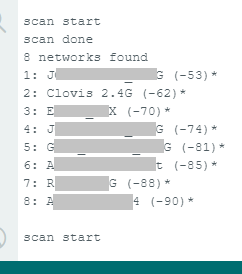
delay(5000);The output on the serial monitor here at my location is as follows, eight (8) WiFi modems were found.
Retrieving weather information from a service via WiFi
We will search for weather information in your location from the “Open weather map” service, based on this article. First, register at https://openweathermap.org/ to get your API key. Then copy the code below to your Arduino IDE, making sure to change your WiFi settings and your Open weather map API key. Also change the city name and country abbreviation.
/*
  Rui Santos
  Complete project details at Complete project details at https://RandomNerdTutorials.com/esp32-http-get-open-weather-map-thingspeak-arduino/

  Permission is hereby granted, free of charge, to any person obtaining a copy
  of this software and associated documentation files.

  The above copyright notice and this permission notice shall be included in all
  copies or substantial portions of the Software.
*/

#include <WiFi.h>
#include <HTTPClient.h>
#include <Arduino_JSON.h>

const char* ssid = "yourSSID";
const char* password = "yourWifipassword";

// Your Domain name with URL path or IP address with path
String openWeatherMapApiKey = "yourApikey";
// Example:
//String openWeatherMapApiKey = "bd939aa3d23ff33d3c8f5dd1dd435";

// Replace with your country code and city
String city = "nameofyourcity";
String countryCode = "yourcountryhandle(e.g BR)";

// THE DEFAULT TIMER IS SET TO 10 SECONDS FOR TESTING PURPOSES
// For a final application, check the API call limits per hour/minute to avoid getting blocked/banned
unsigned long lastTime = 0;
// Timer set to 10 minutes (600000)
//unsigned long timerDelay = 600000;
// Set timer to 10 seconds (10000)
unsigned long timerDelay = 10000;

String jsonBuffer;

void setup() {
  Serial.begin(115200);

  WiFi.begin(ssid, password);
  Serial.println("Connecting");
  while(WiFi.status() != WL_CONNECTED) {
    delay(500);
    Serial.print(".");
  }
  Serial.println("");
  Serial.print("Connected to WiFi network with IP Address: ");
  Serial.println(WiFi.localIP());

  Serial.println("Timer set to 10 seconds (timerDelay variable), it will take 10 seconds before publishing the first reading.");
}

void loop() {
  // Send an HTTP GET request
  if ((millis() - lastTime) > timerDelay) {
    // Check WiFi connection status
    if(WiFi.status()== WL_CONNECTED){
      String serverPath = "http://api.openweathermap.org/data/2.5/weather?q=" + city + "," + countryCode + "&APPID=" + openWeatherMapApiKey;

      jsonBuffer = httpGETRequest(serverPath.c_str());
      Serial.println(jsonBuffer);
      JSONVar myObject = JSON.parse(jsonBuffer);

      // JSON.typeof(jsonVar) can be used to get the type of the var
      if (JSON.typeof(myObject) == "undefined") {
        Serial.println("Parsing input failed!");
        return;
      }

      Serial.print("JSON object = ");
      Serial.println(myObject);
      Serial.print("Temperature: ");
      Serial.println(myObject["main"]["temp"]);
      Serial.print("Pressure: ");
      Serial.println(myObject["main"]["pressure"]);
      Serial.print("Humidity: ");
      Serial.println(myObject["main"]["humidity"]);
      Serial.print("Wind Speed: ");
      Serial.println(myObject["wind"]["speed"]);
    }
    else {
      Serial.println("WiFi Disconnected");
    }
    lastTime = millis();
  }
}

String httpGETRequest(const char* serverName) {
  WiFiClient client;
  HTTPClient http;

  // Your Domain name with URL path or IP address with path
  http.begin(client, serverName);

  // Send HTTP POST request
  int httpResponseCode = http.GET();

  String payload = "{}";

  if (httpResponseCode>0) {
    Serial.print("HTTP Response code: ");
    Serial.println(httpResponseCode);
    payload = http.getString();
  }
  else {
    Serial.print("Error code: ");
    Serial.println(httpResponseCode);
  }
  // Free resources
  http.end();

  return payload;
}
If you are going to leave the code running, pay attention to the maximum number of requests you can make in free mode. It is 60 calls/reads per minute.

Above we see the result of the query we made in OpenWeatherMap with the ESP32-C3, for the city of Joinville (SC). Note the temperature of 292.1, it is in Kelvin and means 19.95 degrees Celsius.
Nice and cool ESP32
The DFRobot Beetle ESP32-C3 board is small, compact, and packed with features. Lithium battery charging, WiFi, and Bluetooth communications are just a few of them. If you’d like to purchase it, click this link.
Expect more articles featuring this little board in the future.


Pingback: Currency converter display with ESP32 - FritzenLab electronics
You’ve crafted something truly timeless here — writing that will continue to resonate with readers for years to come.