ESP32-C6 and WS2812B: Let me introduce you to an addressable RGB LED chip, called WS2812b which can be controller by a ESP32-C6 with Arduino. WS2812b is an integrated addressable RGB LED chip, using only one wire for the control pin of many LEDs in series.
No so many (according to this source) because every pixel uses 3 bytes of RAM from the ESP32-C6. Which has 512kb of RAM, so theoretically 170k pixels are possible, but then you have to take power consumption into account. They consume roughly 60mA so 100 of them would take up to 6A already.
All of those many LEDs are doable from an engineering point of view, but power flow control, layout and code optimization would have to be taken into account.
The circuit
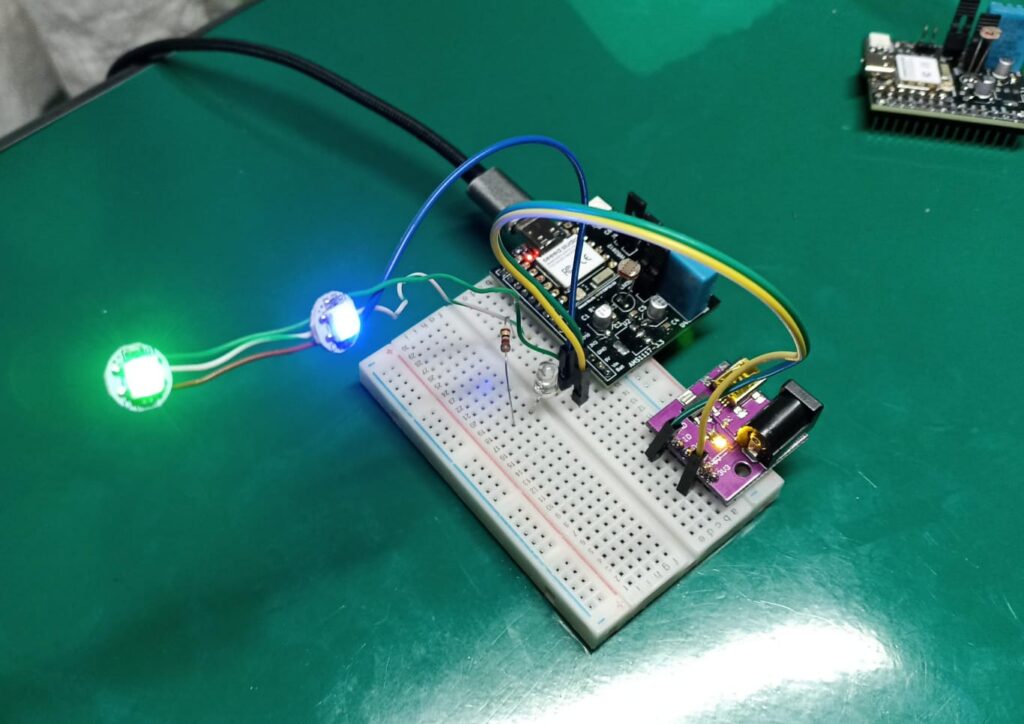
According to its datasheet a simple daisy-chain of LEDs is doable, except you have to bypass the power supply with a 100nF capacitor for each unit. The bits/LEDs I have also use a 75 Ohm resistor in series with DIN pin.
My hardware is as follow, I just soldered the two LEDs together with a bunch of wires. Notice my ESP32-C6 board (info here) in the breadboard.
The code
There are two main libraries for Arduino to control WS2812 and its similars, FastLed and Adafruit_NeoPixel. They are very similar in the surface, allowing for you to select the pin number, the number os LEDs and the controller type. That is the perfect way of controlling the ESP32-C6 and WS2812B.
We will first cover the Adafruit one. For that you have to open the Arduino IDE, go to “Sketch > Add library > Manage libraries” and type “Adafruit Neopixel”. Install it. Then type the code below, WS2812b’s connected to pin D6:
#include <Adafruit_NeoPixel.h>      //Adiciona a biblioteca Adafruit NeoPixel
#define D_in D6       //Nomeia o pino 6 do Arduino
#define qtdeLeds 2    //Informa a quantidade de LEDs que serão ligados em cascata
Adafruit_NeoPixel pixels(qtdeLeds, D_in);     //Instancia o objeto "pixels", informando a quantidade e o pino de sinal
void setup() {
  pinMode(D_in, OUTPUT);      //Configura o pino 6 como saída
  pixels.begin();             //Inicia o objeto "pixels"
}
void loop() {
  pixels.clear();      //desliga todos os LEDs
  for(int i=0; i<qtdeLeds; i++){        //para i = 0, se i menor que a quantidade de leds, incremente 1 em i
    pixels.setPixelColor(i, pixels.Color(255, 0, 0));     //liga o led correspondente ao número da variável i na cor vermelha
    pixels.show();      //executa os parâmetros do comando acima
    delay(500);         //Aguarda 500 milissegundos

    pixels.setPixelColor(i, pixels.Color(0, 255, 0));     //liga o led correspondente ao número da variável i na cor verde
    pixels.show();      //executa os parâmetros do comando acima
    delay(500);         //Aguarda 500 milissegundos

    pixels.setPixelColor(i, pixels.Color(0, 0, 255));     //liga o led correspondente ao número da variável i na cor azul
    pixels.show();      //executa os parâmetros do comando acima
    delay(500);         //Aguarda 500 milissegundos
  }
}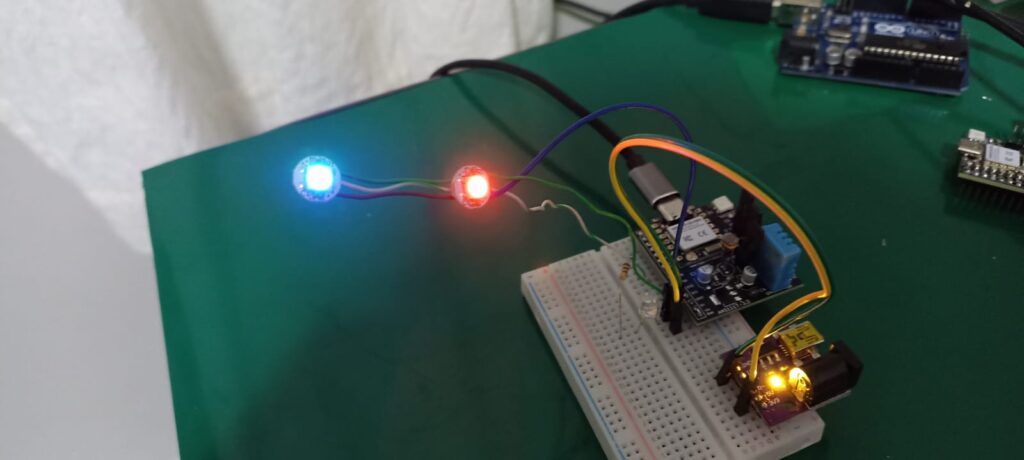
The two LEDs will blink in sequence, first Red then Green then Blue, then the next LED. The next code we will thest is the “strandtest”, available inf “File > Examples > Adafruit Neopixel > Strandtest”, seen below. It will blink both LEDs is a fun and quick way.
#include <Adafruit_NeoPixel.h>
#ifdef __AVR__
 #include <avr/power.h> // Required for 16 MHz Adafruit Trinket
#endif

// Which pin on the Arduino is connected to the NeoPixels?
// On a Trinket or Gemma we suggest changing this to 1:
#define LED_PIN    D6

// How many NeoPixels are attached to the Arduino?
#define LED_COUNT 2

// Declare our NeoPixel strip object:
Adafruit_NeoPixel strip(LED_COUNT, LED_PIN, NEO_GRB + NEO_KHZ800);
// Argument 1 = Number of pixels in NeoPixel strip
// Argument 2 = Arduino pin number (most are valid)
// Argument 3 = Pixel type flags, add together as needed:
//   NEO_KHZ800  800 KHz bitstream (most NeoPixel products w/WS2812 LEDs)
//   NEO_KHZ400  400 KHz (classic 'v1' (not v2) FLORA pixels, WS2811 drivers)
//   NEO_GRB     Pixels are wired for GRB bitstream (most NeoPixel products)
//   NEO_RGB     Pixels are wired for RGB bitstream (v1 FLORA pixels, not v2)
//   NEO_RGBW    Pixels are wired for RGBW bitstream (NeoPixel RGBW products)


// setup() function -- runs once at startup --------------------------------

void setup() {
  // These lines are specifically to support the Adafruit Trinket 5V 16 MHz.
  // Any other board, you can remove this part (but no harm leaving it):
#if defined(__AVR_ATtiny85__) && (F_CPU == 16000000)
  clock_prescale_set(clock_div_1);
#endif
  // END of Trinket-specific code.

  strip.begin();           // INITIALIZE NeoPixel strip object (REQUIRED)
  strip.show();            // Turn OFF all pixels ASAP
  strip.setBrightness(50); // Set BRIGHTNESS to about 1/5 (max = 255)
}


// loop() function -- runs repeatedly as long as board is on ---------------

void loop() {
  // Fill along the length of the strip in various colors...
  colorWipe(strip.Color(255,   0,   0), 50); // Red
  colorWipe(strip.Color(  0, 255,   0), 50); // Green
  colorWipe(strip.Color(  0,   0, 255), 50); // Blue

  // Do a theater marquee effect in various colors...
  theaterChase(strip.Color(127, 127, 127), 50); // White, half brightness
  theaterChase(strip.Color(127,   0,   0), 50); // Red, half brightness
  theaterChase(strip.Color(  0,   0, 127), 50); // Blue, half brightness

  rainbow(10);             // Flowing rainbow cycle along the whole strip
  theaterChaseRainbow(50); // Rainbow-enhanced theaterChase variant
}


// Some functions of our own for creating animated effects -----------------

// Fill strip pixels one after another with a color. Strip is NOT cleared
// first; anything there will be covered pixel by pixel. Pass in color
// (as a single 'packed' 32-bit value, which you can get by calling
// strip.Color(red, green, blue) as shown in the loop() function above),
// and a delay time (in milliseconds) between pixels.
void colorWipe(uint32_t color, int wait) {
  for(int i=0; i<strip.numPixels(); i++) { // For each pixel in strip...
    strip.setPixelColor(i, color);         //  Set pixel's color (in RAM)
    strip.show();                          //  Update strip to match
    delay(wait);                           //  Pause for a moment
  }
}

// Theater-marquee-style chasing lights. Pass in a color (32-bit value,
// a la strip.Color(r,g,b) as mentioned above), and a delay time (in ms)
// between frames.
void theaterChase(uint32_t color, int wait) {
  for(int a=0; a<10; a++) {  // Repeat 10 times...
    for(int b=0; b<3; b++) { //  'b' counts from 0 to 2...
      strip.clear();         //   Set all pixels in RAM to 0 (off)
      // 'c' counts up from 'b' to end of strip in steps of 3...
      for(int c=b; c<strip.numPixels(); c += 3) {
        strip.setPixelColor(c, color); // Set pixel 'c' to value 'color'
      }
      strip.show(); // Update strip with new contents
      delay(wait);  // Pause for a moment
    }
  }
}

// Rainbow cycle along whole strip. Pass delay time (in ms) between frames.
void rainbow(int wait) {
  // Hue of first pixel runs 5 complete loops through the color wheel.
  // Color wheel has a range of 65536 but it's OK if we roll over, so
  // just count from 0 to 5*65536. Adding 256 to firstPixelHue each time
  // means we'll make 5*65536/256 = 1280 passes through this loop:
  for(long firstPixelHue = 0; firstPixelHue < 5*65536; firstPixelHue += 256) {
    // strip.rainbow() can take a single argument (first pixel hue) or
    // optionally a few extras: number of rainbow repetitions (default 1),
    // saturation and value (brightness) (both 0-255, similar to the
    // ColorHSV() function, default 255), and a true/false flag for whether
    // to apply gamma correction to provide 'truer' colors (default true).
    strip.rainbow(firstPixelHue);
    // Above line is equivalent to:
    // strip.rainbow(firstPixelHue, 1, 255, 255, true);
    strip.show(); // Update strip with new contents
    delay(wait);  // Pause for a moment
  }
}

// Rainbow-enhanced theater marquee. Pass delay time (in ms) between frames.
void theaterChaseRainbow(int wait) {
  int firstPixelHue = 0;     // First pixel starts at red (hue 0)
  for(int a=0; a<30; a++) {  // Repeat 30 times...
    for(int b=0; b<3; b++) { //  'b' counts from 0 to 2...
      strip.clear();         //   Set all pixels in RAM to 0 (off)
      // 'c' counts up from 'b' to end of strip in increments of 3...
      for(int c=b; c<strip.numPixels(); c += 3) {
        // hue of pixel 'c' is offset by an amount to make one full
        // revolution of the color wheel (range 65536) along the length
        // of the strip (strip.numPixels() steps):
        int      hue   = firstPixelHue + c * 65536L / strip.numPixels();
        uint32_t color = strip.gamma32(strip.ColorHSV(hue)); // hue -> RGB
        strip.setPixelColor(c, color); // Set pixel 'c' to value 'color'
      }
      strip.show();                // Update strip with new contents
      delay(wait);                 // Pause for a moment
      firstPixelHue += 65536 / 90; // One cycle of color wheel over 90 frames
    }
  }
}
A video of the obtained effect is seen below.
FastLed library
Upon trying this library for the new ESP32-C6 chip, it gave me a message “error Not yet implemented for unknown ESP32 target”. It tells me that this target was not taken into account while developing this library. So we will have to wait a bit longer for compatibility to exist.
Final words
There is a ton of fun and colorful things one can do with these WS2812b LEDs. I’ve seen displays (matrixes) and art installations, to name a few. Do you want to know more about the ESP32-C6 dev board I made? check it out here.


Pingback: HW-006 optical line tracker sensor - FritzenLab electronics
Pingback: Sensor seguidor de linha HW-006 (TCRT5000) - Fritzenlab eletrônica
I believe support for this board has been added to FastLED now.
Pingback: Assemble this amazing DIY RGB light box - FritzenLab electronics