Today we are going to discover the 0.96″ OLED display with Arduino, a very complete display but (in my experience) very difficult to deal with. The model I bought was yellow/blue with i2c, from here (affiliate link).
The resolution of this small display (it’s really small) is 128×32 pixels, accessible individually. I started with this code and a Digispark Attiny85 as a controller. But to do this I had to download the library from here and edit the “DigisparkOLED.cpp” file to modify the lines:
if(Wire.writeAvailable()){
	ssd1306_send_data_stop();
	ssd1306_send_data_start();
	}
Has to be modified to stay this way:
//if(Wire.writeAvailable()){
  ssd1306_send_data_stop();
  ssd1306_send_data_start();
//}
NOTE: making this type of modification is far from the ease that Arduino should offer, therefore I do not recommend using this OLED display with Digispark Attiny85 and this library.
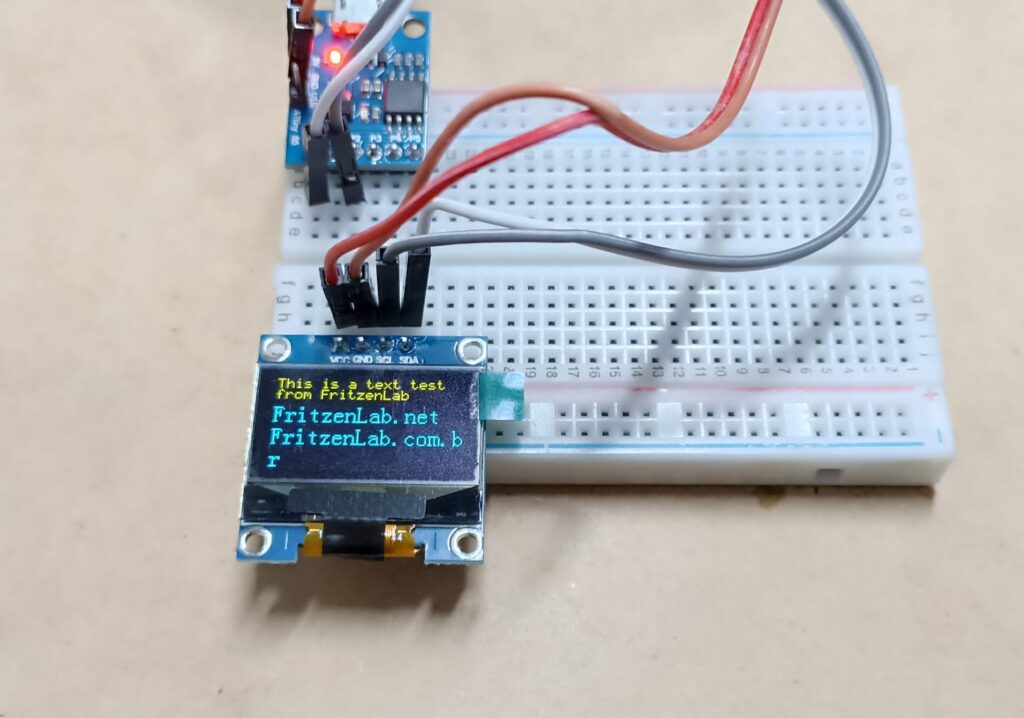
I wrote the code below just to show text on the display, as shown in the image. Note that I had to point said file as absolute path in the first line of the file.
#include <C:\Users\Clovisf\Documents\GitHub\Display-OLED-0.96\teste-display-oled-0.96\DigisparkOLED.h>
#include <Wire.h>
// ============================================================================

void setup()
{
  // put your setup code here, to run once:
  oled.begin();
  oled.clear(); //all black
}

void loop()
{

  oled.setCursor(0, 0); //top left
  oled.setFont(FONT6X8);
  oled.print(F("This is a text test")); //lines auto wrap
  oled.setCursor(0, 1);
  oled.print(F("from FritzenLab")); //lines auto wrap
  oled.setFont(FONT8X16);
  oled.setCursor(0, 2); //two rows down because the 8x16 font takes two rows of 8
  oled.print(F("FritzenLab.net")); //wrap strings in F() to save RAM!
  oled.setCursor(0, 4); //two rows down because the 8x16 font takes two rows of 8
  oled.print(F("FritzenLab.com.br")); //wrap strings in F() to save RAM!
  //delay(3000);
}
The result was really cool, note that the display has a yellow “strip” at the top and the rest of it is blue. I forgot to mention, it works with 5V.
Arduino UNO and Adafruit
However, this library for the Attiny85 Digispark is very limited, so I switched to using Arduino UNO. The Adafruit library that has examples here was the one I used as a basis for the rest of the article.
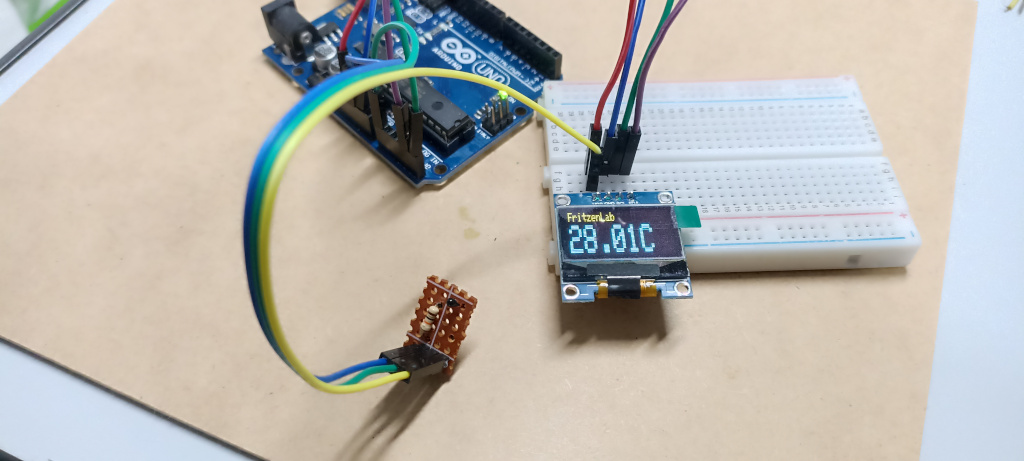
I created an example of a thermometer with an NTC sensor (already seen here) and an OLED display. The code is below. Note that since we don’t have an extra reset pin, we do:
#define OLED_RESET -1You need to install the “Adafruit_GFX.h” and “Adafruit_SSD1306.h” libraries in the Arduino IDE, go to “Draft > Include library > Add .ZIP library” and search for them.
#include <SPI.h>
#include <Wire.h>
#include <Adafruit_GFX.h>
#include <Adafruit_SSD1306.h>

#define OLED_RESET -1
Adafruit_SSD1306 display(OLED_RESET);

// Conexão do termistor
const int pinTermistor = A0;

// Parâmetros do termistor
const double beta = 3950.0;
const double r0 = 10000.0;
const double t0 = 273.0 + 25.0;
const double rx = r0 * exp(-beta/t0);

// Parâmetros do circuito
const double vcc = 4.92;
const double R = 9810.0;

// Numero de amostras na leitura
const int nAmostras = 5;

void setup(){
  display.begin(SSD1306_SWITCHCAPVCC, 0x3C);

}
void loop(){

  int soma = 0;
  for (int i = 0; i < nAmostras; i++) {
    soma += analogRead(pinTermistor);
    delay (100);
  }

  // Determina a resistência do termistor
  double v = (vcc*soma)/(nAmostras*1024.0);
  double rt = (vcc*R)/v - R;

  // Calcula a temperatura
  double t = beta / log(rt/rx);
  t= t-273;

  display.clearDisplay();
  display.setTextSize(1);
  display.setCursor(0,0);
  display.println("FritzenLab");
  display.setTextColor(WHITE);
  display.setTextSize(3);
  //display.setTextColor(WHITE);
  display.setCursor(0,9);
  display.print(t);
  display.println(" C");
  display.display();
  delay(1000);


}
And here the final result, a thermometer with an OLED display reading an NTC thermistor sensor. The NTC sensor has a 10k Ohm resistor in series and is connected to the Arduino pin A0. As already seen in the article linked above.
One difficulty I had was showing images (bitmaps) on this small screen. The official way (using the Adafruit library) initially didn’t work, the image was cropped as shown below.
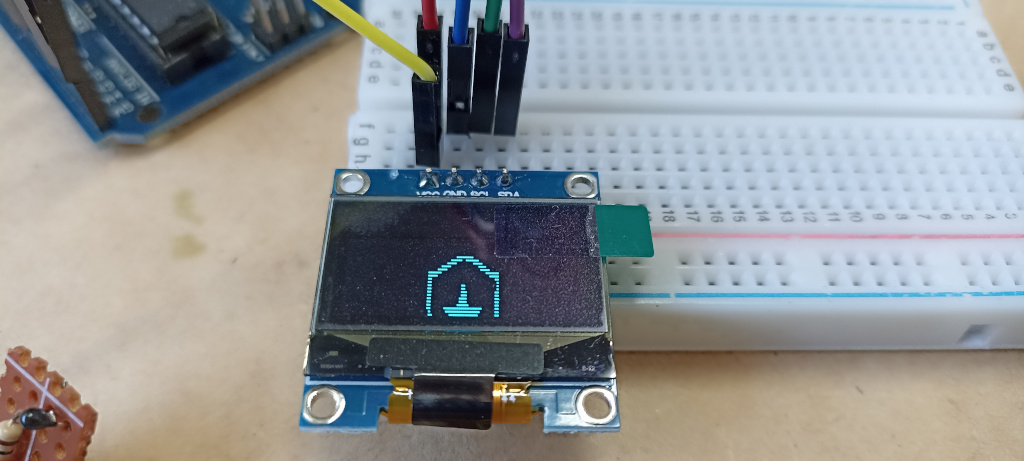
However, the Adafruit example code in the Arduino IDE (ssd1306_128x64_i2c.ino) in “File > Examples > Adafruit SSD1306 >” worked smoothly, showing the Adafruit stars “falling” as it should be.
I then discovered that I bought a 128×32 display instead of the one I wanted, which was 128×64. Then the images started to come out as planned, like the Botafogo football shield and regattas. The code and image are below:
#include <SPI.h>
#include <Wire.h>
#include <Adafruit_GFX.h>
#include <Adafruit_SSD1306.h>

#define OLED_RESET -1
Adafruit_SSD1306 display(OLED_RESET);

/*#define LOGO16_GLCD_HEIGHT 128
#define LOGO16_GLCD_WIDTH  50 */
static const unsigned char PROGMEM drawing[] =
{ 0x00, 0x00, 0x00, 0x00, 0x00, 0x00, 0x00, 0x00, 0x00, 0x00, 0x00, 0x00, 0x00, 0x00, 0x00, 0x00,
	0x00, 0x00, 0x00, 0x00, 0x00, 0x00, 0x00, 0x01, 0x80, 0x00, 0x00, 0x00, 0x00, 0x00, 0x00, 0x00,
	0x00, 0x00, 0x00, 0x00, 0x00, 0x00, 0x00, 0x0f, 0xf8, 0x00, 0x00, 0x00, 0x00, 0x00, 0x00, 0x00,
	0x00, 0x00, 0x00, 0x00, 0x00, 0x00, 0x00, 0x7c, 0x3e, 0x00, 0x00, 0x00, 0x00, 0x00, 0x00, 0x00,
	0x00, 0x00, 0x00, 0x00, 0x00, 0x00, 0x01, 0xf0, 0x07, 0x80, 0x00, 0x00, 0x00, 0x00, 0x00, 0x00,
	0x00, 0x00, 0x00, 0x00, 0x00, 0x00, 0x1f, 0x80, 0x01, 0xf8, 0x00, 0x00, 0x00, 0x00, 0x00, 0x00,
	0x00, 0x00, 0x00, 0x00, 0x00, 0x00, 0x1e, 0x00, 0x00, 0x38, 0x00, 0x00, 0x00, 0x00, 0x00, 0x00,
	0x00, 0x00, 0x00, 0x00, 0x00, 0x00, 0x18, 0x00, 0x80, 0x18, 0x00, 0x00, 0x00, 0x00, 0x00, 0x00,
	0x00, 0x00, 0x00, 0x00, 0x00, 0x00, 0x18, 0x01, 0x80, 0x18, 0x00, 0x00, 0x00, 0x00, 0x00, 0x00,
	0x00, 0x00, 0x00, 0x00, 0x00, 0x00, 0x18, 0x01, 0x80, 0x18, 0x00, 0x00, 0x00, 0x00, 0x00, 0x00,
	0x00, 0x00, 0x00, 0x00, 0x00, 0x00, 0x08, 0x01, 0xc0, 0x18, 0x00, 0x00, 0x00, 0x00, 0x00, 0x00,
	0x00, 0x00, 0x00, 0x00, 0x00, 0x00, 0x08, 0x03, 0xc0, 0x18, 0x00, 0x00, 0x00, 0x00, 0x00, 0x00,
	0x00, 0x00, 0x00, 0x00, 0x00, 0x00, 0x0c, 0x7f, 0xfe, 0x18, 0x00, 0x00, 0x00, 0x00, 0x00, 0x00,
	0x00, 0x00, 0x00, 0x00, 0x00, 0x00, 0x0c, 0x1f, 0xfc, 0x10, 0x00, 0x00, 0x00, 0x00, 0x00, 0x00,
	0x00, 0x00, 0x00, 0x00, 0x00, 0x00, 0x0c, 0x0f, 0xf0, 0x30, 0x00, 0x00, 0x00, 0x00, 0x00, 0x00,
	0x00, 0x00, 0x00, 0x00, 0x00, 0x00, 0x0c, 0x07, 0xe0, 0x30, 0x00, 0x00, 0x00, 0x00, 0x00, 0x00,
	0x00, 0x00, 0x00, 0x00, 0x00, 0x00, 0x04, 0x07, 0xf0, 0x30, 0x00, 0x00, 0x00, 0x00, 0x00, 0x00,
	0x00, 0x00, 0x00, 0x00, 0x00, 0x00, 0x06, 0x0f, 0xf0, 0x20, 0x00, 0x00, 0x00, 0x00, 0x00, 0x00,
	0x00, 0x00, 0x00, 0x00, 0x00, 0x00, 0x06, 0x0e, 0x70, 0x60, 0x00, 0x00, 0x00, 0x00, 0x00, 0x00,
	0x00, 0x00, 0x00, 0x00, 0x00, 0x00, 0x03, 0x0c, 0x18, 0x60, 0x00, 0x00, 0x00, 0x00, 0x00, 0x00,
	0x00, 0x00, 0x00, 0x00, 0x00, 0x00, 0x03, 0x10, 0x08, 0xc0, 0x00, 0x00, 0x00, 0x00, 0x00, 0x00,
	0x00, 0x00, 0x00, 0x00, 0x00, 0x00, 0x01, 0x80, 0x00, 0xc0, 0x00, 0x00, 0x00, 0x00, 0x00, 0x00,
	0x00, 0x00, 0x00, 0x00, 0x00, 0x00, 0x01, 0x80, 0x01, 0x80, 0x00, 0x00, 0x00, 0x00, 0x00, 0x00,
	0x00, 0x00, 0x00, 0x00, 0x00, 0x00, 0x00, 0xc0, 0x03, 0x00, 0x00, 0x00, 0x00, 0x00, 0x00, 0x00,
	0x00, 0x00, 0x00, 0x00, 0x00, 0x00, 0x00, 0x60, 0x07, 0x00, 0x00, 0x00, 0x00, 0x00, 0x00, 0x00,
	0x00, 0x00, 0x00, 0x00, 0x00, 0x00, 0x00, 0x30, 0x0e, 0x00, 0x00, 0x00, 0x00, 0x00, 0x00, 0x00,
	0x00, 0x00, 0x00, 0x00, 0x00, 0x00, 0x00, 0x18, 0x1c, 0x00, 0x00, 0x00, 0x00, 0x00, 0x00, 0x00,
	0x00, 0x00, 0x00, 0x00, 0x00, 0x00, 0x00, 0x0e, 0x38, 0x00, 0x00, 0x00, 0x00, 0x00, 0x00, 0x00,
	0x00, 0x00, 0x00, 0x00, 0x00, 0x00, 0x00, 0x07, 0xe0, 0x00, 0x00, 0x00, 0x00, 0x00, 0x00, 0x00,
	0x00, 0x00, 0x00, 0x00, 0x00, 0x00, 0x00, 0x01, 0xc0, 0x00, 0x00, 0x00, 0x00, 0x00, 0x00, 0x00,
	0x00, 0x00, 0x00, 0x00, 0x00, 0x00, 0x00, 0x00, 0x00, 0x00, 0x00, 0x00, 0x00, 0x00, 0x00, 0x00,
	0x00, 0x00, 0x00, 0x00, 0x00, 0x00, 0x00, 0x00, 0x00, 0x00, 0x00, 0x00, 0x00, 0x00, 0x00, 0x00 };

void setup() {
  // put your setup code here, to run once:
  // by default, we'll generate the high voltage from the 3.3v line internally! (neat!)
  display.begin(SSD1306_SWITCHCAPVCC, 0x3C);  // initialize with the I2C addr 0x3D (for the 128x64)
  // init done

  // Show image buffer on the display hardware.
  // Since the buffer is intialized with an Adafruit splashscreen
  // internally, this will display the splashscreen.
  display.display();
  delay(2000);

  // Clear the buffer.
  display.clearDisplay();

}

void loop() {

  display.clearDisplay();
  display.setTextSize(1);
  display.setCursor(0,0);
  display.println("Botafogo");
  // put your main code here, to run repeatedly:
  display.clearDisplay();

  // miniature bitmap display
  display.drawBitmap(0, 0,  drawing, 128, 40, 1);
  display.display();
  delay(2000);

}
NOTE: to generate the binary image for the code above, I used this service: https://javl.github.io/image2cpp/ .
In fact, I posted the question on the Arduino Stackexchange forum and someone helped me, guiding me to put the display dimensions in the code, as below:
Adafruit_SSD1306 display(128, 64, &Wire, OLED_RESET);In the end, it wasn’t my display that was wrong, but rather the code example that was incomplete.
Final words
In this article I showed how I discovered that my display was not 128×64 but 128×32. I showed you how to generate text, including making an example of a thermometer with an NTC thermistor. Finally we did an example of converting an image to binary and showing it on the OLED display.
Remembering that if you want to buy the display in this article, use my Banggood affiliate link here.


Pingback: GC9A01A round LCD 240x240 display - FritzenLab electronics
Pingback: SD card with ESP32-C6 and Arduino - FritzenLab electronics
Pingback: DFRobot Beetle ESP32-C3 - FritzenLab electronics
Pingback: 2.9" E-paper display from WeAct - FritzenLab electronics
Pingback: Tiny 0.49" OLED display - FritzenLab electronics